
It is the 20th Anniversary since the opening of this page and its rather humble beginnings. The intervening years since 2003 have seen a surprising, even explosive growth in underwater archeology and shipwreck exploration that has exceeded even some of the more fanciful dreams. Particularly special has been the interest in locating and documenting the histories of warship wrecks large and small, including the lesser known battles such as Ormoc Bay or Bantam Bay.
It is an amazing thing to read the original intro to this page as it stood on May 23, 2003 and compare it to what we have seen acheived and discovered in the two decades hence. (To be continued)
May 2003 Original ShipWrecks Page Introduction
(It is my intention to hopefully provide some free-hand drawings of some of these wrecks as the page is expanded and revised.)
Note II: All times and dates given are rendered as Tokyo time, (Item-9)
Note III: This record is concerned with describing the condition of a wreck after sinking, when known, to compare to the circumstances - and augment the details of - its loss. In some cases, a wreck's condition was known during the war,or immediately post-war, but has either been removed or never explored since. An excellent example is the condition of the CA NACHI; preserved in the April 1945 examination report, but a wreck that has since been nearly or even totally demolished and removed. Another example would be destroyer YUZUKI it's fate or even whether re-visited since 1945 is unknown. - (Tully)
Japan built or tried to complete, thirty aircraft carriers. Of these, eleven were sunk or damaged in shallow water and scrapped post-war. Of the available remainder, surprisingly enough, to date, only one Japanese carrier wreck is known to have been investigated, and it only partially discovered:
On October 20, 2019 the Paul Allen Group Research Vessel RV PETREL team led by Robert Kraft announced they had discovered the wreck of Nagumo's famous flagship Akagi off Midway. Unfortunately the ROV had suffered damage prior, and no closer or further survey was possible at this time to further document the wreck. What was revealed by the announcement and image posted on RV Petrel Facebook was that Akagi lies on the bottom nearly upright, bow oriented to the southwest. If the impression of the image is correct, like KAGA the flight deck is largely missing (except possibly at the bow) and you can see down into the hangars. In places KAGA's hangar sides appear to be entirely blown out and missing; this may or may not be true of AKAGI. Unlike KAGA, the entire hull appears to be intact with no part split. However, all of this is based on one image.

Wreckage clearly belonging to a Japanese carrier was found & photographed in the Midway battle-site in May and September 1999. Subsequently, this chunk of wreckage was confirmed to be part of the aircraft carrier Kaga in the spring of 2000 by a research analyst team comprised of the author (Anthony Tully), Jon Parshall, and David Dickson.
Condition: The fragment is just that, transpiring to be the starboard gun tub of the Kaga, its positive identification on 14 February 2000 was made possible by the landing array arrangement attachment unique to her of the four unlocated Midway carriers. Since it is a fragment, it is of course next to impossible to tell anything of the condition of the main wreck, or even if it is immediately adjacent. However, according to eyewitness testimony in the last hour of Kaga afloat and as she sank, the carrier's hull remained intact, but a good section of all but the aft and forward ends of the hangars and flight deck and side completely blown out and missing. She went down stern first at a very shallow angle, and presumably descended in such a way to the ocean floor. However, as further exploration has been repeatedly postponed due to changing conditions, any further details are purely speculative.
Note: For further details on the 1999 discovery and the 2000 identification process, see:
Identifying (part of) Kaga's wreck
Also: "Identifying Kaga", by Jonathan Parshall, Anthony Tully, David Dickson, United States Naval Institute Proceedings, June 2001.
Major Update: Main hull found by RV PETREL - October 2019: On October 2019 it was announced by the Paul Allen Group led by Robert Kraft of RV PETREL that the Midway expedition in progress had finally located the main wreck of one of the Japanese aircraft carriers at the battle-site. This was apparently Akagi. Because of conditions, search continued and on another large wreck was pinpointed. Subsequent ROV footage allowed confirmation that it was Kaga.
Note: As far as could be discerned in the present debris field, the location is distinct and away from that of the large fragment of the AA battery found in November 1999. Nothing like it was seen. Retroactively this strengthens the possibility the section was blown off Kaga at the moment of the stronger induced explosions in the first hours after dive-bombed.
KAGA's wreck is oriented northwest, along the final attempted retirement course she made in obedience to orders to attempt to meet the Main Body. KAGA was the only one of the three dive-bombed carriers that remained underway long enough to comply. Like the AKAGI scan above, the Facebook posted picture is oriented more horizontal for ease of examination to the viewer. What is discernible is that the bow appears to be well embedded in the sea-bed, and there appears to be a break in the hull just aft of the secondary casemate guns in the rear part of the carrier. The extreme fantail may be separated and part of debris beside the wreck. This was the first impression but may be incorrect. If so it may well be due to a scuttling torpedo hit and it came apart on the descent to the seafloor. As for the large rectangular but narrow piece abeam to starboard (upper right of image) -- a colleague has plausibly suggested it is remains of KAGA's hangar wall from some part of the ship; lower or upper hangar. It is known a portion of the starboard quarter upper hangar shell was already missing.

Though as far as known no expedition has confirmed the location of the Shinano it is mentioned because rumors persist that at some point this was done. The Shinano lies comparatively close to Japanese home waters, and the precedent with Yamato's wreck makes it possible that some small private expeditions at least located the wreck. If so, there has been no major underwater survey yet like has occurred with Yamato.
Some of the low interest may derive from the fact that Shinano when last seen was capsized as she headed to the ocean floor. An upside down hulk might not engender much enthusiasm. However, in recent years a series of aircraft carrier wrecks relocated has raised the important possibility that Shinano righted herself on the way down and will be found upright on the seabed. Most cases of aircraft carriers, in contrast to battleships, this has proven to be the case. Since Shinano simply foundered and may not have undergone any underwater explosion and had few if any large fires, there is a real possibility that she waits able to fully view again, reasonably intact, in a posture not unlike the sunken USS Saratoga at Bikini Atoll. This fact alone perhaps should spur greater interest in such an ROV survey to definitively locate and document the great wreck.
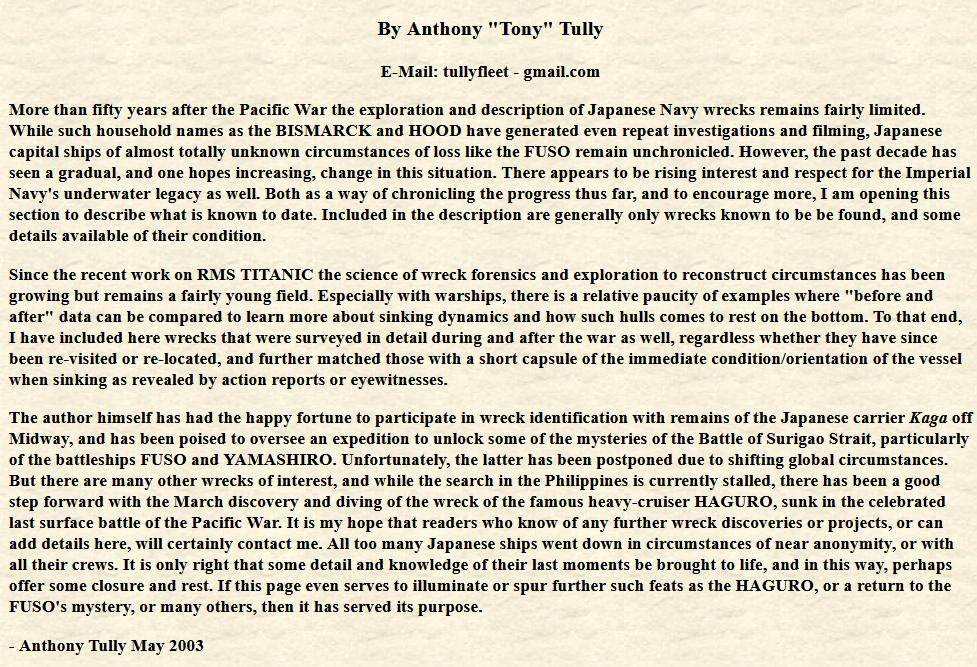
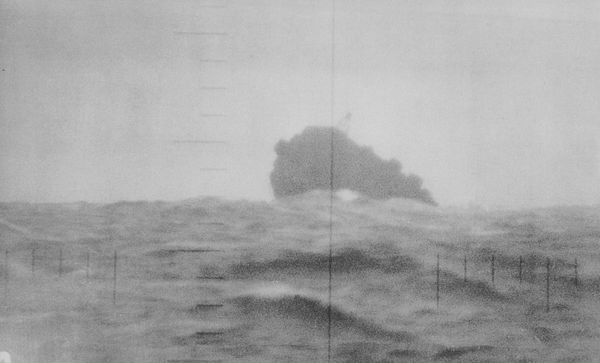
Though it is unknown (as of May 2018) if the carrier's wreckage has ever been re-discovered or salvaged post-war, it is mentioned here because by most accounts it sank in waters less deep than its length and because of a detail of the sinking that may change that picture. There had been reason to believe when UNRYU's stern was upraised in the photo of her sinking that at the same time below her shattered bow was resting on the bottom. The fantail then would have settled back under the sea. It is not unlikely the great carrier came to rest upright. Though her operational career was tragically short and little noticed UNRYU might prove to be one of the most accessible and readily filmed wrecks of a Japanese fleet carrier comparable to the famous HIRYU and SORYU designs that may be generally intact along its greater length.
On the other hand, the real possibility exists that UNRYU in fact broke in half. This would reconcile the peculiar contradiction of the USS Redfish's periscope photographs, and what was reported observed. It is just possible that photos were snapped that caught the fantail, but at times the scope was looking at an upraised bow half. It certainly is hard to square the very specific descriptions of REDFISH entirely with the stern. If there was both a stern and bow section, the contradiction disappears. At least one Japanese account uses these terms, so it remains a possibility. Compare the photograph below to the excerpt of what USS REDFISH observed.
Of the twelve Japanese battleships all but one were lost in World War II, and the last, Nagato was expended just after, as a symbolic sacrifice in the atomic bomb tests at Bikini Atoll in July 1946. Of these twelve, three - Haruna, Ise and Hyuga --- were sunk in shallow water by air raids and scrapped in-situ post-war. Of the remainder, no less than eight have been located and surveyed to date, making Japanese battleships the wreck-type most extensively covered. However, it is also true that the bulk of these have been found upside down, or part of them upside down, with the consequent obscuring of most topside features or details of loss apart from torpedo holes. The remaining at large exception, name-ship of the class battleship Kongo is unfortunately likely to have also ended up inverted, for that is how she left the surface. In contrast to carriers, cruisers, and destroyers, Japanese battleships show little propensity to right themselves on the descent to the bottom.
The wreck of the celebrated YAMATO was apparently first located in May 1982. However, it was not till summer of 1985 that an underwater survey took place. On 1 August 1985 the Canadian-built submersible PICSES II examined the wreckage over a period of a few days. Subsequent expeditions in 1999 and 2016 added greatly to the data available. There were some considerable surprises. All accounts had agreed that at the moment of sinking at 1423 on 7 April 1945, that the YAMATO had first capsized more than 90 degrees to port, then exploded violently, allegedly as a result of a raging fire touching off "C" turret magazine. However, something more complex has been found to have taken place.
These surveys show that YAMATO ended up in two major halfs in a depth of 1,400 feet. The surprising thing is that it turned out that YAMATO had first turned over to port, and while turning, `vomited' out the huge 18.1 inch gun turrets and their barbettes in their entirety. Immediately after, came the huge explosion seen, but it was not "C" turret at all, but rather apparently "B" turret magazine that first exploded. Though this contradicted all prior assumptions, ironically, this matched the testimony of YAMATO' s XO Nomura who had all along reported seeing a red light flash for No.1 magazine just before the capsize. More specifically it seems the No.1 powder store set off the No.2 main projectile magazine (but not No.1's). In any event, the explosion of forward main magazines was sufficient to sever meters of the bow section clean off the ship. Further, immediately following, apparently the aft 6-inch magazine or 12.7 cm AA battery magazines exploded with some boilers and tore a large hole in the bottom on the starboard side of the ship, about level with the mainmast. Both halves subsequently plunged to the bottom, the bow landing upright, and the bulk of the ship landing flat upside down, the bridge superstructure crushed to the side. The rear half is the longest, some 180 meters, and is keel up running nearly west to east with the rudders facing east. The bow half is 90 meters long, with the break just abaft No.1 barbette. The bow half lies upright less than 50 meters to `starboard' of the aft section, pointed at an angle to its midships on a northwest heading about 310 Degrees True.
Though it can't be certain, the lack of blast damage at that spot on the bottom of the hull suggests that No.3 turret magazine never exploded, but that the fire in the aft-6-in turret did finally reach its magazine when the ship turned over. This detail actually has some importance as it lays to rest a theory that had recently been gaining some currency, and that was the postulation that that had YAMATO not capsized, the fire in in the 6-in turret would soon have touched off its magazine and set off the No.3 main magazine in turn, thus destroying the vessel anyway. The condition of the wreck shows this was not the case. Had the 6-in store detonated while still upright, it would have greviously injured and flooded YAMATO, but she would have lingered a while yet though sinking fast. More to the point, there is no reason to believe the magazine was going to be set off before she capsized. The explosion seems to be entirely a product of the unusual circumstance of the hull inverting. As far is known, the flash-tight doors and the hoists had been closed after the bomb hits.
Update: Developing: 2 March, 2015 - The MUSASHI has been reported discovered by MY OCTOPUS of Microsoft Co-Founder Paul Allen. The pictures show the bow clearly upright, and the distinctive bow leaves no doubt, but condition of the wreck remains unclear. Full details and revision to be posted as revealed.
UPDATE: The exciting discovery of the wreck of the MUSASHI on March 1, 2015 by a team of researchers led by Microsoft co-founder Paul G. Allen and his yacht M/Y OCTOPUS has been confirmed and fuller details and photographs now available. Please see MUSASHI's movement record for details:
TROM of Super-battleship MUSASHI - updated to include wreck discovery details and photographs.
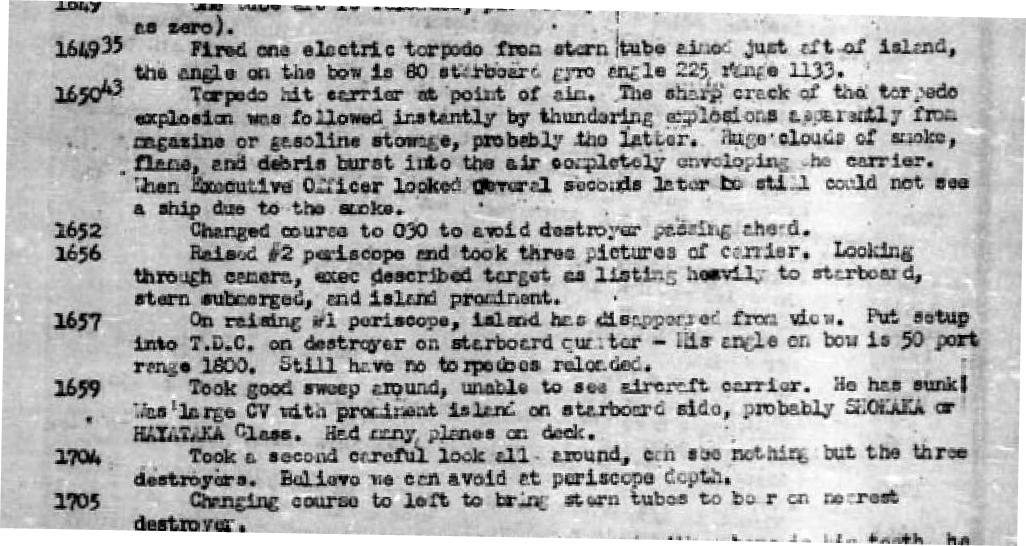
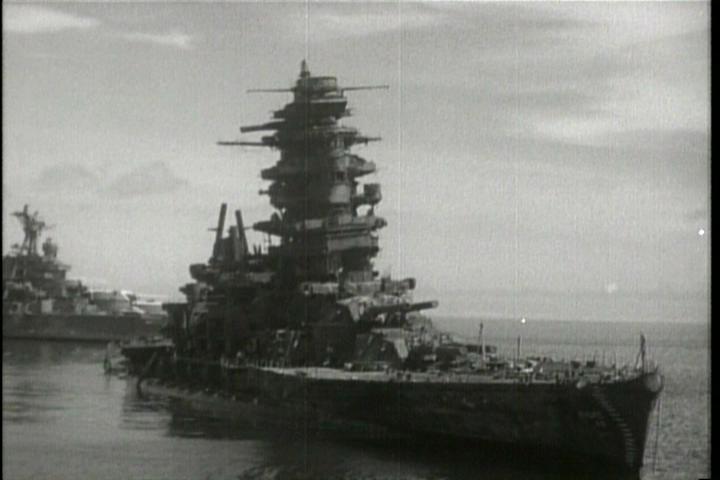
The NAGATO, along with new light cruiser SAKAWA, had fallen into American hands at the end of the Pacific War. (NAGATO had already been damaged, with her bridge wrecked in bombing at Yokosuka 18 July 1945.) Both ships were then subjected to the atomic bomb tests on fleet targets on 1 and 25 July 1946. The SAKAWA and NAGATO were moored roughly parallel, with the battleship to starboard and the U.S. battleship NEVADA between them. The first test fatally wounded and sank the SAKAWA (see entry), but the NAGATO rode it out with minimal damage. For the second test NAGATO was moored in a position only 1,100 yards away, starboard beam facing the bomb. This bomb was suspended underwater and when detonated at 0835 25 July 1946 inflicted mortal damage, though this was not at first apparent. After the bomb, though highly radioactive, the NAGATO appeared more or less intact, though her superstructure was heavily scarred and she had a 5 degree list to starboard. Attempts to wash her down were made the following days, but it remained impossible to consider reboarding her to inspect hull damage. Progressive flooding slowly and almost invisibly mounted, the list increasing only very slowly. However, by 27 July the NAGATO was now listing 8 degrees to starboard, though remaining on an even keel fore-and-aft. She remained this way though, and plans were made to possibly move her out of the atoll to deep water and finish the job. It had neither been expected or desired that she would survive so close to the blast, and the delay was proving discomfiting. However, NAGATO had other plans --- like a samurai, it transpired that she chose her own time.
At nightfall 29 July, the NAGATO was listing close to 10 degrees to starboard and the main deck was awash beside the mainmast. Incredibly the battleship appeared to otherwise be on an even keel. However, come sunrise 30 July, the NAGATO's outline was not visible among the array of ships. She was nowhere to be seen. A search party sent out to the site found her below the surface having capsized 120 degrees to starboard. At sometime during the night she had "sunk under cover of darkness and no one knows the time." The impression gained is that it had been a fairly even roll to starboard followed by a bodily settling to the atoll floor. Either then, or subsequently the wreck turned further and settled deeper into the atoll bottom, snapping its stern and causing the large pagoda foremast to bend and flatten outward on the bottom on the starboard side of the wreck. She lies in about 160 feet of water. The famous bridge tower and spot from where Admiral Yamamoto Isoroku directed the Attack on Pearl Harbor remains well-preserved and by the fluke of the crumpling, accessible to the camera and divers. The NAGATO is now often visited by divers today, though the SAKAWA attracts little attention.
NAGATO's final phase including details of her Atomic Bomb test preparation and sinking are included in my previous article in the Mysteries section NAGATO's Last Year: July 1945 - July 1946
The battleship MUTSU mysteriously exploded and sank at anchor in Hashirajima on 8 June 1943. At the moment of the blast, centered in the aft magazines, the MUTSU broke in half at a point roughly approximating the join of the engine room. The larger section was the foreward part, some 535-feet, and immediately capsized to starboard and sank bodily on its side to the bottom of Hashira-jima in some 130 feet of water. The severed stern floated free, upended, and remained afloat due to air pockets until two hours past midnight; where upon it too, sank to the bottom. Formal inquirys and investigation by divers commenced almost immediately, well before the war was over, and the wreck's location was never in dispute. In 1970 an eight-year salvage operation commences, and later that year the No.4 turret is raised. The climax of the operation comes in February 1972 when the forepart is raised, but some work continues until 1978. The net-result is that while parts of the pagoda portion, the afterpart and apparently the stern remain on the bottom, most of the wreck of the MUTSU has been cleared and there would be little left to dive. A memorial is maintained in the vicinity, and 272 crew remains were never accounted for.
Given MUTSU's relatively short World War II career, and the unusual circumstances of her loss, in this battleship's case, the TROM contains a detailed narrative of the explosion and its aftermath. Written by Bob Hackett, Sander Kingsepp and Lars Ahlberg, readers are recommended to visit it here:
TROM of Battleship MUTSU - career and sinking.
In August 1992 during Dr. Robert Ballard's expedition with National Geographic to explore wrecks associated with the battles in Iron Bottom Sound he located in 4,000 feet of water the upturned hull of a Japanese battleship assumed to be the KIRISHIMA, though sister-ship HIEI remains a lesser possibility. Being totally upside down, the wreck yields disappointingly few details of the damage that sent it to the bottom, which would in turn possibly assist identification. However, even keel up, some important details are discernible. For one thing, the whole forepart of the ship is missing, and the whereabouts of it were not located. Though no clear hull landmarks apart from the bilge keels were obvious, rouch calculations based on the remaining length of about 150 meters suggest that the break in the hull is about level with the foremast pagoda structure. That is to say, by any calculation, it was the forward 14-inch and possibly secondary magazines as well that exploded. Only one pass over the wreck was made, so it is not certain there was no damage further aft, but nothing like torpedo holes were observed. It should be noted this further supported identification as KIRISHIMA.
Note: For more information on the 1992 Ballard expedition and some fine paintings and wreck photos of KIRISHIMA, YUDACHI, and AYANAMI, as well as celebrated U.S. Navy warships, see "The Lost Ships of Guadalcanal" by Robert D. Ballard with Rick Archbold, Warner/Madison Press, 1993.
UPDATE: February 2020. All the preceding should be considered to be superceded and displaced by the exhaustive new study now conducted by Robert Lundgren and Anthony Tully of the KIRISHIMA wreck as both confirmed in identity and extensively documented by RV PETREL of Vulcan Inc. in winter 2019. The study article can be found here:
Articles of Interest: The KIRISHIMA wreck in 2019.
The Japanese battleship HIEI was crippled by a combination of gunfire and likely destroyer torpedo hits in the early morning hours of November 13, 1942 in the First Naval Battle of Guadalcanal , also known as the `Battle of Friday the 13th.' The HIEI's steering engine room was flooded by combat damage which prevented her easy escape and the morning found her limping out of Ironbottom Sound near Savo Island. Though cruiser NAGARA had stood by until shortly after 0400 (Tokyo) it was clear daylight would greatly reduce HIEI's chances for survival and so it proved.
(For an excellent study of the battle, read:
"Neptune's Inferno: The U.S. Navy at Guadalcanal" by James D. Hornfischer. Bantam Press)
At 0830 after a major air attack it was decided escape was now doubtful and since could still maneuver by engines HIEI should head back toward Guadalcanal and beach near Kokumbona, to serve as a shore battery. This would have been in a position just west of the Matanikau River and in range of Henderson Field. For this reason the battleship had moved back closer and northwest of Savo Island by the afternoon when stopped by a second air attack by torpedoes at 1130. In this position she was abandoned, the Kingston valves in the engine room opened to scuttle her, and the battleship left to founder.
For more details of the HIEI's drama see my article on this site: Death of Battleship HIEI
as well as HIEI's TROM on Senkan!
On February 5, 2019 it was announced that RV PETREL had located HIEI's wreck lying upside down in over 900 meters of water. There is no doubt it was HIEI for the same expedition laudably made a point of re-locating and further documenting KIRISHIMA's wreck, finding it some four miles to the southwest. Thus there can be no confusing them and this is extremely fortunate, for both battleships landed upside down and both are missing their fore-parts and share a surprising number of similar visual traits as wrecks. Even rudder positions and fantail damage is similar.
Similarly as with the KIRISHIMA entry, I do not intend to expand much on HIEI's wreck here as it is discussed very extensively with photographs in a new essay of April 2023 by naval historian and author Robert Lundgren on the NavWeaps.com site. It forms part of an overall examination and fresh look at the chaotic and confusing events of the night battle of November 13, 1942 up to and including the sinking of USS JUNEAU. It can be found on this page here and then select `Naval Battle of Guadalcanal':
Naval Battle of Guadalcanal by Robert Lundgren and Frank Sposato - Edited by Tony DiGiulian.
Among other interesting finds, it appears that U.S. destroyer torpedoes may have hit starboard under No.2 stack (frame 166) another under the forward part of No.3 turret about frame 190. Damage according with this is discernible on the wreck. Yet a third torpedo hit on starboard side in the vicinity of frame 201 described I suspect is probably the VT-6 air torpedo hit that flooded the starboard engine room.
Having bearing on how the wreck was found and the final moment, after Abe left HIEI for the last time it is clear that the battleship's stern-down trim and list increased until she capsized to starboard (I suspect within two hours or less) and commenced to sink by the stern. Robert Lundgren has persuasively postulated that at that moment: "As she settled aft, she attempted to lift her bow out of the water placing all the stress on her port side and she ripped where MONSSEN�s torpedoes had struck her. This was also the area she suffered a secondary magazine explosion around casemate gun #6 and #7.[At 2358] Once she separated the stern section quickly sank but the bow section had enough reserve buoyancy to drift and has not been discovered. I do believe it is intact and likely close by." This writer concurs with Mr. Lundgren in the general opinion that it appears HIEI did not break from an explosion (since the split is at the machinery room) but a structural failure of some kind something much like what is quoted occurred. The different nature and character of the break from that of KIRISHIMA's points in this direction.
The YAMASHIRO was sunk with sister-battleship FUSO on 25 October 1944 in the chaos of the night surface battle of Surigao Strait. Having gallantly engaged six battleships and the whole American battleline with gunfire only to be shelled and torpedoed into ruin, the YAMASHIRO at the end reportedly capsized and sank stern first following a final two torpedo hits in the starboard side amidships and aft. Accounts actually contradict whether she heeled to port or more likely to starboard at the end, but as it happens, we will never know given how she wound up.
In the first weekend of April 2001, the large wreck of what is almost certainly the battleship YAMASHIRO was discovered in the vicinity of her reported sinking position. Rather surprisingly, it appeared that apparently the battleship landed upright on the bottom in some 600 feet of water, but almost no other details were available as it was a low resolution side-scan.
Then in 2013/2014 important survey and search-sounding work by the Surigao Strait Museum determined the locations of some of the likely wrecks of the battle, especially the battleships. Particularly the YAMASHIRO was about where would be expected. The opportunity to examine these by ROV and search for others came in 2017. Starting in November the Paul Allen Group led by Robert Kraft aboard RV PETREL in partnership with the National Museum of the Phillipines surveyed and dived the Surigao Strait battlefield by ROV, and by 2019 had succeeded in locating and surveying all of the Japanese wrecks of the Battle of Surigao Strait. The YAMASHIRO was found about where generally expected, at the northern end of the battlefield and at last laying to rest any remaining controversy which battleship had engaged the American Battle Line. (This was never in much doubt after testimony of survivors of both YAMASHIRO and FUSO were published) Alas, YAMASHIRO, like all too many battleship wrecks to date, landed upside down on the bottom. Thus forever concealing almost all of the details of the dramatic shellfire damage she must have sustained. A portion near the rudders has collapsed, nearly the width of the ship, but unless a munitions store exploded after leaving the surface or landing on the bottom, it is difficult to explain.
However, while YAMASHIRO's wreck conceals her shellfire damage, it confirms and adds detail regarding some of her torpedo damage. But because of the currents in Surigao Strait it was not practical for the ROV to risk attempting to film the upstream starboard side, less it risk being swept down against the hull. Only the port side could be documented somewhat. Yet these are the torpedo hit locations earlier in the battle and in some ways of the most interest. Apparently confirmed is YAMASHRIO suffered three, not two, torpedo hits to port side. One in the port bow, one amidships under the mainmast, and one under the rear turrets. Worth mentioning is the southeast heading of the wreck on the bottom matches in a general way the last known course taken, which was to meet Shima's NACHI then coming up from the south. The final torpedo hits foreclosed any such encounter. (It is interesting the heading also provides for the possibility that USS NEWCOMB's last torpedo hits struck to port; which might explain the stated port capsize. So little is known of the last moment the massive damage aft near the propellers may also be this hit.)
Update: August 2009 - As regards FUSO, as revealed in my recent book The Battle of Surigao Strait the FUSO seems did not suffer a massive magazine explosion, nor was she blown and torn into two separate sections floating well apart. The circumstances are extremely complicated but are breifly summarized as this: following a torpedo hit in No.1 powder room and a second amidships in the starboard boiler or machinery spaces, the FUSO began to list to starboard and lose speed, while settling inexorably by the bow. However, she remained underway, at a slowed speed of 10 knots, until the forecastle became inundated. At which point, twenty to forty minutes after being hit, she nosed down and heeled over to starboard. She upended sharply enough to lift the screws clear and corkscrewed as she sank. Stories of great noise and her pagoda smacking the water hint that -- like TITANIC - at that point battleship FUSO might have wrenched and snapped her hull apart from strain as she sank, but this is completely distinct from the conventional version of being "blown in two" by a magazine explosion. Furthermore, it is just as likely she remained in one piece and rests on the bottom upright, for her construction and armor belt would be naturally stouter than the TITANIC's.
For details of the questions involved, see:
Entangled Fates of Battleships YAMASHIRO & FUSO
Major revisions and answer to questions raised there are found in:
The Battle of Surigao Strait by Anthony Tully, Indiana University Press, 2009.
The ASHIGARA was torpedoed and sunk by HMS TRENCHANT on 8 June 1945 while trying to relocate troops from Batavia to Singapore. Struck by four to five torpedoes in the starboard side, her bow was blown off, and she capsized and sank in the narrow Banka Strait near and west of Hendrik Klippen Shoal. Though no details have come to the author's attention, in 1998? it was reported that the ASHIGARA wreck was to be salvaged. Though this is uncertain, it is more than likely the wreck "position" had always been known, as the Banka Strait is not likely to have been very deep in that area of reefs. When last seen, the ASHIGARA had lost her bow and had capsized to starboard and settled beneath the waves. Presumably the wreck ended up not unlike KUMANO (see below) upside down, or possibly lying on its starboard side. Anyone knowing any details of this supposed salvage plan or the condition of the cruiser is asked to contact me. One possible important detail that inspection could provide if not too weathered is whether or not ASHIGARA sported a camouflage pattern like the MYOKO and TAKAO, and possibly the HAGURO did in spring 1945.
Addendum: On 23 May Paul Parsons on J-aircraft.com brought this little blub to my attention:
On the subject of Ashigara I remember reading somewhere that the wreck was rumoured to contain gold (as usual!) and was to be dived. I did a quick web search and came up with this message posted to a forum in January 2002:
dear sir we are looking for sponsors for a project in salvaging a japanese ship name Ashigara sunk in indonesian waters on the 8.6.1945 with 228 tons gold the wreck is in 60 meters deep permits and legal papers are arranged can you help me on this thank you
Comment: if the above is true, starting in January 2002 there was renewed interest in ASHIGARA. Due apparently, to probably unfounded assumption that there was gold aboard. (though it is possible some might have once been). Interestingly, this seems to tie with a message Kevin Denlay sent (see next). It may be that this expedition came to grief.
Update: Kevin Denlay, one of the divers of the HAGURO site, submitted this useful appendix to the state of the ASHIGARA wreck today: "Her remains lay in very shallow water and reportedly have been heavily salvaged over the years, and also dived on occasionally. Because of the VERY poor visibility at the site there have been several deaths on her over the years, with, reportedly, two Indonesian navy divers loosing their life, lost inside her hulk, these just sometime in 2002. When we passed by the wreck site earlier this year (February) the clarity of the water (or lack thereof) would have been equivalent to looking into a cup of milk coffee. Seriously. We didn't even bother stopping it was so bad." It is unclear whether the Indonesian divers were on official assignment or a private venture at the time of their tragedy. Additionally, the wreck is very shallow less than 100 feet/30 meters and heavily broken up but apparently on her side. This suggests that the `capsize' mentioned in acounts of ASHIGARA's foundering do not mean rolled bottom up in this case. A fact of some interst.
The wreck of the CHIKUMA has not yet been located but is mentioned here because the recent discovery of CHOKAI (see entry below) makes the possibility in the future more likely as photographs and battle maps both strongly imply they lay roughly on the same latitude somewhere between 3-5 miles apart. It seems meet to mention CHIKUMA's last confirmed damage afloat and what to be looking for in appearance.
Heavy cruiser CHIKUMA was damaged by a series of air attacks on 25 October 1944 during the battle off Samar. Since there was only one survivor of her among the crews of both the cruiser and standby destroyer NOWAKI only USN action reports with confirmed damage can fill in the picture. At 0853 CHIKUMA was hit by a torpedo that smashed the fantail and destroyed her rudder, leaving only the inboard port propeller working and the cruiser left making clockwise circles. At 1105 VC-5 stopped her with two torpedoes in the port side that left her unavigable and listing to port. By 1130 the NOWAKI had joined her off her port side when photographed by a VC-76 plane. There may have been more attack damage before the last blow that came after 2pm. Finally it appears that three torpedoes from VC-75 (USS OMMANEY BAY CVE-79) in the port side at 1415 caused her to capsize to port and sink by the stern. All the evidence roughly agrees with NOWAKI commencing rescue operations about now. Click here to read the author's full analysis on CHIKUMA's fate.
If 1430 marks the latest last moment of CHIKUMA as believe it confirms the final appearance. Therefore any future wreck interpretation should note at the very least the cruiser will no longer possess its fantail and will give a shorter length return on any scan. However, it is entirely possible the rest of the main hull will be intact as there was not a trace of bow damage or similar as she capsized to port and sank.

CHOKAI, the famous former flagship of the 8th Fleet and Vice Admiral Mikawa Guinichi as victor of the Battle of Savo Island, met her end in ambiguous circumstances at the Battle of Samar. This uncertainty is simply a product of the tragic fact that because CHOKAI's rescue ship was then sunk, there were no survivors. There is not even the ample photograph evidence such as have for CHIKUMA. The few radio messages from CHOKAI and what other ships saw have been, until now, all there is. For that reason, it is best to quote what the Japanese summed up in full. Shortly after 0845, four Japanese cruisers including CHOKAI were closing in on Taffy 3, their 8-inch guns and torpedo tubes trained to starboard. Then at 0851 witnesses on HAGURO observed CHOKAI 1,500 meters to their port side coming under fire:
"Hits were concentrated on the starboard side and amidships of Chokai�, which was steaming with her bridge and our bridge side by side near our (Haguro�s) port side. We observed that her bridge was enveloped with smoke. Chokai attempted to evade from being hit, but the enemy radar caught her steadily, and the damage must have increased. Her speed decreased, and at 0859, with a signal of faulty rudder control [in the general sense of a breakdown of control - she hoisted a `fukan-flag' *], she suddenly made a left turn and fell back. We saw many enemy aircraft swarmed over her. The [ultimate] fatal damage of Chokai might have been caused by the attacks of the enemy aircraft. By this air raid her forward engine room was damaged [radioed at 0918]. Chokai, which was left behind in the battlefield, attempted to catch up with the main force with DD Fujinami of the 2nd Desron escorting her. At around 2150 of the same day (October 25), Fujinami [later] message stated that the survivors of Chokai were transshipped to Fujinami, and Chokai had been disposed of by Fujinami�s torpedo. Thereafter, Fujinami would proceed to Coron on Busuanga Island. Fujinami was never heard of after [sending this update at] 0400 on October 26. According to the US sources, the US carrier-based aircraft sank Fujinami in the Sibuyan Sea on October 27. There were no survivors of both ships (Chokai and Fujinami)." [End quote]
[Finally, just to add the mystery, some post-war IJN writers claim CHOKAI may have been a victim to "friendly fire" from battleship KONGO. However that may be, it cannot account for all of the shellfire damage---HAGURO reported the gunfire against CHOKAI's engaged starboard side noted above even as returning to Brunei.]
It was made official on October 26, 2019 by RV PETREL's Facebook page that while searching the general Samar battlefield the Paul Allen Group's RV PETREL on 5 May 2019 discovered CHOKAI sitting upright and when the ROV subsequently dived on her on May 30 it found the Japanese cruiser in remarkably good condition in 5,173 meters of water. Heading was roughly SE. However, the bow forward of No.1 turret was completely separated about frame 38 and lying upside down on the bottom some 300 meters or more away to the north. A catapult track - probably the port one - had landed on the bottom astern. Otherwise, the preservation of both the main hull and the forepart was surreal in some respects. Especially considering the general lack of data and photos from both IJN and USN records that day, plus the ultimate loss of all hands, it is something of a God-send for naval history. For CHOKAI's wreck is the one remaining witness that can speak. It thus rates a review at somewhat greater length than others.
This site below has done an impressive job of displaying the available CHOKAI pictorial wreck footage in good format so the reader is urged to consult it for reference while the space is used here to concentrate on what those images of the wreck tells us in relation to the sources.
First in general overview, allowing for the amputated bow snapped off about at the point just aft of the capstans, the overall bulk of the cruiser is present. All five turrets are in-place. The forward turrets are all more or less intact. All are trained basically on the centerline, but the barrels of No.3 and No.2 are horizontal; while those of No.1 are sharply elevated. (Perhaps pushed up at the sinking moment by the bow breaking away?) Both of the rear main turrets are also on the center-line trained aft over the fantail, but three of the barrels (the left one of No.4 is horizontal) are elevated skyward, as if aimed at aircraft. Significantly, the turret tops of both appear to display bomb damage not visible on the forward three turrets with a direct hit having penetrated the roof of No.4. The distinctive tower-mast bridge is still solidly there, but far from intact for it shows considerable signs of both shell and bomb damage and having been ravaged by fires. The fore-mast and radar installation are missing. Most of the forward stack remains but its various piping has been bent. The second seems to be more destroyed and the after fire control superstructure area and aircraft deck shows considerable holing from fragments and bomb/or shell hits and big fires. Fire hoses are present in the bridge tower and after superstrcture area. This projectile & bomb with fire damage amidships accords well with what was observed. Which brings us to what is not present.
While some mysteries remain, one important one is solved out of the gate and surprisingly, in the negative. One of the most persuasive theories (beleived also by the writer) for CHOKAI's loss was that her torpedo mounts were exploded by shells or bombs, mortally crippling the cruiser much like happened to SUZUYA that same day, or the MIKUMA at Midway. However it bears mention right off the bat: This is not the case. Both shellfire and bomb damage is very present but CHOKAI's torpedo launchers are all in place. The actual condition of the torpedo mounts is all four are trained inboard in what appears to be the normal waiting-to-be-loaded position. None appear to be loaded. (This does not mean they had not been previously fired. CHOKAI seems to have either fired them in the battle or jettisoned them after being crippled or a combinaton of both. But the tubes are empty)
However the surrounding area and space where torpedoes would be loaded show great damage in the top deck and missing plates of shell -- massive oxygen fires appear likely, but the hull is also not split by explosions so the reserve warheads themselves apparently did not "cook off." It appears the precautions to keep the warheads proper from exploding were successful. As severe as the various fire damage is, none of it looks like a product of CHOKAI's torpedo warheads detonating. What appears to have stopped and doomed the cruiser was the massive damage and large fires around her uptakes and supply ducts. At least one bomb reached and knocked out the forward engine room.
One area where the gunfire of USS WHITE PLAINS and SAMUEL B. ROBERTS do appear to have certainly made a mark is the towermast bridge structure and the funnels and after deckhouse. (HAGURO in fact observed shellfire impacting the starboard bridge just before CHOKAI was forced out of column) In addition to bomb impacts on the roof of bridge levels and turrets there are myriad holes and signs of fires (and the hoses deployed to fight them) throughout the superstructure and in the weather decks. Fire hoses remain that run all the way to near the top of the tower-bridge: mute testimony of the extent of the fires in the superstructure. The destruction extends down nearly to the compass bridge. Since Captain Tanaka Jo survived (initially) he was probably on the compass bridge during the action. One other point is the starboard No.1 HA gun is at maximum depression -- perhaps a calling card of when engaging the ROBERTS?

Underwater damage is great, but more limited in scope than might appear. On the starboard side aft of No.5 turret there is a large hole in both deck and shell that looks like possibly venting from a torpedo hit from below but is hard to tell due to the overall general collapse of the quarterdeck more definitely from implosion. Just as likely is bomb near-miss. Hits reported by VC-5 aft on the stern are one hit and two near misses. Wreck indeed shows a hole in the fantail deck set to starboard that seems to have destroyed the bollards, just where Fowler indicated. (See diagram linked below) The near-miss on starboard quarter seems to have sheared the starboard outboard propeller shaft around frame 325. The outboard propeller has slipped out of normal position. There is a torpedo-like hole long and high gash in lower starboard hull which extends from front of middle of turret No.2 to middle of turret No.3 (frames 85 - 103). This is about 32.4 feet width. But even though it exposed the armor belt the damage does not seem to have penetrated inboard as much as would expect for a torpedo hit, and in any case did not detonate the 20 cm shell and powder magazines. (Perhaps a fortuitous immediate flooding event saved CHOKAI like had happened with USS BOISE at Cape Esperance?) A very near-miss is another possibility but it should be noted a torpedo hit in this area on a cruiser was claimed by U.S. forces. The third and most obvious torpedo damage is on the port side forward that was instrumental in severing the bow and is almost certainly Japanese. Finally the upside down bow has no torpedo damage itself.
Whatever the truth of which damage came from shellfire, bombs, or torpedoes, what the wreck tells us more clearly is the condition CHOKAI had been put in by 11am 25 October when FUJINAMI is ordered to stand by her. Though it is possible a USN torpedo had hit the starboard bow between No.2 and No.3 turrets, until FUJINAMI scuttled her the lion's share of crippling damage to CHOKAI had been inflicted by a flurry of shell hits and 500# land-bomb hits. It bears mention that nearly all of the AA guns are trained aft---apparently during VC-5's attack. One thing that is clear is CHOKAI after hoisting the break-down flag had time and remained sufficiently operational to train her main turrets back to the centerline. The surface action for her had thus terminated before bombed. At least for a time she retained sufficient power from her generators (deep in the ship and protected) to radio and operate her weaponry as well as pumps for the fires. Fowler's claim to have surprised his target is likely true for CHOKAI had disengaged from the gunfire duel. The result was CHOKAI was dead in the water possibly as early as 0900 before the bombing attack and certainly after it. The attack by KITKUN BAY's VC-5 had left the target so burning and exploding with fire and smoke it was believed to have sunk at 0930. That wasn't true.
However, by this time CHOKAI had suffered bomb hits on the VI and VII levels of the tower bridge above the compass bridge, and fires started there. * A cluster of bombs had bracketed the forward stack, causing considerable fragment damage and shattering and twisting emergency steam vent pipes. The bomb hits on the bridge structure had hurled fragments onto the roofs of No.3 and No.2 turrets, but they remained operational. Other bombs had landed to starboard of the towerbridge, blowing the splintershields off the forward 4.7 inch mount and damaging the barrels of it and the 25mm emplacements adjacent. Aft, No.4 turret suffered a direct hit and was penetrated, and fragments peppered the roof of No.5 turret. At least two bombs landed on the quarterdeck; one blowing off the bollards on the starboard side of the fantail. A near-miss from the same bombing salvo damaged the starboard outboard propeller shaft. Its interesting to note that part of CHOKAI's difficulty in restoring navigation and helm may have been a result of un-realized damage to the shafts, rather than the rudder. The wreck clearly shows such damage. The rudder itself is set midships and not jammed.
In summation; allowing for uncertainties, it does appear CHOKAI suffered torpedo hits at: (A) the port bow forward of No.1 turret that severed it; (B) A severe underwater hit (torpedo or depth-charge) starboard forward between No.2 and No.3 turret; and (C) possibly (more likely near-miss) the starboard quarter aft of No.5 turret. It is only speculation, but odds are the starboard damage is American, and the port bow damage the work of FUJINAMI. It is worth noting that traces of bomb damage can be found at nearly every spot claimed by the rough sketch made by VC-5 of KITKUN BAY. Also present are traces of the shellfire damage to superstructure and stacks from surface gunfire.
.jpg )
In the end this damage combination defeated Captain Tanaka's efforts to get back underway and escape the battlefield. From noon through the whole afternoon the combined efforts of CHOKAI and FUJINAMI's crews left behind by events struggled with emergency repairs to try to get back under way. (They may have succeeded, but it didn't last.)* At some time after dusk, in obedience to Kurita's 1917 order for units unable to proceed to be scuttled the last efforts were abandoned. Captain Tanaka and all surviving crew transferred to destroyer FUJINAMI. Because CHOKAI by this time was probably down at the bow but on an even keel(such was mentioned by U.S. forces) FUJINAMI's skipper probably rightly judged the fastest way to finish the job was to torpedo the bow again. At 2148 hours one or more Type-93's (probably no more than two, maybe only one) were fired into the port side blasting the forward section. No other damage really matches the Type 93 and this damage matches it perfectly. There is even more clear evidence that CHOKAI in fact then plunged by the bow at the end, and as she made the long descent to the bottom the quarterdeck imploded so drastically that all the decks were crushed down within the hull sides to the level of the hold deck after of No.4 turret.(It bears mention similar also happend with MAYA and MOGAMI) The damage to the shafts looks pre-implosion and implies that Captain Tanaka was contending with more issues than may have realized. If it is true CHOKAI got back underway for a time --- this damage is probably why little progress could be made and it ultimately failed.
Had FUJINAMI and those aboard survived to tell us as they did aboard OKINAMI about SUZUYA in a very similar case, we would know far more. As it is, historians must let CHOKAI's forlorn wreck reveal what it can in their stead. As ever when there are no survivors, the last authoritative witness of a last moment can be found only beneath the sea. Such it was for HMAS SYDNEY, and such it is for IJN CHOKAI.
The FURUTAKA was sunk during the night surface Battle of Cape Esperance. It was located by RV PETREL and announced on May 5, 2019. The cruiser lies on the bottom upright basically north to south in some 1,400 meters of water NW of Savo Island about where expected. The superstructure is reasonably well preserved aft of the bridge but the bridge area has been demolished and the bow of the ship has been wrenched clean off and lies at right angles to port forward of No.1 turret. No. 2 turret is gutted; the gun house completely gone. Significantly, no obvious trace of torpedo hit in port machinery spaces is visible, though there is ample shellfire holes in the port side shell and on the torpedo mount as reported. This tends to confirm the Japanese belief it was a heavy-caliber shell, not torpedo, that flooded the room. In fact, the PETREL's survey found no evidence of torpedo hits anywhere on FURUTAKA.
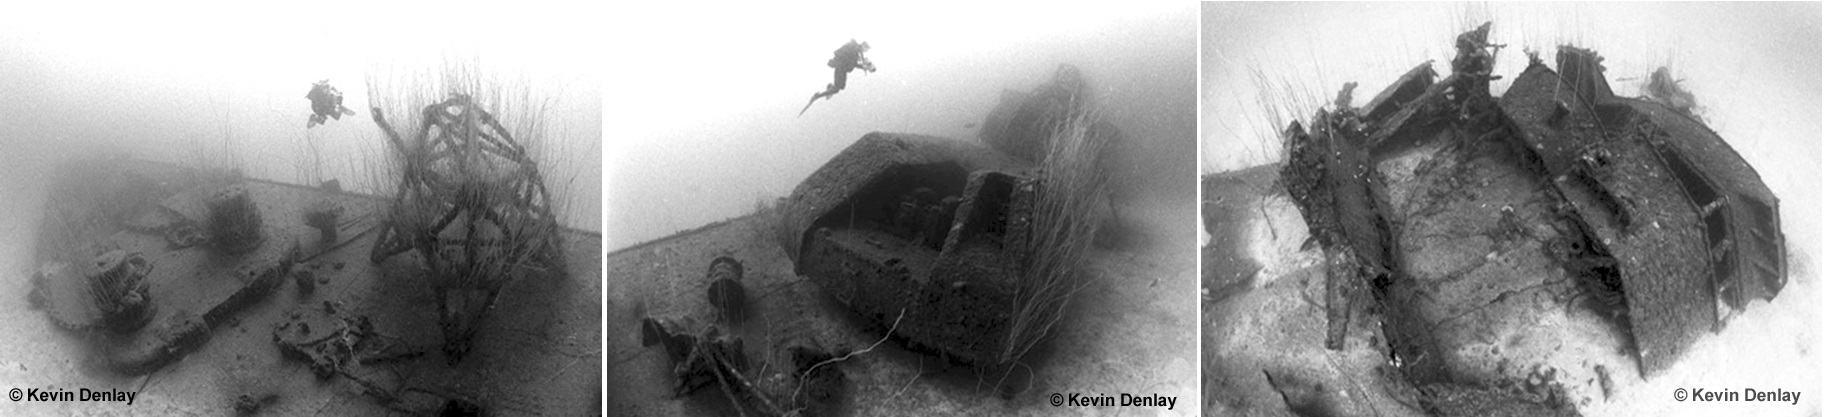
On 16 May 1945, in the early hours of the morning, the HAGURO went down after a hard-fought surface battle against five British destroyers. When last seen she was had returned nearly to an even keel from a steep port list and was sinking by the bow. It is now possible to compare this with facts from the bottom.
On March 4, 2004 a group of divers off MV Empress including Kevin Denlay located HAGURO roughly 50 nmiles southwest of the island of Penang off the west coast of Malaysia in 220ft / 67m of water. The heading is nearly due north, 10 degrees True, which has an interesting correlation to the last tracks of the cruiser circling around. He reports that the shipwreck is upright, covered in parts by snagged trawler netting with her hull adjacent to her forward turrets buried in the seabed to about her original waterline, but this level gradually reduces until at the very stern her outer propellers and shafts are actually up above the seabed. Her foremast and the top half of the bridge structure are missing/collapsed. Her funnels have collapsed. Her mainmast is collapsed. British hits are visible in places. The bow section forward of No. 2 turret is decimated from a torpedo strike (or strikes). The No. 1 turret and barbette are completely uprooted and now lay against the starboard hull, the rear of the turret on the sea bed and the barrels pointing vertically towards the surface. Her No. 2 turret is trained to starboard at approximately the 1.00 o�clock position, with its roof collapsed and both barrels and breach blocks missing (they were never replaced after bomb damage sustained at The Battle of Leyte Gulf). The No. 3 turret's guns are elevated and askew and trained to the port quarter at about the 9.00 o�clock position. Both her aft main turrets� guns point directly astern. Just behind the No. 5 turret, the wreck is broken completely in half, although the stern section is still partially attached and heavily damaged on the port side. (Since the hull is partially buried in the seabed, it may be difficult to confirm all the torpedo hits received; hopefully subsequent visits will settle these questions, but the only hit really ever doubted was the one by HMS VERULAM prior to the final `coup de grace' shots of HMS VENUS.)
A thorough survey of the wreck was carried out in 2010 by the Explorers Club. This was fortunate as commercial salvagers got to the wreck circa 2014 and have begun to ruin. Read or right-click the report here:
(WWW.Explorers.org)
REVISED_Report._Kevin_V._Denlay_Operation_Dukedome_Flag_52_Nov._2010.pdf.
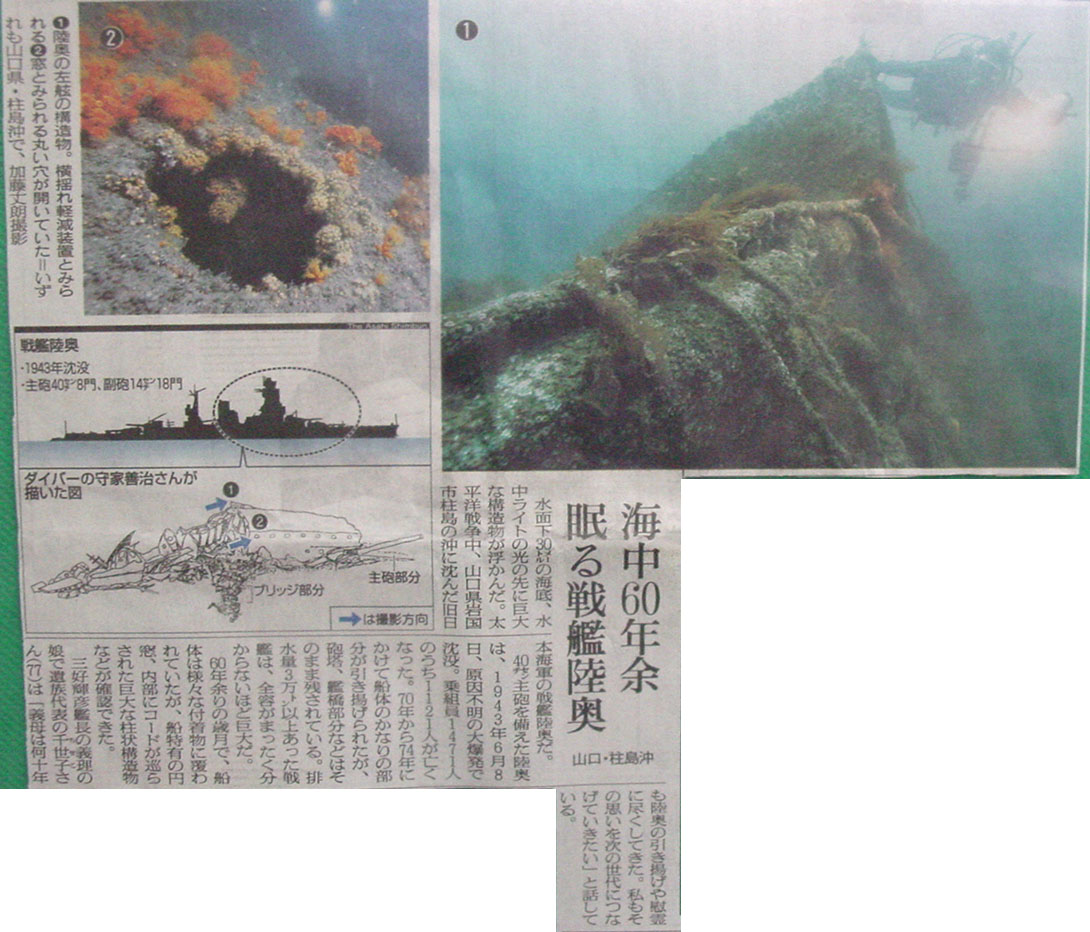
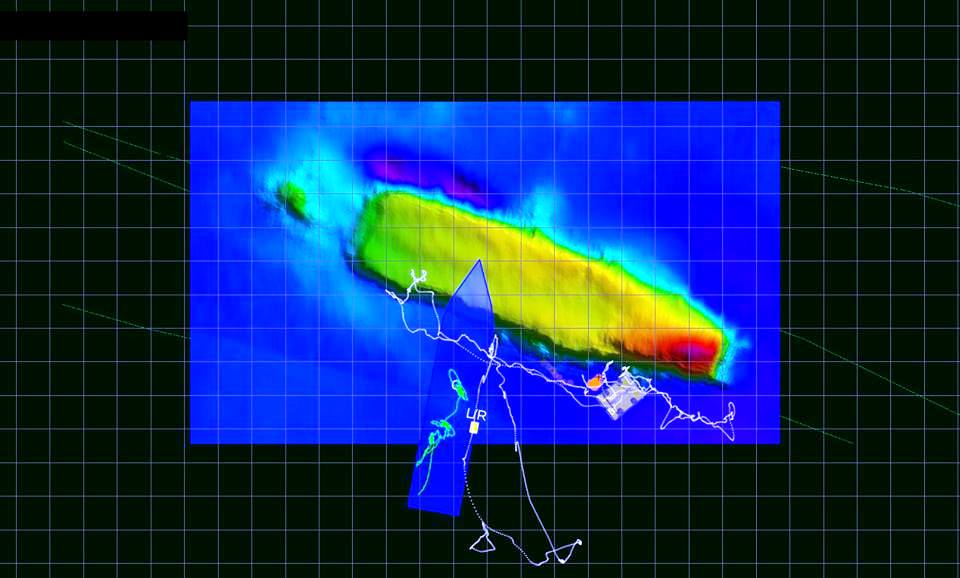
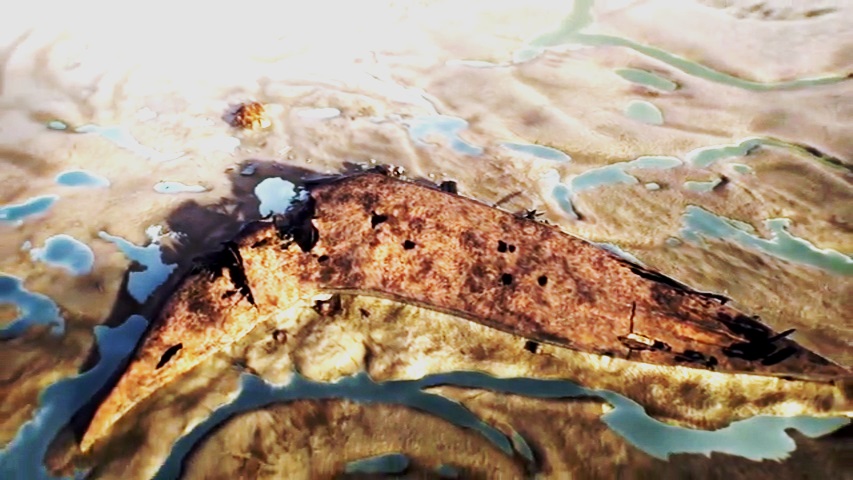
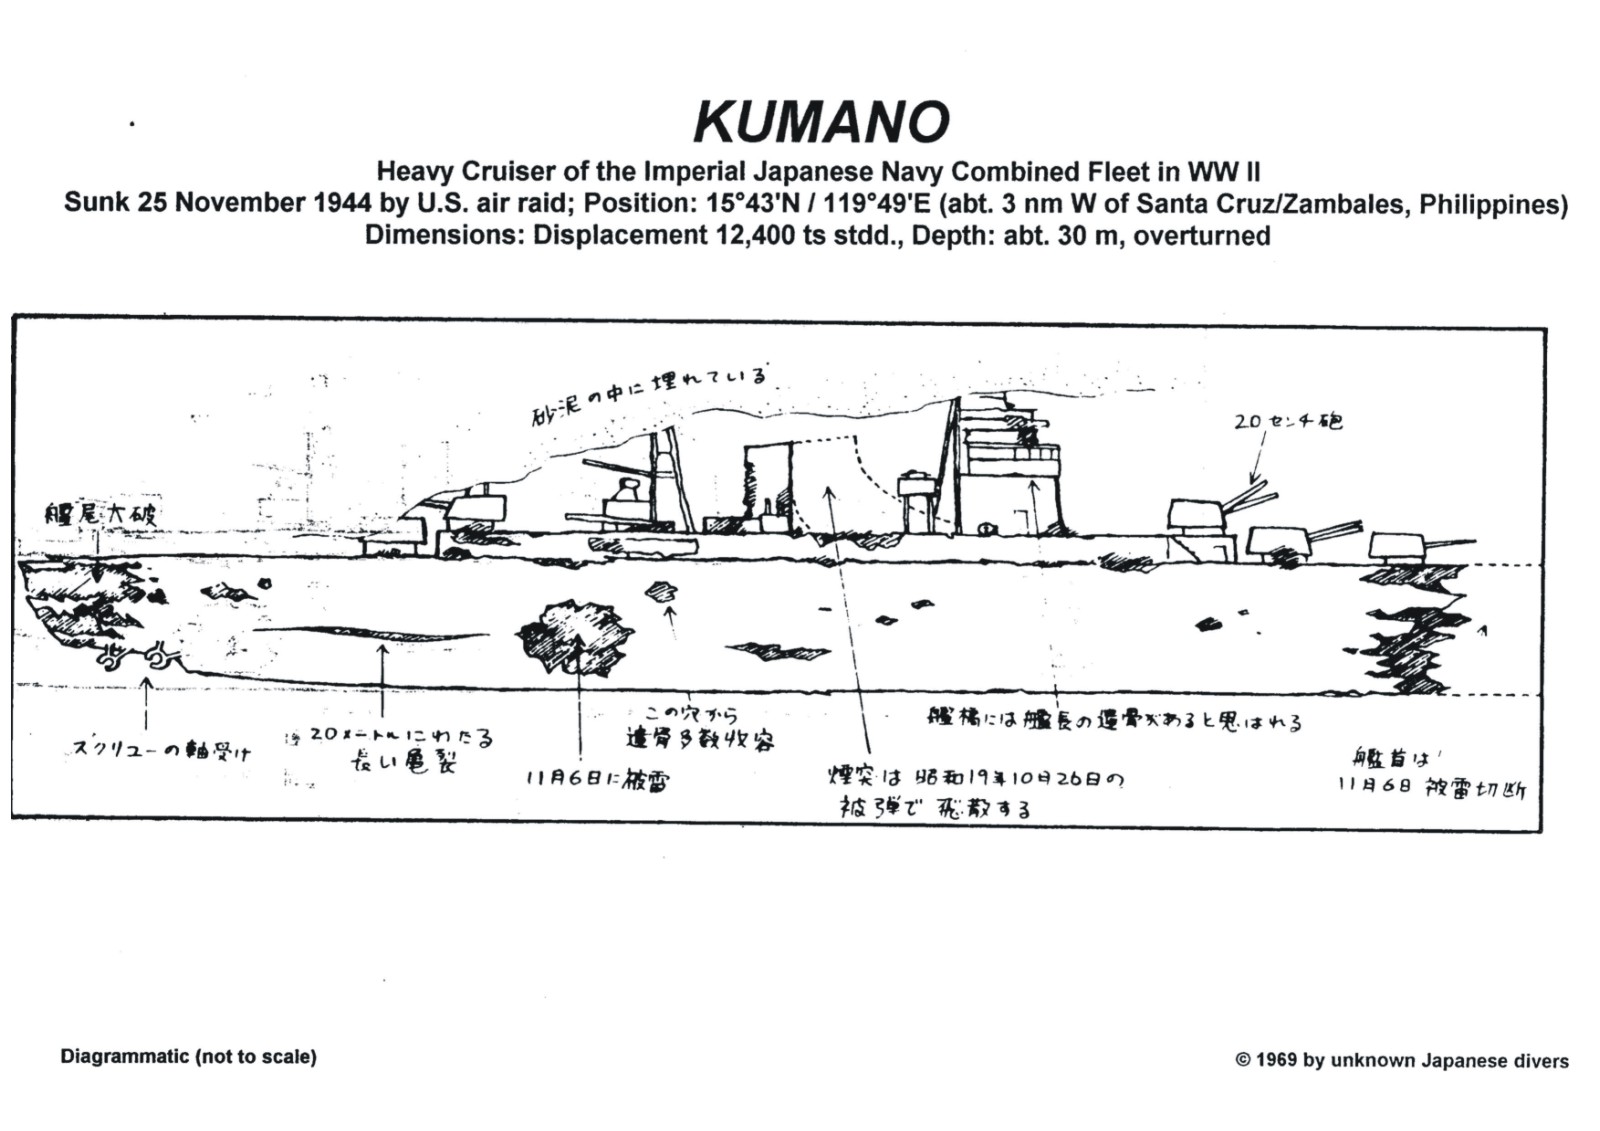
On 25 November 1944, after having her bow blown off forward of No.1 turret and surviving an incredible number of attacks and damage during and after the Battle of Leyte Gulf, the KUMANO was finally caught and sunk in Dasol Bay, near Santa Cruz, Luzon by planes from USS TICONDEROGA. Blasted by five nearly simultaneous torpedo hits on the port side, the KUMANO within four minutes had heeled 45 degrees to port, then turned almost completely upside down. Twenty five minutes later the upturned hull had settled beneath the waves.
The details have been well chronicled by the writer here and need not be revisited:
Ship of Nine Lives: The long struggle of cruiser KUMANO
On 4 June 1945 USS CHANTICLEER's team located the KUMANO. At the time she was lying upside down with a 120 degree list to port in 108 feet of water. The superstructure and all decks above the third deck were in the mud. The bow was completely blown off (matching IJN records - author), and was subsequently found 150 yards from the bulk of the wreck. Numerous bomb and torpedo holes were found and practically all seams were split. Interestingly, even at the time the entire ship seemed to have been well-stripped apart from a compartment that yielded several coding books and instruments, and the deck logs of KUMANO from 1937 to 1942. Ironically, also recovered and of great interest to the salvers was the wiring diagrams of the rader sets pulled off the NACHI a few months prior. One 27mm mount and ammo was salvaged in operating condition. According to an email in 1998, the KUMANO wreck is still on the bottom, and this may be true for the site is in the open sea and difficult weather conditions in the assessment of the U.S. Navy salvers.
Japanese divers in 1969 reportedly made an attemp to recover the remains of Commanding Officer Hitomi Soichiro with others but it appears it was unsuccessful and they remained on his bridge buried in the seabed. At this time the large hole in the forward starboard engine room from the torpedo hit by USS RAY was prominently noted; there was also a long split in the starboard shell from the back of the No.4 turret to well aft of the No.5 turret. Nothing more is known about the wreck since then.
On May 31, 2019 RV PETREL's Facebook page officially announced the finding of the wreck of MAYA had taken place in April. Her sister-ship, ATAGO (the flagship of Vice Admiral Kurita when sunk) was also searched for at that time but remained unlocated. MAYA lies 6,070 feet down and is generally good ship except for the forepart, which has snapped off and now lies upside down just astern of the main cruiser wreck. In addition, MAYA'S quarter-deck has collapsed within the hull; apparently a result of implosion on the way down to the sea floor.
To the common descriptions of MAYA's sinking what can be added to the picture by some other Japanese sources on Leyte is some better understanding of MAYA's last moment. It is commonly mentioned that she "exploded" and sank four minutes after being hit. What did happen is after the first two hits a huge cloud of smoke arose from forward and everyone feared the magazine was going to exploded for one of the torpedoes had hit abreast No.1 turret. However, this did not happen. Others mention the sharp list to port MAYA took up after hit. It was steep, some 30 degrees, and it was immediately obvious no counter-measures could succeed. The crew hastily gathered on the weather decks and began to leap overboard. In fact, it is notable that while MAYA came close to rolling on her port beam ends this never quite happened. The bow submerged and the fantail lifted high enough to expose the propellers and show that they were still turning. Then she went down with a roar. Unrealized at the time, this appears to have created enough stress that the bow section broke off just as she left the surface and began the descent to the sea-floor. In addition, the steepward angle drew the stern down under before it had flooded. For this reason it especially imploded severely as the MAYA neared the bottom.
The result was that MAYA, which had never entirely capsized, or turned bottom up either one, righted herself after losing her bow and impacted the bottom upright. The result was a fairly well-preserved wreck (Though not quite as well preserved as CHOKAI). As he did for the CHOKAI, the Into the Breach website has done an excellent job of arranging the pictorial evidence for MAYA.
Into the Breach: The Wreck of MAYA

On September 8, 2019 RV PETREL announced that MOGAMI had been located on May 8, 2019 fortuitously sitting upright in over 4,750 feet of water. Closer study made clear the bow had torn off forward of No.1 turret; indeed, the anchor deck lies atop the forward turrets.

When scuttled, though there is a slight discrepancy whether the single torpedo AKEBONO fired forward or amidships both version sions agree that after the torpedo hit, the structure above it collapsed, and the MOGAMI's bow submerged and she began to turn sideways onto her port side and soon left the surface at that angle.
Heavy cruiser MYOKO was surrendered like cruiser TAKAO in a damaged condition at the end of the war when the British returned to Singapore. Damaged by aerial torpedo in the starboard engine room during the Battle of Leyte Gulf after reaching Singapore in November it had been concluded MYOKO could not be repaired there. She was ordered to return to Japan only to have her stern fantail shattered by a submarine torpedo on December 13 1944 a day after heading north from Singapore. After an arduous tow back to Singapore what remained of her after section was cut off flat by yard crews aft of the rear turrets and she had become a floating battery but her boilers and generators remained operational. Nestled alongside to starboard at the time of inspection by the British on September 25, 1945 were two ex-German submarines, U-181 (now I-501) and U-182 (now I-502). (Of interest her TROM says when inspected no 8-inch shells were aboard; only rounds for the secondary battery and AA). Like TAKAO (see entry below) the MYOKO was similarly sentenced to simple disposal after an interval as a barracks ship. On 2 July 1946 the still stern-less cruiser was towed out away from Seletar and out of Johore Strait down to Malacca Strait. At a position off Port Swettenham (In 21st C termed Port Klang, Malaysia) MYOKO was positioned and scuttling charges set. Reportedly at 0310 on 8 July 1946 the cruiser was scuttled. The pre-dawn time seems inordinate but no details of her post-war service and end comparable to TAKAO's disposal (see entry) has emerged and hardly anything is known of the mechanics of MYOKO's scuttling but TAKAO's fate offers some analogy. However, a marked difference is the extreme early hour of the scuttling. Whether it has significance is impossible to say.
However, it has been suggested that a photo published on page 358 of "Japanese Cruisers of the Pacific War" by E.Lacroix & L.Wells purporting to capture ASHIGARA's torpedoing by HMS Trenchant as seen by periscope is in fact possibly a touched up one of MYOKO's scuttling moment. Somewhat supporting this is the fore-shortened look of the fantail in the low resolution picture. Against this the overall odd look of the picture and what looks like shoreline--none would be visible off Port Swettenham in that locale (and there is no doubt MYOKO is there). Yet the touching up may have included artifacts not originally present. In any case - if this claim is true - a random illustration alter ironically preserved a scuttling picture of MYOKO. If the picture was taken in moonlight conditions it might further account for some of its surreal character. The side-scan images described are inconclusive whether she is upright. A passage that was/is? so busy that a vessel passed over almost every ten minutes and being right at 300 feet/90 meters down is very unfavorable for any diving. In all likelihood MYOKO or TAKAO will never be surveyed unless done by ROV and even that would be difficult to remain in channel long enough to do so.
On 5 November 1944 VAdm Shima Kiyohide's 5th Fleet flagship (fortunately for Shima he was ashore that morning) heavy cruiser NACHI was caught while still in Manila Bay. That morning NACHI had been reprovisioning at Cavite when TF 38's first strikes arrived. According to USHIO's report at 0930 order was given during the second wave attack for ships to disperse by leaving port. This is probably when NACHI cast off from Cavite because at 1230 she was by found maneuvering at high speed in the middle of Manila Bay by bombers and torpedo planes of the third wave from USS ESSEX and USS LEXINGTON. Crippled by a torpedo from VT-9 starboard side in the forward set of boiler rooms she came to a dead halt. However, because the forward three boiler rooms did not have a centerline bulkhead she flooded uniformly across her width and remained on an even keel. A large bomb hit between the forward turrets caused further damage and there must have been some bombs aft because the aircraft deck appeared to be on fire before the last strike. Nonetheless, NACHI was not settling and there was an excellent chance that she could be saved if towed back the short distance to Cavite. But a fourth attack wave delegated specifically to sink her voided that possibilty. At 1445 NACHI was summarily blown into three sections by no less than five torpedoes against the port side dropped by USS LEXINGTON VT-16 planes which took a spectacular series of photographs. The hits were spread along the cruisers length; the first on port bow in nearly the same place where had struck MOGAMI; a second under the mainmast inundating the port forward engine room but it was the third that proved the killer: it hit square under No.4 turret and detonated the aft magazines. There was a huge balloon of fire and smoke and two other torpedoes apparently crashed into the wreckage. The photos after the smoke cleared showed NACHI heeling to starboard and sinking nearly upright with both bow and stern severed. Nearly spectacular and macabre as the photographs was the post-war career of the wreck. [*]
Of warship wrecks, few have provoked as much lurid and absurdly unwarranted tales as the NACHI. The ultimate fate of the wreck post-war has been obscured by tales of gold and the consequence re-exploration and and apparent removal of the wreck around 1975. However, the immediate post-sinking condition of the wreck is known, and has plenty of interest as it can be compared to the condition and unforgettable aerial photographs of her spectacular demise.
After Manila fell to MacArthur's forces in spring 1945, CinCPac wasted little time ordering the sunken flagship searched by divers. This was done in a series of dives commencing on 14 April 1945 and brought up equipment including radar sets and very valuable documents and records which were translated and distributed before the war was over. These same divers reported finding the NACHI in 102' of water, with the main cruiser wreck buried in the bottom with a 45 degree starboard list covered with barnacles. The remains of several gunners were found still at their AA posts. The bow was completely missing, and the severed stern was nearby, bottom up on the seabed. The divers noted "several" torpedo holes and bomb hits, the former presumably in the port side as the starboard side was buried. These in fact belonged to the final fatal series of hits that sank the cruiser, as the earlier torpedo damage was to starboard. When the salvage operations were finished, the masts were dynamited to clear any obstruction of the ship channel.
The condition of the cruiser was not the main interest, and few other details are available, but these form a useful appendix to the pictorial record of the sinking. They do answer the most immediate curiosity -- how what was seen on the surface ended up on the bottom. Contrary to often cited locations placing it near Corregidor the NACHI was sunk northeast of that island, roughly 8 odd nautical miles east of Lamao, Bataan in a main-ship channel approach to Manila Harbor. This factor, with the addition of post-war salvage, has apparently resulted in the wreck being entirely or nearly so removed and the site leveled.
Like MYOKO the TAKAO was surrendered in a damaged condition at the end of the war; and by a strange quirk of history, was also missing her fantail from submarine torpedo damage. During the Battle of Leyte Gulf a torpedo hit at frame 335 starboard had created a rent 16 meters long in the outer plating and basically shattered the fantail shell on the starboard side. The blow knocked off the rudder and had broken the two inboard shafts and caused their propellers to fall off. Another had hit amidships dead between the stacks flooding three boiler rooms. Despite these TAKAO had been able to steam first to Brunei then to Singapore using the outboard shafts. However, at some point after January 26 1945 (when seen with damaged stern still in place with what looked like a bite out of its starboard quarter) the damaged after-part was simply amputated flat in drydock. TAKAO was then demoted to status of an immobile floating battery and positioned approximately 500 meters from the Navy Yard in Johore Strait, with her stern facing the southern bank. Of 817 Japanese officers and men still aboard, all but 157 were disembarked for a camp ashore (see TROM) The remainder stayed embarked as a caretaker crew. She was in this position when attacked at the end of July 1945 and given medium damage by British midget XE-class submarines (See TROM) After surrender TAKAO subsequently was moved out into Johore Strait by the British and served for a time as as a floating base for quarters and communications for the 10th Area Fleet command during demobilization of South East Area Forces through most of 1946. Like some other interned Japanese vessels some of her Japanese crew continued living aboard. Beyond that, the Royal Navy showed relatively little interest in her (apparently neither she or MYOKO were even surveyed in the fashion the USN did for the Japanese vessels - afloat and wrecks alike - in the Inland Sea at war's end) Also like MYOKO before her, it was resolved after a year to simply dispose of the cruiser. On September 25, 1946 the order to get rid of TAKAO was telegramed.
At 0730 27 October 1946 HMS fleet tugs GRIPER and ASSIDUOUS towed TAKAO away from Seletar and down to Malacca Strait. The former CH-17 and the NITTO MARU, like TAKAO still manned by Japanese, sailed with them. The cruiser HMS NEWFOUNDLAND convoyed the procession. After arriving in a position near where MYOKO had already been sent down, at noon on 29 October 1946 the scuttling procedures began. The Japanese crew still aboard (about 160, see her TROM) was now transferred to CH-17 to be taken back to Singapore and eventual repatriation. Scuttling parties than opened the kingston valves in the engine room. Since the cruiser seemed to be settling a bit too slow or for practice, cruiser NEWFOUNDLAND opened fire on TAKAO with her main batteries. These finished her off, and at 1838 finally yielding and lifting her bow, TAKAO sank stern first to the bottom. According to Kevin Denlay, the wreck lies close to 330 feet and being in the main shipping lane of Malacca Strait like MYOKO and not far from the latter will likely never be dived.

April 26, 2019 it was announced RV PETREL had found light cruiser JINTSU. She lies 900 meters down and as expected from the reports of the sinking moment, is in piece. The bow section lies on its port side. The stern half sits upright. All is fairly well preserved. You can see what appears to be her quad 24 inch torpedo mounts, and torpedoes in some of the tubes.
Like the NACHI, the KINU was in fact sought out and dived by personnel of the USS CHANTICLEER in spring 1945. Though nothing is known about the wreck since, the findings then agree with what was known about her last moments. According to KINU's Action Report a direct bomb hit and three severe near-misses acted like torpedoes to rip open her port side aft, flooding the aft engine room. Despite efforts to stay the flooding, she foundered about six hours later. The KINU was located and diving began on 15 July 1945. The KINU was found in 150 feet of water, lying flat on the bottom with a 90 degree list to port. Inspection showed a torpedo hit forward and that her back was broken abaft the bridge in the well deck area. Bomb hits were seen between number one and two stacks, and between number three stack and the aft torpedo tube mounts. However, this wasn't the only impact area as all was a mass of wreckage abaft the after superstructure. As it happened, the bridge itself was undamaged. Many documents and four coding machines were pulled from the communication room in the bridge as well as misc other material. The torpedo hit on the starboard side forward is a bit puzzling, as it was not reported by KINU's report, but in the hail of bombs and torpedoes on her, it is perhaps not surprising. Any possibility that she is the ABUKUMA instead seems ruled out by the location found off Western Masbate, and the unequivocal statement of the CHANTICLEER log.
It should be mentioned that historians of the battle will recall that destroyer URANAMI was sunk at the same time in the general vicinity while screening KINU. However, she is not listed below or discussed because is not (as far as known) a "found wreck" then or now. The same U.S. report that discusses KINU does not mention a search or any finding of URANAMI. If it took place, it is unknown to the writer.
It is an irony that light cruiser KISO became a wreck in part due to a wreck in Manila earlier covered. Namely, heavy cruiser NACHI. When VDAM Shima Kiyohide's flagship was sunk on 5 November, for a time there was no replacement. Then when KISO which had accompanied carrier JUNYO south from Japan on a materials transport mission to the Kurita fleet arrived at Brunei she was designated as that replacement. KISO arrived at Manila at 1847 on 9 November with JUNYO, TONE, SHIGURE and Desdiv 30 (YUZUKI, UZUKI)
At first there was some thought given to her taking part in the TA Operations as a new flagship of Desron 1 to replace ABUKUMA, but the need for a new 5th Fleet flagship was greater. It proved academic. On 11 November JUNYO and the others had departed Manila for Takao, but KISO had moved into the harbor the same day and was still there when on 13 November the great TF 38 raid struck. By very unfortunate timing KISO had been scheduled to depart with Shima aboard that very day and was anchored on standby near the jetty where the Southwest Area Fleet HQ was located, in preparation to embark the 5th Fleet staff.
So KISO was still inside the harbor breakwater when first wave struck. She promptly opened fire and this and her size naturally attracted attention. KISO had weighed and was underway headed for the exit between the moles when at 0922 she sustained the first of three 250kg (estimated) bomb hit on the starboard side with a hit beside the aft turret. One minute later two more hit, one beside the third funnel killing most of the machine gunners there and wrecking the No.3 and No.4 boiler rooms and the other on the starboard bow. At the same time a gash 6 meters long vertical crack was opened in the port side. KISO had passed OKINAMI and HATSUHARU and was approaching the breakwater gap when she came to a halt and by 1330 the fantail was nearly awash. But subsequent attacks inflicted even more damage. At 1400 another bomb hit beside the No.2 funnel to starboard killed six men and opened a one meter gash in the deck while near-misses punched more holes so that KISO settled aft till grounded with a slight list to starboard. In all KISO endured six waves of enemy attacks between 0740 to 1700. In return, she claimed one aircraft definitely shot down during the first hits. By the end of the afternoon she was on the bottom in shallow water with forecastle above dry and the weather or main deck just at the waterline at low tide.
Technically speaking, KISO was listed as "heavily damaged" but was de-facto sunk, resting on the bottom, as was destroyers HATSUHARU (even more obviously) and OKINAMI. Nor was that quite all-- when Manila was raided again the following day at 1443 the 14th KISO sustained a 60 kg bomb hit to starboard near the bridge. But was already on the bottom. Any remaining aboard now left the ship. In the weeks that followed the wreck was gradually stripped.
By 10 December 1945 most of KISO's weaponry and equipment that was still usable and useful had been offloaded from the cruiser. On this date she was declared a 4th Reserve ship. In February 1945 she was captured by American forces entering Manila. Reportedly some of the remaining machine guns aboard were used in the final seige.Later, on 10 March 1945 was removed from the Navy List.
With KISO the largest warship wreck in Manila Harbor proper (NACHI lay outside in Manila Bay) it is perhaps fitting that it appears she was the last of the IJN warship wrecks of 13/14 November to be removed. On 15 December 1955 the Nippon Salvage Company refloated KISO. Only a month later, she was sufficiently patched to be towed to the Manila docks for dismantling and scrapping.
On 11 January 1944 while engaged in exercises 18 nautical miles west of Penang Island light cruiser KUMA at 1145 was hit by two torpedoes in the starboard side aft from a spread of seven fired by Royal Navy Submarine HMS TALLY HO! First torpedo struck near the Captain's room and the second hit under the rear torpedo tube mount. According to her reports the aft magazines were inundated and all engines went off-line and KUMA listed 23 degrees to starboard and caught fire while settling by the stern. Though damage control briefly checked the list by counter-flooding to port by 1152 the Upper Deck was submerged from aft as far forward as the mainmast and a fire was burning amidships with list 25 degrees to starboard. At 1154 it increased to 38 degrees starboard. It was now that a devastating freak accident occurred: because KUMA's fantail was under water her own depth charges there detonated and finished the cruiser; KUMA now rolled fully to 90 degrees and sank rapidly tail-first 3 minutes later.
When (fortunately) surveyed in March 2004 (and again in November 2010) by Australian diver/photojournalist Kevin Denlay and a group of divers operating off MV EMPRESS the wreck of KUMA lay on its starboard side in about 47m/154 feet of water. The stern just aft of the rear gun mount was blown off and almost entirely missing with jagged edges though the port outboard propeller remained in place. This accords with the induced explosion of own depth-charges which hastened her end. Otherwise the cruiser was mainly intact, other than the fact that the stacks and other structures had collapesd to the bottom. The bridge was intact. Unfortunately visibility was not especially favorable for documentation by the divers, but as noted on her TROM "Her port waist 5.5-inch gun is intact, except the top of the mount's enclosure has disintegrated. The circular rotating base of the forward port torpedo rack is intact, but there are no tubes on it. Denlay reports that the fire amidships melted and fused glass on many portholes along her hull."
"Fortunately surveyed" above refers to the fact that a decade after discovery, in the summer of 2014 it was learned that basically the entire wreck of IJN KUMA had been ruthlessly cut up that year into pieces and "salvaged" from the sea floor by scrappers in May 2014. This proved to be an ominous fore-shadowing of the egregious fate of the historic and important Allied ABDA wrecks of the Battle of the Java Sea that would take place in the following decade.

The July 1, 1946 detonation of the Atomic Bomb "Able" inflicted devastating damage to the flimsy light cruiser, and left her little more than a floating junkyard. Though the forward turrets and bridge were oddly almost whole, everything aft of it had been squashed flat as if stepped on by a giant foot. The stack, hangar, and amidships superstructure were almost unrecognizable -- only the mainmast toppled over to port and the No.3 turret standing forlornly in place provided a landmark. The explosion smashed the stern and started a fire, and apparently here, as well, inflicted the damage that ultimately proved mortal. After the test she was found down by the stern about two feet, with a slight list to port. However, during the night of 1/2 July this settling greatly accelerated and morning found the stern now down by ten feet with the port rail almost awash. She was clearly sinking and at 0906 an attempt was made to tow and ground her. But the list to port increased to 8 degrees and the stern now went under. The tow was cut as SAKAWA began to heel over to port faster and faster. By 1035 her stern had come to rest on the bottom, and she was listing 85 degrees to port, whereupon the upraised bow slowly subsided under the waves, to finally vanish at 1042 in nearly 200 feet of water.
Twenty-four days after the first blast, a second atom bomb "Baker" was detonated, a shallow-water shot. The effect on the sunken SAKAWA, barely 500 feet away, was unrecorded, but was presumed severe. As recently as 1992 the SAKAWA's wreck had not been relocated or positively identified, but has since been found. The way she ended up is interesting, having apparently corrected as she settled. Despite the angle at which she sank, the SAKAWA in her final resting place is almost upright. She is buried in the sand with a perhaps 15-20 degree list to port, with the starboard side exposed but the port main deck rail completely buried abaft the forecastle. The bridge has clearly been further flattened by the blast of "Baker" Bomb after she was already on the bottom. The forward turrets are still in place, but almost nothing is left abaft of these and a ruined segment of conning tower. In fact, the highest point now on the wreck is ironically one of the "Christmas Tree" monitors still on "B" turret. What remains of the bridge lays smashed in the mud off the port side, apparently destroyed during the "Baker" blast, for it was intact when she sank. Aft of this point, little is left, which accords with the last views of her before she sank
For a fuller story, read on this site:
Born Too Little, Too Late: The IJN's SAKAWA
(Incomplete, still collating and researching)
Note: Four Japanese destroyers were sunk in shallow waters in Manila Harbor or Cavite; the AKEBONO, AKISHIMO (off Cavite pier), OKINAMI, and HATSUHARU (Inside Manila harbor mole.) Another, the HAYASHIMO was beached in plain view off Semirara Island. With the apparent exception of the last, all almost certainly salvaged and scrapped post-war, probably before 1960. However, with the exception of OKINAMI (in Gakken), the author has not seen photographs or info of the salvage operations of the other wrecks. Apparently they were extant in 1952-55, but removed afterward. Any information would be greatly appreciated and urged to contact me.
Update: With the discovery of the situation with HAYASHIMO's wreck discussed in a Japanese thread of January 2019 the above questions have been pretty much answered and are placed below in the related vessel entry.
It may appear unusual to link two unrelated destroyer class types like this, but the fact is the AKEBONO [FUBUKI-class] and AKISHIMO's [YUGUMO-class] last month was one of entwined and even physically shared fates. Both were crippled in November 1944 and forced to begin emergency repairs at Cavite Navy Yard. They were moored side-by-side at the very end of Cavite pensinula south of the Sangley Point peninsula. Both were then hit by bombs and demolished in the big TF 38 air-raid of 13 November 1944 that also sank cruiser KISO and destroyers HATSUHARU and OKINAMI.
First, on November 5, 1944 in Manila Bay AKEBONO had been hit by two bombs amidships and set afire while trying to defend and assist heavy cruiser NACHI before the latter was sunk in a fourth wave. AKEBONO was then towed to the shore temporarily and November 7 moved over to Cavite. Meanwhile, AKISHIMO while engaged in the TA-No IV Transport Operation on November 10, 1944 at 1418 had her bow shattered forward of frame 31 by a large bomb. Frame 31 became the new forward `emergency' bulkhead. (This beam is under the front center of the No.1 turret and it is unclear from the telegram if the forward turret drooped forward into the sea, but it seems likely.) Nonetheless AKISHIMO was still able to make 16 knots and returned to Manila safely. There she was tied up at the quay at Cavite alongside AKEBONO already there. There the 103rd Repair Unit was to work on both as time permitted. However only two days later, final disaster struck both.
In a sequence oddly reminiscent of the entwined fates of USS CASSIN and USS DOWNES sharing the same drydock at the Pearl Harbor attack; with one (AKEBONO) toppling over against the other, the two Japanese destroyers suffered similarly. They were moored side-by-side beside Guadalupe Pier, Cavite with their starboard facing the pier; with both alongside the port side of the small tanker HORAI MARU (834 tons) whose starboard side also faced the quay; with the AKEBONO's the inboard destroyer and AKISHIMO the outboard one. Though roughly similar size vessels, AKISHIMO now appeared shorter because of the missing bow. At 1520 Cavite came under heavy attack with much of it concentrated on the destroyers. AKISHIMO received a few bomb hits and was set afire; while AKEBONO recieved one direct hit and ten near-misses that also started what would be stubborn fires. By sunset both destroyers were burning furiously. In return, they claimed six planes shot down between them.(See TROMs)
At 0500 November 14 a terrific explosion took place aboard AKISHIMO and this blast also riddled the upper-works of AKEBONO to starboard. After the explosion the AKISHIMO turned turtle to starboard and kicked her stern against AKEBONO as she did; while the blazing AKEBONO lurched over to port against her comrade and both settled to the shallow bottom in that position. AKEBONO's bridge and two stacks remained above water at a slanted angle. What appeared to be a blade of the port propeller and the bilge keel was all that was discernible of AKISHIMO. The small tanker HORAI MARU was also on the bottom upright with bow reared up and forming a confusing backdrop to the destroyer wrecks in pictures of the aftermath.
The wrecks remained in-situ apparently till 1951. In that year, the Ishikawajima Shipyard after stripping off nearly all the superstructure successfully refloated the hull of AKEBONO. Once afloat it was anchored for a time in Manila Harbor awaiting disposition. Of the upperworks only the bandstand platform for the twin 25 mm machine-guns remained in place in front of the absent bridge. (Perhaps it served as a temporary conning station?) Judging by how well it rode above the waves almost like a freshly launched hull, the underwater damage requiring repair might have been comparatively limited. * It was then towed for scrapping. Though it is not definite, presumably the AKISHIMO and HORAI MARU were removed at the same time by the same company.
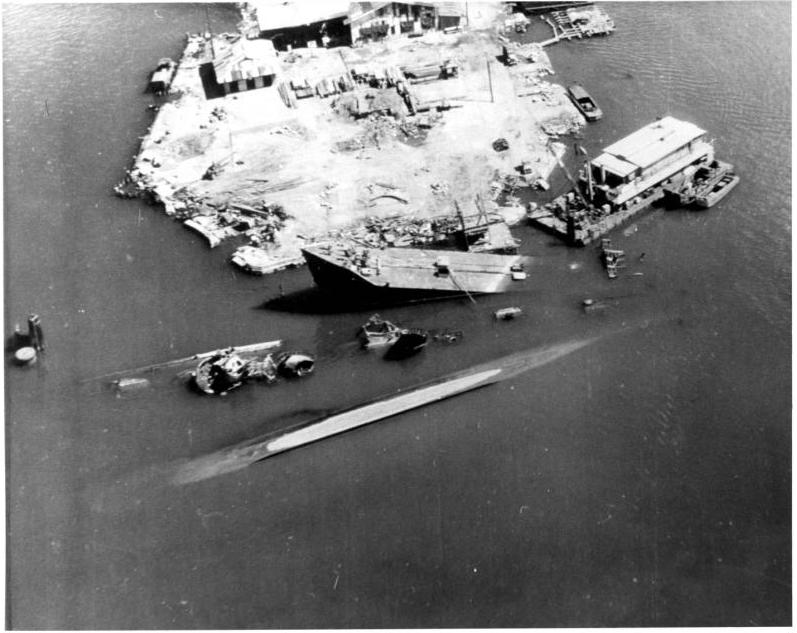
The wreck of the celebrated Japanese destroyer Amagiri, which gained notoriety and fame for ramming and sinking John F. Kennedy's PT 109 at 0024 (IJN time) August 2, 1943 was discovered by Captain Vidar Skoglie of MV EMPRESS in 2003. The identification was confirmed in October of that year, and it was found that the Amagiri wreck rests on her starboard side but somewhat upright at a depth of 28 meters/92 feet about 60 miles south of Balikpapan in Makassar Strait. It turns out she landed much as she left the surface, as will be seen.
How Amagiri came to be there is a relatively obscure chapter of the Pacific War, and certainly not as well known as her encounter with PT 109. By an interesting quirk, both senior officers involved that fateful night -- Comdesdiv 11 Captain Yamashiro Katsumori and CO Lt.Cdr. Hanami Kouhei had left the destroyer at the end of February 1944 before she headed south to the Singapore area. On 20 April 1944 with cruisers AOBA and OI she had departed Singapore transporting aviation materials for Davao. At 1235 on April 23 while the force was passing through Makassar Strait, the Amagiri struck a mine (apparently laid by USS TAUTOG) in way of No.1 boiler room, and fire and flood broke out. Though Chief watertender Nishimatsu was mortally wounded in Boiler Room No.3 during courageous measures to save her, after two hours the Amagiri listed to starboard and settled bow first in reported position 02-12'S, 116-45'E at 1453. The AOBA rescued her crew including Lt.Cdr. Yoshinaga Gen, and her losses were very light, but Chief Nishimatsu died the next day and Comdesdiv 19 cited him for special posthumous promotion.
After initial survey in October 2003, the wreck of the Amagiri was visited more extensively in January 2005 and most of its details recorded. Curiously, for one reason or another, the wreck has somewhat collapsed in on itself, leading to the unusual situation where areas usually below decks or inaccessible are exposed to view. Apparently in addition to the usual destructive forces on a wreck, some illicit diving and demolitions have taken place. In fact, it appears that fishermen conducting illegal underwater demolitions to kill schools of fish somehow set off Amagiri's No.1 forward magazine! The destruction in the bridge area and beneath that mount is accordingly massive. (The speculation this is post-war damage inflicted in this way is probably correct, for Amagiri went down somewhat slowly, with no huge explosion, though there was a fire and scalding of men in the boiler rooms). The forecastle area forward, however, remains reasonably intact, and divers even thought they could discover traces of where Amagiri's prow had hit PT 109. (Amagiri received a very small rent in the cutwater above waterline from the collision, and though repaired, traces might remain of the patch).
Moving aft from the shattered fore-turret area, not much remains of the lower bridge area, but the rangefinder and director above survive, though collapsed down into the heap. The foremast is described as a tripod, but no mention of a radar platform or such key details.There are also remains of both funnels, but the deck around them is now split where even the boilers can be seen. Being a FUBUKI-class destroyer, the Amagiri had three sets of torpedo mounts, and all survive, though not all in original position. No.1 TT mount lays upside down, half buried in the bottom; No.2 TT mount has actually collapsed with the deck into the hull; and No.3 TT mount has also collapsed, splaying fan-like on the port deck -- which itself, however held at this location. Notable is that while all tubes are empty , the reload torpedoes are still there lying around, and appear to be `Long Lance' Type 93.
Of particular interest to IJN historians is the fantail area, where one finds confirmation that Amagiri's No.2 turret was removed and replaced by increased 25mm AA like many destroyers at this time. (Allyn Nevitt's speculation in his TROM that this took place during the refit in the first half of January 1944 is thus shown almost certainly correct). No.3 turret is there, but its gunhouse completely eroded away, and the remains lying on its side, and scattered a little behind are numerous depth charges and their throwers. The rounded fantail is also collapsed, but the rudder and two screws are visible just beneath it.
For more details, see:
See Kevin Denlay's write-up of the exploration here HIJMS Amagiri
Regretabbly, according to report, commercial salvage-pillagers from Balikpapan removed most of the AMAGIRI wreck in 2011. At last visit, apparently only the keel remains to indicate where it was.
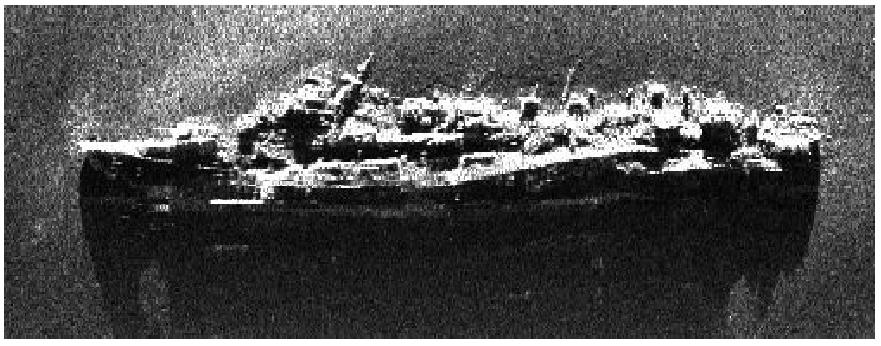
On July 5, 1942 ARARE, KASUMI and SHIRAYUKI escorted CHIYODA and ARGENTINA MARU into Kiska harbor with reinforcements for the Navy garrison. The three destroyers then set forth again, but because of fog paused the sortie and anchored off Salmon Lagoon to wait. There they are subjected to a spectacular submarine attack of USS GROWLER (SS-215). To the submarine finding three destroyers anchored where they overlap with bows headed southwest and presenting port angles was a dream target. A chance to take out dangerous adversaries on the submarine's terms for a change. At 0255 Tokyo time GROWLER commenced attacking all three: the submarine fired one torpedo at each of the first two, and the last two at the third destroyer. The sub observed both of the first targets hit amidships, but the first torpedo fired at the third missed. To GROWLER's surprise that destroyer than fired torpedoes at it in turn. GROWLER had fired a second torpedo and dived deeper and was just missed by the Japanese "fish" crossing overhead. As the scope went under the third destroyer was hit under the foremast.
The targets were in order of closest to furtherest: ARARE, KASUMI, and SHIRANUHI. ARARE was struck squarely amidships between the stacks and broken in two and by 0320 had foundered. KASUMI was crippled; but it was SHIRANUHI that nearly nailed their assailant with a torpedo salvo in turn and started to get underway, only to have her bow blown off by GROWLER's last torpedo. Because of this fortunate hit, the submarine escaped and survived this brilliant attack.
The wreck of the ARARE was located in June 2007. Side-scan revealed the destroyer's torpedo tubes did not explode and break the ship in two as might have been surmised from the sinking report. Instead, it appears No.2 boiler exploded, buckling the hull, and the destroyer literally jacknifed and sank in situ. The torpedo mounts were intact but the hull was jacknifed at the location of No.1 torpedo mount and literally both parts folded like a switchblade half-open lying on the sea floor. The stern section lies along a line facing north-to-southerly, with the bow section folded over to its starboard side and facing back northwest.

The wreck of the Asagumo was the first to be surveyed by RV PETREL in the November 2017 Paul Allen Group expedition led by Robert Kraft in partnership with National Museum of the Phillipines to Surigao Strait battlefield. The destroyer lies upright with a slight list to starboard, buried in the seabed deeper than the former waterline. The bridge is remarkably intact, and plainly visible are the distinctive `ping pong padde' shaped pads of the radar-detectors. Somewhat surprisingly, the No.1 turret is still present but bent vertical and turned to port side and simply sticking out of the bottom indicating that the point the bow as severed was directly under the mount just as the brief survivor reports described. Also of interest is the torpedo tubes are turned outboard and empty, having apparently been fired. The aft turret is trained to port and there appears to be a gash in the fantail weather deck behind but it is still attached.
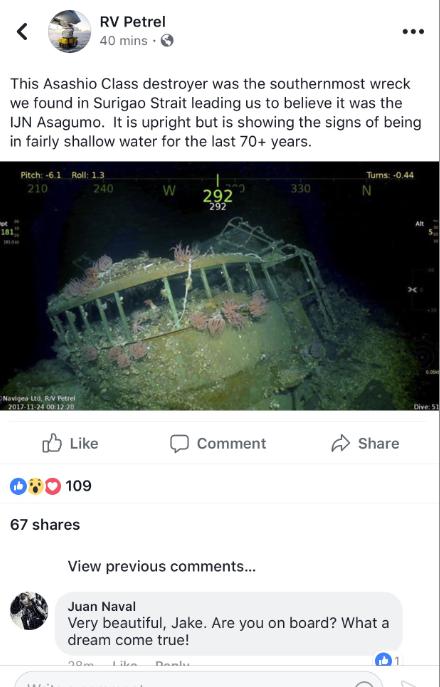
The same expedition by Dr. Ballard and the National Geographic Society that found the KIRISHIMA also found in late July 1992 in some 700 meters of water two sunken Japanese destroyers associated with the battle. One was clearly identified as YUDACHI, the other with only slightly less certainty as the AYANAMI, though AKATSUKI was a long-shot alternative. Though at the time only "officially" uncertain, it was clear to the expedition historian Charles Haberlein beyond any reasonable doubt even then the Japanese destroyer wreck located was the AYANAMI and not the AKATSUKI. The historical record and location were almost decisive alone. The destroyer surveyed on July 28, 1992 is in a strange "two angle" configuration. This is because at the break of the hull abaft the bridge, the ship's hull and back is literally broken, so that the forepart lies twisted and lying on its starboard side, while the rest of the destroyer is upright. Though Japanese accounts slightly conflict on whether an induced explosion or a scuttling torpedo from URANAMI ultimately sank the AYANAMI, they agree on the location of the event: just abaft the bridge, which corresponds exactly with what was found, hull-breaking damage resembling a starboard torpedo hit.
Incidentally, these details of the wreck orientation further militate against the AKATSUKI possibility. The AKATSUKI's survivors reported that when the destroyer foundered it had heeled increasingly to port until it lay over on its side, then the bow raised and she slipped under stern first.{Curiously, the painting of AKATSUKI made for the expedition book does not follow this testimony and instead shows her down at the bow, perhaps for dramatic license}. Though she may have corrected her descent, this would lead one to expect to find AKATSUKI on her port side or upright, or even upside down, but in any case not jacknifed and partially laying on her starboard side. That the wreck is AYANAMI is scarcely to be doubted but there is a further irony on on the identity question. If the destroyers just had different first letters it would be settled already -- for the first cursive letter "A" in Hiragana still survives on the wreck's stern, more than 50 years later. Of course, since AKATSUKI had the same first letter, even that isn't enough!
As for the wreck's features, the No.1 turret points straight into the sea floor since about 90 degree starboard train and the bow is lying on its starboard side. The forward torpedo mount is somewhat shattered, apparently by shell-fire, but the aft torpedo battery is in good condition though corrosion and possibly battle damage has eroded portions of the canopy over the control wheels. Both tube mounts are trained in-line. No.2 turret is aimed somewhat askew toward the starboard quarter while No.3 is trained to starboard. Significantly, the stacks and bridge superstructure are just gone, leveled. A cursory impression is that AYANAMI took most of its shellfire damage forward and amidships.
The explorations conducted by Robert Ballard for National Geographic in the 1990's pre-dated the era of FaceBook so there is no live site or blog to go review the imagery as in contemporary expeditions. It is necessary to seek out the associated coffee-table books and videos. Fortunately, they are available on amazon.com and are highly recommended. See the Wreck Entry for Destroyer YUDACHI below for more details.
Invariably accounts use terms like "immediately exploded and sank." But these are simply false. FUBUKI's demise was closer to FURUTAKA's; i.e, a progressive foundering from accumulated damage and coming to rest on the seafloor upright. The fairly high number of survivors (119) had already hinted at the fact the sinking was something far less violent than a disastrous explosion. Then confirmation came in 2015.
The wreck of FUBUKI was located and filmed in January 2015 and filmed by an ROV dive from Microsoft co-founder Paul G. Allen's M/Y OCTOPUS of Vulcan, Inc. The wreck actually stands upright and is more or less intact as far as its length goes. She rests more or less upright, with a little bit of starboard list. FUBUKI's entire after deck from No.2 turret aft to a point just in front of the depth charge racks (where the normal height resumes) has "subsided" between the sides of the hull -- USS ARIZONA-like -- and presents a strange appearance. The bridge is totally demolished--definitely by repeated shellfire for the damage is too severe to be a process of the descent to the bottom. It resembles a pile of scrap metal loaded onto the hull between the intact forward turret and the twisted No.1 torpedo tube. The stacks are leveled as well. All three Torpedo Tube mounts are still in place, but exhibit shell hits, with No.1 the worst damaged, half-bent up from its base. Turrets No.2 and No.3 are trained aft and either did not get into the action or were firing over the stern. The No.1 gun is trained aft to starboard and clearly was in action.
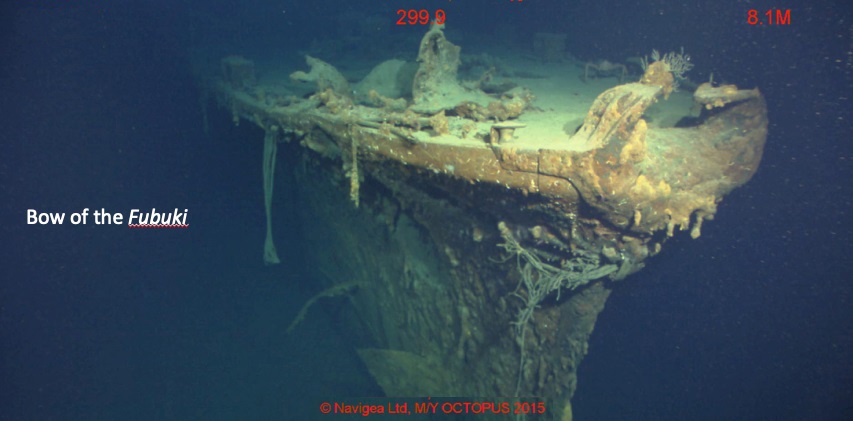
The destroyer FUMIZUKI had suffered damage forward from near-miss bombs while between Rabaul and Kavieng at the start of 1944. On 6 February she came to Truk for repairs and was unlucky enough to still be there when the great TF 58 carrier raid hit on 17 February. She was caught with her starboard engine inoperable and could only slowly maneuver and fight in the confined waters. Still only one direct hit was received, but it flooded the remaining port engine and No.2 and No.3 boiler rooms. Near-misses aggravated the damage. FUMIZUKI went dead in the water and was left in a sinking condition with stern coming awash and listing heavily to port.
FUMIZUKI foundered shortly before sunrise the next day even before the second day of attacks began on Truk. She sank in about 40 meters of water. There she lay for four decades. In April 1987 the FUMIZUKI was discovered due to the efforts of Japanese writer and diving enthusiast Yoshimura Tomoyuki. The FUMIZUKI was found in 130 feet of water, resting upright but with a 25 degree list to port. The stern and deck there are buckled, apparently from impact with the sea floor, and the forward stack is missing. The forward triple torpedo mount is intact. The aft torpedo tube has been removed, and bomb damage that sank the ship is visible there. Of interest the "the searchlight is not mounted aft of amidships where it is supposed to be; in its place are bomb-like projectiles in racks." This is yet another reminder of how wrecks can sometimes inform and if need-be correct the historical record in details small and large.
Note: For more details, the reader is encouraged to consult "WW II Wrecks of the Kwajalein and Truk Atolls" by Dan E. Bailey. North Valley Diver Publications, Redding, CA, 1992. Koke Printing Co. ISBN 0-911615-05-9

The abandoned destroyer drifted slowly eastward in Ormoc Bay before finally sinking at 1930 hours. Even before she sank, HAMAMANI is known to have had her bow blown off from the base of No.1 turret forward with what remained of the foredeck including the turret slanting down into the sea. She remained underway after this till further attacks brought her to a halt. The ASASHIMO came alongside around noon and removed survivors, then left the wreck to drift. About two hours after SHIMAKAZE exploded and sank the HAMANAMI foundered near Ponson Island. The wreck landed on the bottom upright and as expected, the forward portion is missing.
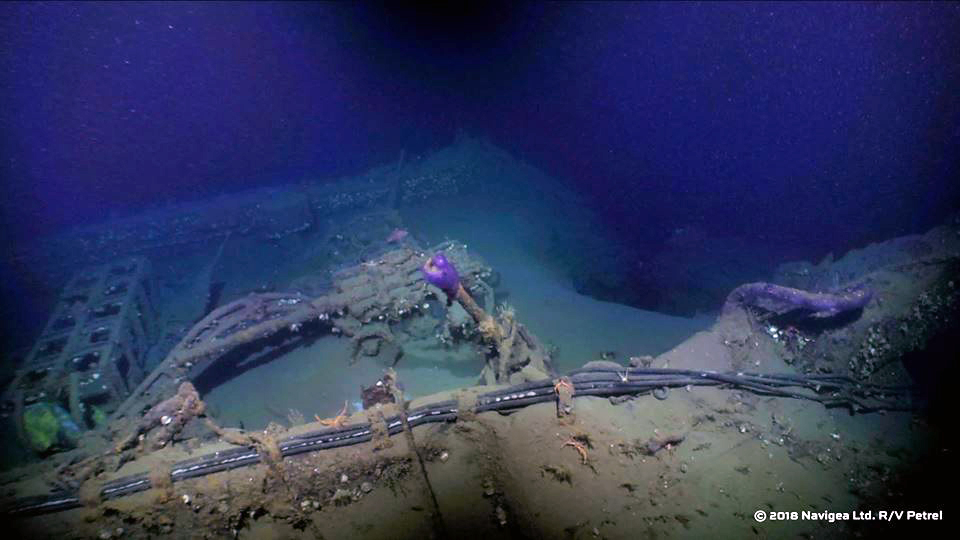
Of three warships sunk inside the breakwater during the large TF 38 air-raid on Manila on November 13 1944 the HATSUHARU formed the center of a rough diagonal formed by cruiser KISO, HATSUHARU, and OKINAMI. The first wave in the morning left HATSUHARU burning and riddled with holes from direct hits and near-misses. There was some flooding forward, but Nos. 1 and 2.Boiler rooms were completely flooded. Though No.3 boiler room remained dry, the engine room was also flooded. Water continued to flow in through the seemingly collandered hull in several places. Despite the efforts of pumpping and damage HATSUHARU settled slowly to the bottom over the ensuing night inside the quay within Manila Harbor proper. At 1443 the 14th the last of her crew left her. Above one of the deeper portions of the enclosure HATSUHARU continued to subside upright until the weather deck was completely submerged and only a portion of the superstructure, gun turrets and stacks above water. The wreck sat on the bottom with a slight starboard list.
The position was only a few hundred meters ahead and to port of the also sunk OKINAMI and near the likewise bottomed cruiser KISO. As the wreck kept settling deeper the Japanese soon wrote off any further attempts at salvage work. By the time of the fall of Manila only the barrels of No1. turret, some miscellaneous superstructure including the port AA platform, the No.2 stack, and mainmast projected above water. HATSUHARU sat deeper and more inaccessible than the nearby OKINAMI and KISO whose main decks remained just below the surface and at times merely awash. Unlike those two, nothing is known of the `when' and agency of HATSUHARU's salvage and removal but presumably it was in the same time frame.

Destroyer HAYASHIMO was a member Desdiv 2 of Kurita's Fleet at Leyte Gulf, and had a rather protracted and star-crossed adventure as she sought to escape from the Battle of Samar with the other ships. With her forepeak collapsed by a torpedo hit in the port bow on October 26, 1944 while in Tablas Strait, she steered to a temporary anchorage in a cove off Semirara, only to be further damaged and bottomed there by subsequent attacks, the next day and even afterward. Two destroyers trying to rescue her -- FUJINAMI and SHIRANUHI -- were also sunk. * As late as April-May 1946 her wreck was in position sunk upright with a slight list to port to the main deck level amidships, with fantail submerged to the top of No.3 turret. After that, her wreck disappears from the written and photograph record. Though the wreck was thoroughly inspected by U.S. Naval technical teams and probably various equipment removed there is no mention of post-war recovery. Though it seems scarcely likely that such a prominent wreck would have remained all these years, there has been mention more than once of an unsalvaged Japanese wreck in shallow water (now just beneath the surface) off Semirara Island, that has been settling ever deeper over the years. The mentions are little more than anecdotal evidence given in passing by locals and divers of the Mindoro area. It is just possible that this is indeed, HAYASHIMO, but remains unconfirmed. In any case, if this is true, identification should prove very simple - a Yugumo-class in the right location with forecastle damage that could be matched to any remains.
Addendum: January 2019 a Japanese discussion thread explored the question of HAYASHIMO and confirmed that the shell of the lower part of the main wreck minus any upper decks surprisingly appears to still be where it first grounded/sank in the lee of Dalit Island, Semirara Bay (Ilogao Bay). This is a fortunate survival because it has now allowed clarification of the setting of the events of 27 October 1944 off Mindoro.
Along with the KISARAGI sunk only an hour later, the KAMIKAZE-class destroyer HAYATE shared the dubious distinction of being the first IJN surface warships lost in the Pacific War when she was hit by shore batteres during shelling of Wake Island on the morning of December 11, 1941 and then exploded and sank. (The KISARAGI followed just a little later; victim of an aerial bomb.)
The bombardment force had made a run and just made a turn to port and was heading west along the southern coast of Wilke's Island shore for another closer in when U.S. Marine Battery L's 5"/51 caliber gun opened fire. At 0652 on just its second shot an impact on the target destroyer caused such a huge explosion that "the whole back of the ship blew off" and when the smoke lifted a bit HAYATE was broken in two and sinking; and had disappeared within two minutes. The shore batteries switched fire to the others, and both OITE and YAYOI tooks hits. There was just time to rescue one HAYATE survivor before the ships hastily opened distance, and if there were any more survivors (none were observed) they were not rescued. Without crew testimony, it can only be speculated that the 5-inch round detonated HAYATE's aft torpedo tube mounts. The depth charges seem less likely to have broken the ship in half in the middle. The impression given the Japanese is one of total destruction, and there is little indication any thought of search for the wreck, let alone salvage, was given even after Wake Island fell. As far as known, no attempt was made to locate HAYATE till the second decade of this century.
At this point it should be mentioned that for a while the impression had been given in 1970's sources that HAYATE not only had been sunk in a less devasated state than the above account implied, but that the wreck had been salvaged by 1944. Yet the picture had always seemed `off' and certain elements not quite correct and hard to square with either the circumstances or the Wake Island location. In fact, this photograph was a red-herring. A mis-captioned subject.
It was none other than a founding contributor to Combined Fleet Allyn Nevitt that in 1982 demonstrated in a letter to Warship International No.2 in 1982, p 107-109 that this was not the case. Once presented, all the inconsistencies resovled themselves: the shoreline that didn't match Wake Island, the more or less intact condition of the main hull, the date of the supposed salvage, and even the lack of survivors, etc. The simple answer was, it was not HAYATE.

By August 2016 when NOAA using the OKEANOS EXPLORER made a concerted effort to locate the HAYATE's wreck for real the above identity confusion's clarification was well known to the parties involved, including this writer who participated as a consulting historian observing live ROV feed during the project. An intact wreck was hardly expected. The search for HAYATE took place as part of a larger exploration of the uncharted deep-sea ecosystems and ocean around the Wake Atoll Unit of the Pacific Remote Islands Marine National Monument from July 27- August 19, 2016.
The best evidence put HAYATE anywhere from 4,000 yards (U.S) 5,200 meters (as the Japanese had it) of the eastern shore of Wilkes Island two odd miles southwest of Wake Island itself. The dive for HAYATE began in the second week of August. At 4:22pm central U.S. time August 10, 2016 * there came a special moment: the ghostly prow of a what appeared to be a Japanese ship came into view. However, by 5pm it was clear that while indeed Japanese, it was not HAYATE. It turned out to be an interesting wreck in its own right and at first there was belief it might well be one of the patrol boats that were converted destroyers, such as PB-33. It was about an hour before it was conclusively identified instead as the water tanker AMAKUSA MARU No.1. which had been torpedoed and sunk the morning of December 24, 1942 by USS TRITON (SS-201) just after arriving and anchoring off Wilkes Island. The way the wreck sat almost undetected until the ROV was nearly atop it is instructive for why HAYATE ultimately was not found. The backup target locales proved to be natural formations. Though a thorough search had been made of the likely area, the bottom conditions were extremely favorable for concealing a ship. There were numerous tall projections of large carbonate rocks from the sea floor forming something of an underwater maze-effect. HAYATE could well wait inside one of these troughs and was missed. Or the sinking locations simply are not close to correct.
As of mid 2023 HAYATE remains undiscovered (as does KISARAGI.) Theoretically, HAYATE could lie anywhere within the range of a 5"/51 battery in a spot in the ocean southerly of Wilkes Island and all that area must be considered a possible search zone now that the most likely positions have been exhausted. On the other hand, the exceptional state of preservation and visibility encountered with AMAKUSA MARU No.1 would indicate that a future new ROV attempt would be worth the effort. Perhaps it could also seek KISARAGI.

After the end of the war and serving a year on repatriation duty HIBIKI was turned over to the Soviet Union and sailing from Sasebo arrived at Nakhodoka, Siberia on 7 July 1947 as reparations. That day the ship was assigned to Vladivostok. There was still a reduced Japanese crew aboard and there they sought for a short time to instruct the new Soviet owners in operating the ship. She was then re-named VERNYY (Or another source says "PRITKY" but the clue is it is the Russian word for `reliable' or `faithful' and VERNYY seems correct and is how Russian sources list her) However, HIBIKI had her turrets and tubes all removed during repatriation service and was in a very denuded state. It would be necessary for the Soviets to re-arm and re-equip her. An additional complication was the relative unfamiarity with her steam turbines. With only modest modifications and changes possible the ex-HIBIKI was quickly downgraded one year later to status of a training ship and in July 1948 re-named again `DECEMBRIST' after an old faction of the Revolution. However even full adaption to this role proved beyond the Soviet resources available at the time and the the `DECEMBRIST' Ex-HIBIKI instead served as a target and target towing ship till February 1953 for the Soviet Far Eastern Fleet. Then it was laid up and all but forgotten at Vladivostok (probably serving as a barracks ship) for a decade or more. It is generally believed ex-HIBIKI was then scrapped around 1962/1963. But like many early reports, sometimes little more than rumors, during the Soviet era, this is not the literal case.
This assumption seems to have grown out of the fact that DECEMBRIST was de-commissioned on 20 February 1953 for `disposal'. This seems to have gotten somewhat conflated with the fact that in 1962 (another says the more general "1970's" though the interval from 1953-1962 seems more persuasive) it was then towed out to sea from Vladivostok, Primorsky Oblast, Russia and sunk as a target ship off the remote and small Karamzina Island nearby. This was an established military zone routinely used for target practice and such was the fate of VERNYY the Ex-HIBIKI. As for the agents, the sinking was done by Soviet naval or air forces (sources conflict here too). Following the Russian disposal, the ex-HIBIKI settled to the bottom to a peaceful rest on her starboard side. Today she is a popular dive site. On clear days of the water, the details of the wreck are very visible. However much of the shell plating has caved in and worn away, and it is sometimes hard to tell which gaping opening was a product of the target-ship hits or the passage of time.
The wreck rests on its starboard side at an angle with the bow in deeper water at 26 meters and the stern only 6 meters below the water and closest to shore. The hull has severely eroded and much of the familiar superstructure is gone. This has revealed the boilers and turbines. These are actually of great interest because they were never replaced during the Soviet era and are the original Japanese installations. The original (or at least last wartime) steam turbines and boilers. It is an interesting if not particulary warm dive, said to average 18 degrees Celsius generally when dived and dropping to Zero in winter.
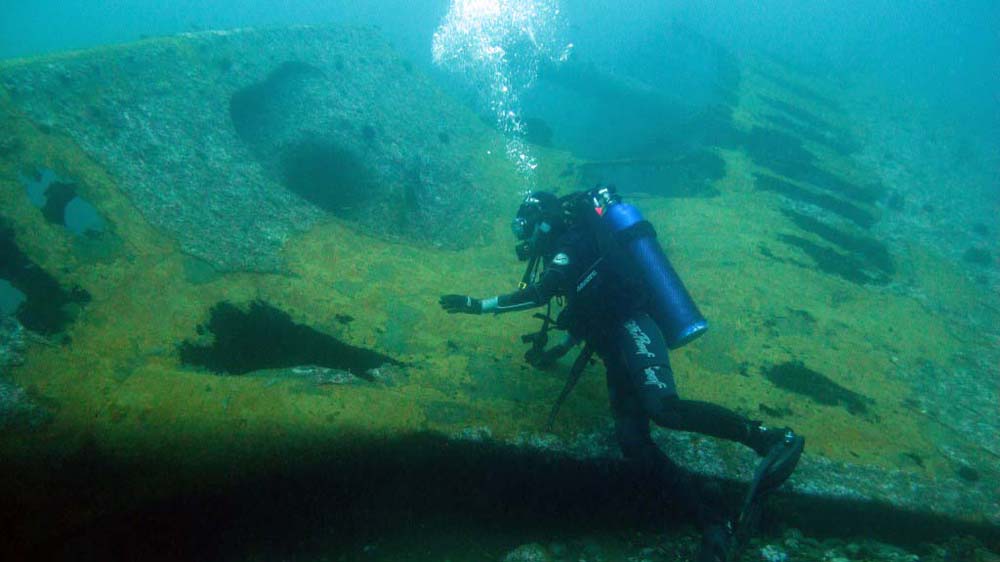
This Hibiki wreck link of Sankei News in April 2023 has a real nice set of pictures of the wreck as it appears today. Compare the eroded bow with the picture above at least five years or more in the past.
Some nice pictures also here from ww2wrecks
The Fukuda Salvage and Marine Works announced they had found the wreck of the ISOKAZE at a depth of approximately 450 meters. Almost nothing is known of its condition, but the one image released clearly shows a torpedo tube mount which somewhat implies the wreck is upright on the bottom. It is probably the No.2 TT mount since the forward torpedo mount was targeted by shellfire during the scuttling. From experience with similar wrecks, in view of the explosion that sank her the possibility that it is only the after-part of the destroyer should be left open. Apparently the wreck had been photographed in May of 2016. Other than YAMATO herself, it is the only warship of the Last Sortie affirmed to have been located and filmed.
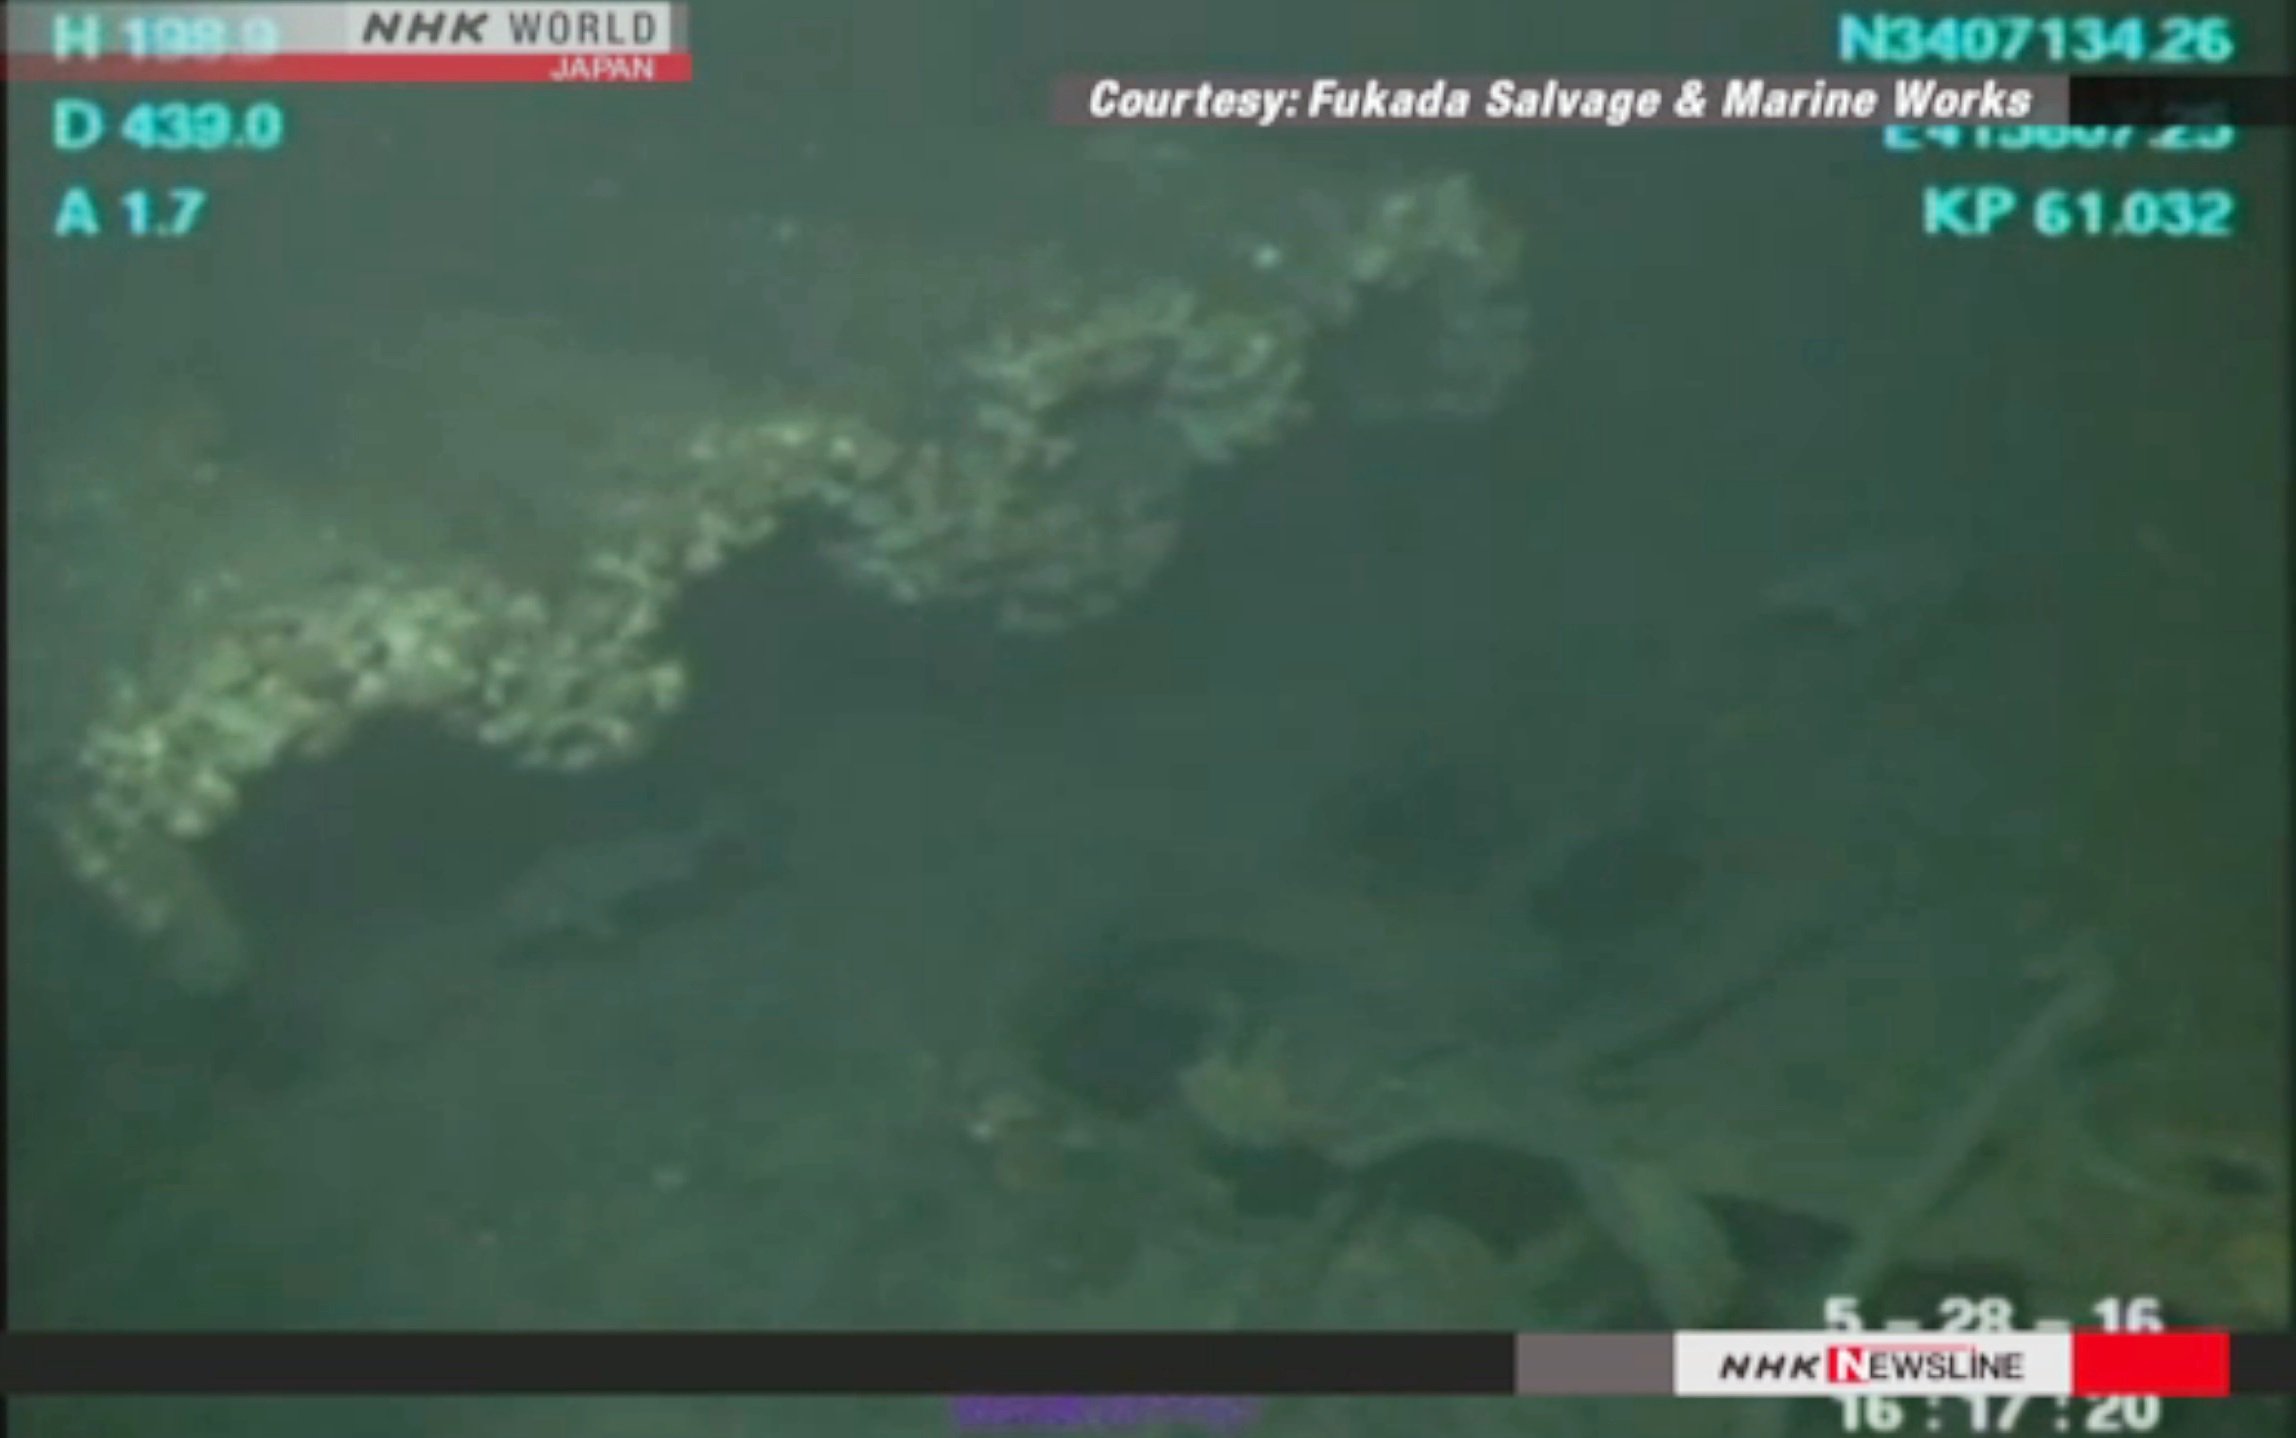
The KIKUZUKI was sunk during the preliminaries of the Battle of the Coral Sea and happened to be sunk at the future site of some of the most ferocious naval battles to come, Namely: Guadalcanal. Since the wreck is still there and is one of the most photographed both in salvage and over the years the lack of pictorial documentation may surprise. This is because the data is so abundant yet complex KIKUZUKI's wreck merits its own separate page that is in preparation. What follows then is just the broad picture as originally posted on this page.
Hit by torpedo in the engine room from planes of USS YORKTOWN (CV-5) on 4 May 1942 while covering the invasion of Tulagi. It was the prelude to the Battle of Coral Sea, and while subchaster TOSHI MARU No.3 managed to beach KIKUZUKI on Gavutu Island, the Japanese were unable to give full attention to salvage. Before they could make her sufficiently watertight, KIKUZUKI slid back into the sea and sank on 5 May. For a while the wreck was forgotten, but in 1943 after the fall of Guadalcanal to the Americans, salvage teams from USS PROMETHEUS raised the KIKUZUKI and got her back on the beach. The wreck thereafter has a complicated history, which because of the confusion it often causes, is worth outlining in sequence.
In mid-1943 KIKUZUKI was raised by the U.S. Navy and towed to Ngelle Sule (Big Gela Island) and beached in Tokio Bay on the south shore of Tulagi Island. There intelligence teams studied the ship and its fittings for more than a year. A photograph of 11 June 1944 shows the KIZUZUKI wreck beached on an even keel, bow facing shore, but stern down with the quarterdeck and main deck abaft amidships awash. (This is the photo discussed below as often mis-identified as the wreck of HAYATE sunk off Wake Island).
Later, in 1944, after the intel study was completed, apparently in December 1944 the wreck was moved to Purvis Bay, and positioned with stern facing the shoreline and allowed to settle there. At the time she was on even keel with fantail awash, stacks and bridge still in place.
The wreck remained there long after the war, and indeed, if some color pictures seen indicate they were taken recently, the KIKUZUKI may yet be there still. In any case, she is no longer on the bottom, but sat upright in shallow water with main deck clear and both stacks still in place. Whether or not she has been broken up as of this date (2009) is unknown, but the KIKUZUKI has figured in an interesting drama of identity confusion. A picture of her wreck was often identified as the HAYATE (for example in A.J. Watt's "Japanese Warships of WW II" published in 1973) , sunk during the invasion of Wake Island in December 1941, but this never really fit the facts of HAYATE's explosive demise. The mystery was put to rest by noted IJN destroyer enthusiast Allyn Nevitt in a letter to Warship International No.2 in 1982, p 107. Having with others ruled out such choices as NAGATSUKI, Mr. Nevitt showed that the oft-anonymous or mislabeled wreck was KIKUZUKI. (See HAYATE shipwreck entry above)
Addendum: After first posting this page in May 2003, I have received no less than three updates from readers on the KIKUZUKI in particular, and they shed great light on the ravages to the wreck over time, while once more returning some mystery to the wreck site. The photos agree with the descriptions that KIKUZUKI likes sunken with fore-part canted over to starboard with only a portion of her port main deck and forecastle above water. It is an extreme state of ruin, and could easily perplex those unaware of the wreck's past.
Michael Slater gave this vivid description: "I visited Guadalcanal last August [2002] and saw her sitting upright in shallow water in a channel between two of the Florida Islands. She is still there. Her superstructure is long gone and the deck lies only a foot or so above water. Two of her 4.7" (?) guns are lying on the remains of her deck. One large crocodile was resting on her stern. A few miles distant lies the remains of the bow section of a USN LST [LST 342]. From what I gathered from a survivor's story, the LST was sunk during an action off the Russell Islands in mid-43. The bow section remained afloat and was towed to Tulagi to serve as a Fleet Post Office for the rest of the war."
Kevin Denlay reports: "She is still there, in a backwater on Florida Island (Ngella Sulle). Very little of her remains above water although if you want to brave the crocodile infested mangrove swamps that surround her (well not quite 'infested' but there are crocs around there and you certainly wouldn't want to go swimming near her!) then you can pull a dinghy alongside her and walk around on her deck - that is if you don't fall through the rusty deck! She is not where she was initially beached, and cannot be seen from the ocean, and must have been towed in there many years ago, as I first saw here there in 1993 (and it looked like she had been there forever then.) How she got where she is now is a bit of a mystery to me actually as I cant imagine it being deep enough to sail her up the inlet to get her in there now..."
Steve Athanas has sent and kindly granted permission to use this photograph of KIKUZUKI, taken on 10 August, 1993. (Coincidentally and usefully, it is thefore from the same year as Kevin Denlay first saw her as related above.). Notice that the fore part appears to be twisted over to starboard, whereas the main part of the wreck is nearly upright astern of it. However, this is an illusion. Other photos show that what has really happened is the hulk has so rotted that the upper part of the forecastle has simply sheared off the hull and toppled to starboard. What looks like a junk lighter off the port bow is in fact the lower part of the hull!
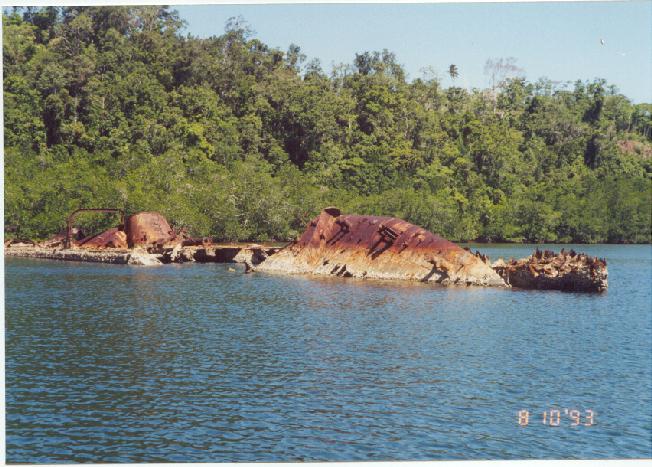
On May 19, 2002 during Robert Ballard's search for PT 109 in Blackett Strait (he found PT 109 on May 26), the wreck of a destroyer was noted by sonar, and soon after filmed. It was identified as the KUROSHIO, one of three Japanese destroyers sunk in the mining disaster of May 8, 1943.(See Allyn Nevitt's study Destruction of Desdiv 15) Though not described in the associated National Geographic book, the discovery of the wreck and name of the ship is mentioned in the DVD video special of same search. The wreck was in bad condition, highly shattered by the forces that had sunk her. Unfortunately - but understandably (they had barely a week for the search) - the expedition was interested only in using her wreck as a fix for the track of movement of Japanese forces through Blackett Strait, and it seems little time was spent at the wreck. Almost no details were given. However, the brief glimpses of video footage when mated with the historical record of the sinking yield a passable picture. At about 0500 May 8 1943 KUROSHIO struck a mine aft, and was rendered unnavigable then shortly after, while drifting struck one or more mines, one of these exploding her No.2 magazine. By 0506 she had swiftly gone to the bottom, shattered into three parts (and this observed above water).
What the PT 109 search team of Ballard found was a shattered Japanese destroyer, that the historian on the expedition - Dale Ridder - apparently identified as KUROSHIO. The little video is sufficient to confirm massive upper deck and hull damage, and of most interest, that part KUROSHIO settled to the bottom somewhat upright, possibly with a list to port (if interpretation of video is correct). On the other hand, part is on its side. Parts of the wreck are on its side and one or more turrets distinguishable. This is not very surprising considering how fast she sank and apparently in sections. It is not unlikely that the Ballard team found only part of the wreck --- as said before, little interest was shown in her. However, the identification is probably correct, as despite the close proximity of the the three Japanese destroyers involved in the Desdiv 15 disaster, their wrecks ultimately sank at very distinct and separate locations, readily apparent even on a general plot. KAGERO sank westward up the strait, indeed, not far from Plum Pudding Island where Lt.(jg) John F. Kennedy and his shipwrecked crew first landed. The OYASHIO had drifted south, grounding on the reef of Anuin Island on the east side of Ferguson Passage where she keeled over to starboard (it is unclear if it implies part of wreck remained above water); thus only KUROSHIO sank in mid-Blackett Strait where all three struck mines, for she was the one that sank almost immediately. Therefore, on the strength of these correlations, the identification of the wreck as KUROSHIO can be accepted. (And likely, was made on pretty firm grounds not apparent in the National Geographic video).
Naturally, this discovery immediately raises the question --- what happened to the wrecks of OYASHIO and KAGERO? Are they still there? Were they salvaged post-war? At the present, September 2009, that answer is unknown to the author. If anyone has information concerning this, their mail would be welcome.
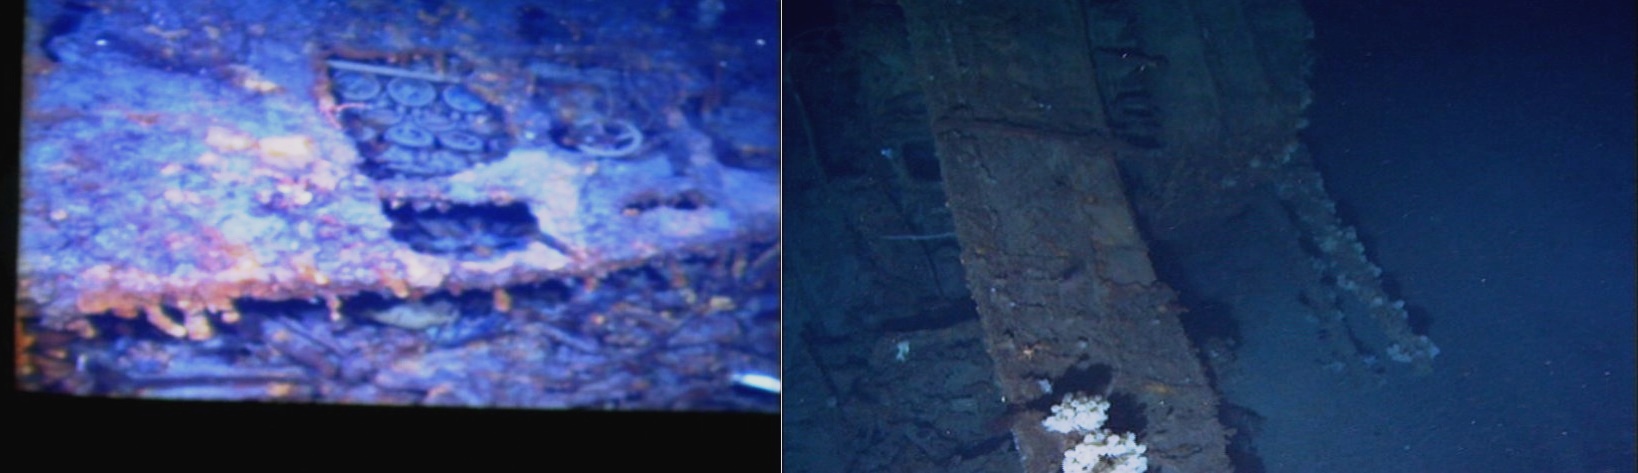
The Matsu-class destroyer Kuwa was sunk around midnight of Dec 2/3 1944 in the violent surface battle of Ormoc Bay when the third echelon of the TA VII reinforcement ran into a U.S. destroyer trio sent to intercept it. The action was as bloody as it was swift -- flagship Kuwa and consort Take raced to defend the convoy, only to for Kuwa be hit repeatedly starting ten minutes after midnight just as Dec 3 began, and apparently going down in flames soon after. In the meantime, destroyer USS Cooper had also been sunk with 191 hands, falling victim to a torpedo hit starboard amidship from one of the Japanese destroyers.
In 2002 a wreck suspected to be the Matsu-class destroyer Kuwa sunk in this Battle of Ormoc Bay on 3 December 1944 was located by renowned diver Robert Lalumerie. On December 15, 2005 a major dive to survey and attempt to confirm the wreck's identity was undertaken by a team of six Hong Kong based divers. A documentary aired on the expedition gives useful details and precious interviews with Japanese survivors. The wreck was found to lie at a depth of 105.12 meters, and somewhat upright, buried in the bottom. The distinctive torpedo tube mount among other features confirmed its identity as a Japanese warship, and its length was the correct length. Moreover, the location was not far from where the U.S. Navy had reported sinking her. A final confirmation seemed to come from the fact the wreck has a welded hull. Though technically identity could not be proven in 2005-2006 and some slight doubts remained among the diving team and their consultants, they really have little cause to doubt their find. It is this writer's firm informed opinion that the wreck is Kuwa, no question, for the other four Japanese destroyers mentioned (the victims of Nov 11, 1944 TA III convoy disaster) do not lie anywhere near there, but rather off Ponson Island. Furthermore, the single torpedo mount is characteristic, and the wreck's position and even how it lies matches the account of a survivor's interrogation the author located in the National Archives. There simply are not any other comparable candidates though the relative neglect of the later Leyte campaign apparently has created this impression. The case is strengthened all the more by the discovery of the other victim of that battle, destroyer USS Cooper at comparable depth and in the correct relation to the Japanese wreck.
From what can be discerned from the documentaries and few images of the wreck from the dive, Kuwa's superstructure lies largely collapsed, and the bridge area and pilothouse all but destroyed. This is consistent with reports that mentioned shell hits on the pilothouse area. The torpedo tube mount is trained out to port, and most significantly, according to Kevin Denlay the torpedo tubes were empty, and that this was one of the details specifically checked. Also, what appeared to be reload torpedoes were found further aft. It is notable that that the 2005 expedition asserts credit for the torpedo hit on USS Cooper to Kuwa - apparently based on survivor's recall. It is more generally credited to her consort Matsu that night, the Take, which certainly fired torpedoes. However, more detailed accounts of Take's own action suggest a possible delay in reaching attack position -- and Cooper was struck very early. This remains under investigation.
According to the interviews of Kuwa survivors, the destroyer than slowly settled with a port list, and nosed under "quietly" to descend to the bottom. Among the few other unusual details cited by the survivors was that Kuwa floated about 1-2 hours after being hit before finally sinking (never before claimed), and that eight survivors were rescued by Transport No.140 as she passed through them and left the bay with the withdrawing convoy. (The No. 140 was indeed with the TA VII Third Echelon, and the citing of this obscure fact goes far to affirm the interviewed Kuwa survivor's (Hirabayashi Takashi) recall. It is worth noting that No. 140 and others departed Ormoc at 0330, so Kuwa had sunk prior to then at the latest.). As far as is known, there have been no follow-up dives since December 2005 to further document the wreck.
On 26-27 November 2017 Vulcan Inc. of Microsoft co-founder Paul G. Allen and his team of researchers aboard RV PETREL in partnership with National Museum of the Phillipines survey the remains of the YAMAGUMO and MICHSIHIO below the surface of the Surigao Strait. The wreck was found at the same latitude west of that of YAMAGUMO, which settles one mystery of her loss. She was indeed hit by torpedo from the west flank U.S. destroyers and foundered from that damage in the first phase of the battle at the same time range (0320-0330) as YAMAGUMO and ASAGUMO, and apparently not again later as far north and late as 0355 by U.S.S. HUTCHINS as conventionally alleged. Japanese indications had always been that she was hit shortly after ASAGUMO, i.e., last of the three destroyers hit and rendered immediately unnavigable, and this fits the evidence. Brought to a halt and swinging right in the current MICHISHIO drifted south and sank soon after hit, landing on the bottom on a west-east heading facing the east shoreline with hull unbroken upright but crumpled over to port. She ended upon the bottom basically two kilometers west of YAMAGUMO's set of remains. The short time drifting south accounts for the interval that MICHISHIO was also hit last and yet ended up at the same latitude. (Incidentally in the limited coverage of the badly deteriorated wrecks that shows a recognizable portion the prominent 5" gun turret laying on its port flank is No.1 turret and belongs to MICHISHIO)

(Pending).
On July 25, 1943 while ARIAKE was standing by attempting to assist in refloating MIKAZUKI both were attacked by fifteen B-25 bombers escorted by P-38s. They claimed seven direct hits on each destroyer. ARIAKE actually received four and sank stern first. MIKAZUKI, hard aground on the reef, couldn't really "sink" but was pounded unmercifully. One by one the B-25s made their runs. A hit forward started a fire on the port side and it appeared to be coming from the torpedo well-deck of "foxhole" forward of the bridge. Another bomb hit the port side of No.2 funnel and left it buckled and crumpled and inflicted severe damage on the hull at this point. Other hits savaged the bridge. Particularly damaging was a direct hit and near-miss both that tore open the port side and flooded the port engine room. But dusk came and she remained manned and attempts to get off the reef resumed.
However MIKAZUKI stayed grounded, and the next day was bombed again. Those still aboard MIKAZUKI abandoned ship after the attack. Because most of the crew had already been taken to shore by ARIAKE (before she herself was sunk) these attacks killed only 8 men and wounded about a dozen.
The wreck remained stranded there. By September and probably earlier the entire forward section snapped between the funnels and began to angle downward slowly starting to slide off the reef into deeper water.
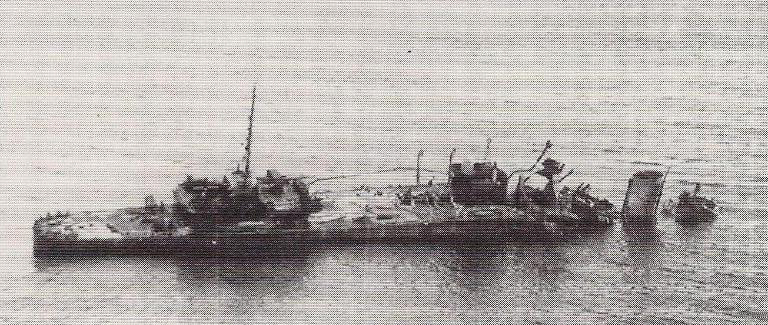
What is known is by the end of 1943 the MIKAZUKI wreck had fully split in two or jacknifed in an inverted ^ direction. The break point was just in front of the former location of the already toppled No.2 funnel; that is, between the stacks. A photograph of 4 September 1943 shows her with No.2 stack gone with back now broken abaft the No.1 stack and the forepart and most of the bridge submerged. Possibly the fore-part was "drooping down" into deep-water while the rear remained on the reef.

A slightly later, likely post-war photograph shows the wreck had undergone considerable degradation. Though the example of KIKUZUKI gives pause, it seems safe to assume the wreck has been removed from the reef off Cape Gloucester by the present.
According to Pacificwrecks.com the MIKAZUKI wreck is still there but badly broken-up. Presumably this means wreckage remains at a shallow level, as it does not appear to be above water.
Note: For the same reason as URANAMI with KINU, the destroyer ARIAKE also lost by grounding at the same time with MIKAZUKI is not discussed here because is not (as far as known) a "found wreck" then or now. For details on her sinking, see ARIAKE's trom.
One of four Japanese destroyers sunk on November 11, 1944 in Ormoc Bay during the disastrous TA-III Operation the NAGANAMI was dived by ROV of RV PETREL also in December 2017. Not surprisingly given the photographic evidence of the attack, NAGANAMI was found at similar latitude as WAKATSUKI and not far from the latter.
NAGANAMI lies more or less upright angled pointed NE but in poor condition and fairly demolished and in three (or more) sections. The forward part leans sharply to port, while there is a section of bow with chain and some deck machinery hanging close by as the cable deck of the forecastle proper has separated or "hinged back" and lies beside it so that the ruined cable deck faces aft.
On the main wreck which is layiing over on its port side behind this "hinge" the number 1 turret is laying on the bottom and has fallen off the front of the ship. As you move aft `the ship splits and goes into a deep crater. The break of the main hull begins between the stacks and the middle portion - which comprises from aft of No.1 torpedo mount (trained to starboard) to nearly the fantail - and has landed in a large hole or crater on the bottom about 30 meters across and 10 meters deep. The segment of wreck here has basically collapsed in on itself and appears as a pile of wreckage obscured by the gloom of the crater. It was thus not actually filmed much.
As the ship starts into the crater the No.1 torpedo tubes are visible and you also see the triple anti-aircraft gun platform. The No.2 and second set of torpedo tubes are just visible as the descent into the crater begins. Finally the aft-most part of the fantail lies outside the crater to the southwest, having snapped at position near the depth charge rack and aft of No.3 turret. Even this portion cuts off and nothing of the extreme stern or rudder was found. (In discussion on Combinedfleet.com RV Petrel explained none of the aft turrets are visible, and presumably lie in the crater as there are no large targets within 100 meters of the known parts of the wreck) The main revelation of the wreck is what appears to be confirmation of damage to the prow that was apparently visible in the last few indistinct pictures as NAGANAMI began to heel to port, settle by the stern and roll over. Incidentally, the wreck also confirms the reliability of the Fukui Shizuo drawings of final AA-armament.
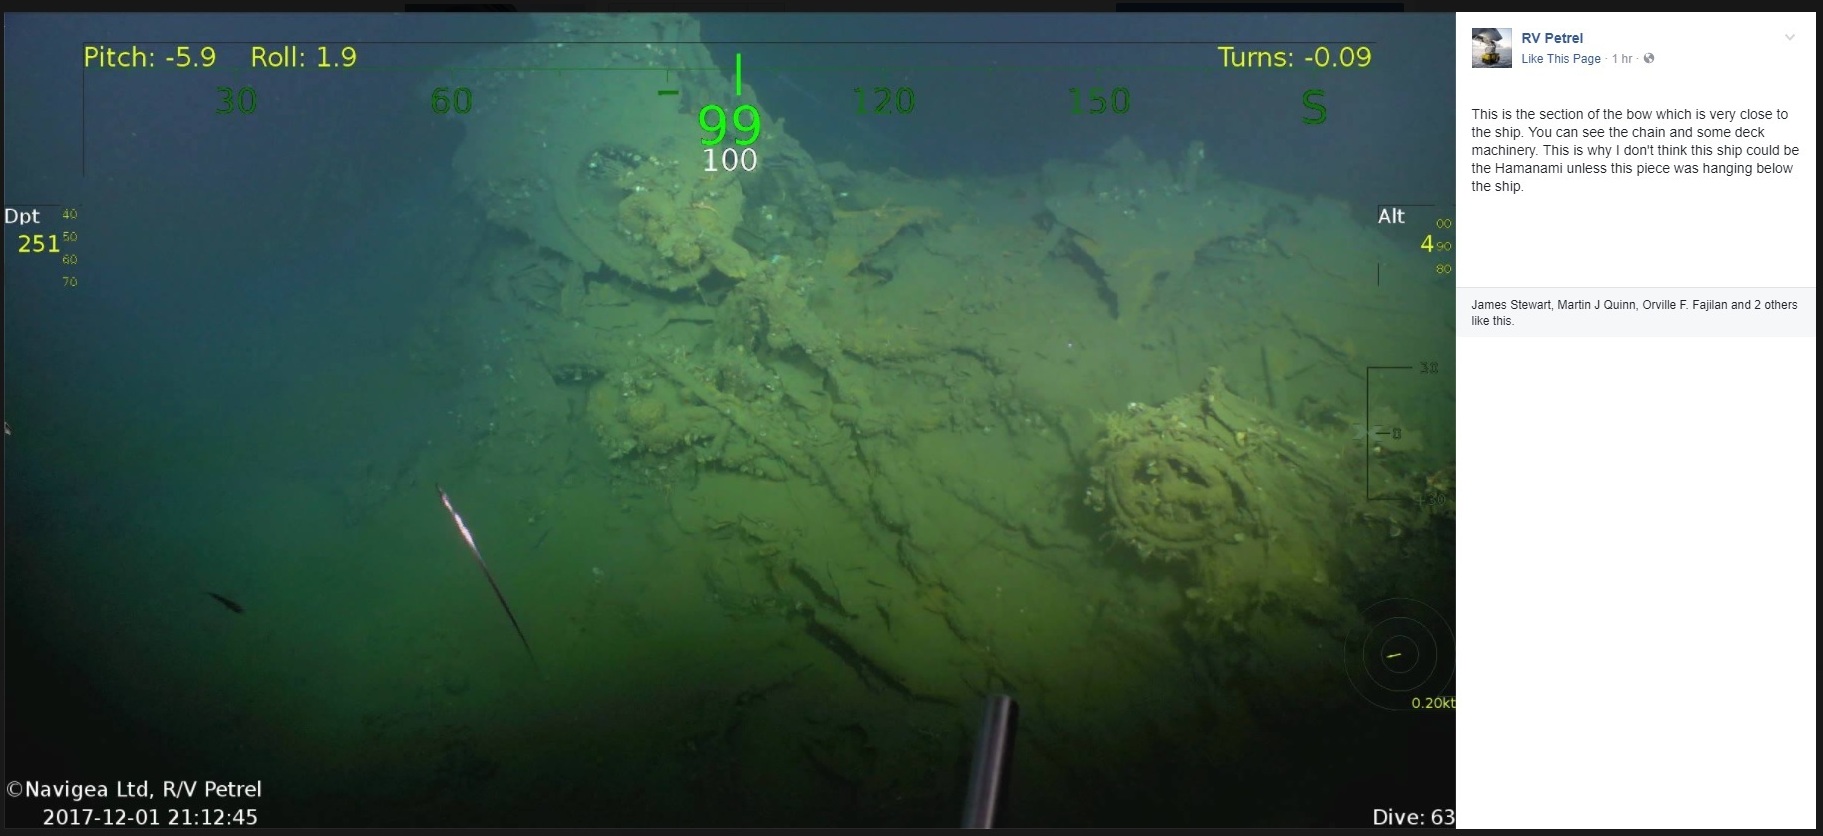
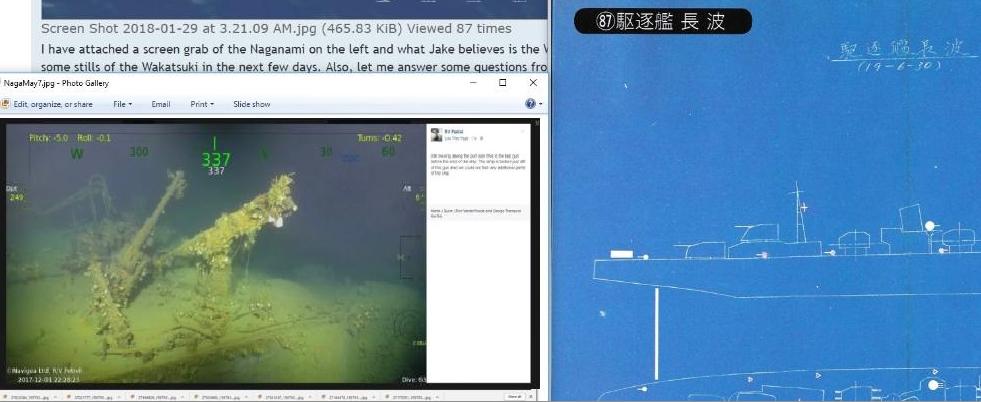
The NAGATSUKI was damaged in the night battle of Kula Gulf on July 5-6, 1944, and while maneuvering to flee the battle ran hard aground on Kolombangara just shy of 1am (Tokyo time) on the southern shore of the entrance just outside of Bambari Harbor (modern MBambare Harbor or Jack Harbor on the southeast of Kolombangara Island) Why did she run aground? U.S. radar tracked a target heading at considerable speed away westward retiring from the battle straight toward Waugh Rock, Kolombangara. Until NIIZUKI's wreck was discovered it seemed this might have been her. Instead, it appears that NAGATSUKI headed straight for Kolombangara's coast, then at Waugh Point wheeled south to parallel the shoreline dangerously close as headed for Vila. This would explain why she ran aground in the manner did. Whatever the truth, Destroyer SATSUKI came to her aid and tried to pull her off, but was unsuccessful. Then daylight brought the almost inevitable air attacks. In fact they came twice that day, around 1000 (local time) from SBDs and early in the afternoon from B-25s from the 42nd Bomb Group. Bomb hits are said to have exploded a magazine and forced abandonment of the vessel. Reportedly all ahead of the bridge was wrecked including No.1 gun and the forward torpedo tube. Fortunately because of NAGATSUKI's current transport duty the reserve torpedos had been offloaded before the mission and its an open question whether the forward mount was loaded. A 500# bomb in the morning strike hit to port of the rear deckhouse and wrecked the No.2 stack; changing the ship's profile.
A very interesting air photo taken during the morning attack on July 6, 1943 showing the grounding location very well in relation to land-mass as viewed from the north is found here on Pacificwrecks.com - Nagatsuki and the site is highly recommended for other wrecks as well.
Though little textual detail has come to light about NAGATSUKI's last fight as yet, the photographic evidence appears solid and clear. Yet somewhat complicating interpretation of damage is the fact the wreck was bombed and strafed more than once again later in July. Instead it is best to speak in terms of how it appeared after July 1943. The wreck was inspected by men from the light cruiser USS MONTPELIER (CL-57) in May 1944. The destroyer remained hard aground and bottomed with an almost even trim and notable list to port. Bombs indeed apparently destroyed the No.2 stack. In addition, the entire forward section of the ship immediately in front of the bridge has (from the later photographs) generally been taken to have been blown off by a direct hit and explosion. Yet this requires a Disclaimer: Close examination of the wreck picture reveals what looks like the extreme forepeak above water after an interval forward -- it is just possible that NAGATSUKI's fore-section is only buckled, but still attached, and the submerged well deck and lower part of the ship forward gives the illusion of being severed? A similar case exists with USS ARIZONA at Pearl Harbor. Perhaps only the forward magazine, and not torpedoes exploded.
On the other hand, it is equally clear in view of the fact the vessel is almost level in trim that the forecastle is now subsided to a level well below where it would be in some views and even looks off-set to port. It is more likely that the forward section is wrenched off and demolished just as reported; but remains roughly in alignment with the main wreck. It has even been pointed out that the remnant visible may not be the prow of the ship, but just the forward continuation of the raised up well deck. In this case, the evidence of the forward magazine having exploded seems likely to be true. This can accord with what Allied pilots observed.


The question is whether such a prominent wreck above water remains in any way partly unsalvaged and a rusting ruin. The remoteness of the area and the example of the KIKUZUKI do raise the possibility NAGATSUKI -- or part of her, remains where she grounded. As far as is known, she was never moved (even if scrapped) from her original grounding position. Satellite imagery is unclear on this point.
However, if Pacificwrecks.com entry is taken at face value, since early 2000's NAGATSUKI is largely removed and far less remains then say, of KIKUZUKI for a contributor posted there the following:
Unfortunately, the website doesn't give the date of this observation. From the context it seems to be post-1999/pre-2006
On April 17, 2019 Vulcan Inc. posted video that RV PETREL had located the wreck of Niizuki in Kula Gulf at 745 meters depth. The wreck lies upright buried in the seabed about to the waterline heading about 20 dg True. The prow is missing its upper decks and the forward part of the ship, the anchor deck, and particularly the starboard bow is demolished by what looks like very large induced explosions. They could be large shells exploding inside or torpedo hits; however, the segment is still attached to the main hull so it seems unlikely the forward magazines exploded per-se. The forward turrets are still approximatley in-situ but No.2 is toppled toward starboard and trained in while No.1 is trained to starboard and the foc'sle deck attachd to bent over less. However, the the bridge is almost entirely leveled and demolished. It looks almost like a giant's foot has stepped on it - giving mute testimony of the hail of 6-inch and 8-inch hits that killed Akiyama and crippled Niizuki early.
However, appearing to confirm the clue that she recovered briefly the aft turrets are trained to starboard around 75 degrees relative to engage and are riddled with shell hits in turn. At first thought to be missing, the torpedo mount is still there. It is simply heavily eroded and encrusted. The torpedo tube mount is trained in, and had not exploded. In fact, it appears to be empty and to be in reload posture, and the indications are that Niizuki had already fired a salvo of torpedoes successfully. This would be in line with doctrine to not open gun-fire until having done so and it is known the flagship had a firm fix on the enemy. The torpedo reload housing is present but heavily eroded. What is clear is that despite the rain of shells the warheads of the torpedoes had not been set off. The fantail is fire damaged and holed, but the rudder and propellers are intact. Though the stack is gone, the AA platforms remain in place showing Niizuki had indeed received the latest upgrades of the class.
Most fatefully of all, by some miracle the foremast still stands proudly in place, having survived both shelling and sinking. It stands almost intact some 22 meters above an otherwise almost leveled forward superstructure. This clearly shows the late rig radar platform and mounting and possibly some remains of the radar itself just linger. Even the mounting pylon that once had the radar mattress attached is present, helping to settle a lingering debate and confirmed Niizuki had an operational Type 21 radar mounted. It is notable the rudder is not jammed hard over and neither it or the two propellers show obvious damage. It is not unlikely Niizuki remained navigable initially from aft after losing helm control from forward. The condition of the wreck matches the last known observations and tends to support the speculation that U.S. destroyer torpedoes abruptly finished Niizuki off not long after her last radio message. (The probability is that one of a destroyer torpedo spreads fired around 0020 and/or 0030 that sank a target hit NIIZUKI in her starboard side and sank her just as she was seeking to follow the others again. See also NAGATSUKI entry.)
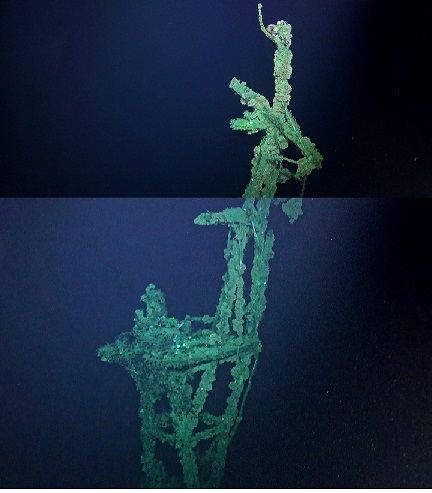
Like destroyer FUMIZUKI the OITE was unlucky enough to be caught at Truk while there for a purpose when the great raid struck. OITE had in fact on February 15 escorted out of Truk the light cruiser AGANO (See TROM), only for the cruiser to be torpedoed and left in a sinking condition the next afternoon by USS SKATE (SS-305). Though the light cruiser NAKA received orders to depart Truk to assist that evening while the OITE stood by that night, the cruiser had sunk before dawn. After rescueing the survivors including AGANO's Commanding Officer, OITE had set about returning to Truk. Since the cruiser sank in the early hours of the 17th the OITE had not reached the environs of Truk till after sunrise the 18th. Here the unfortunate ship was caught by the just breaking attack as she entered through North Pass.
Maneuvering with the speed and agility of a younger ship which impressed the American fliers, the OITE desperately combed one torpedo after another. The fierce strafing killed her skipper Lt. Uono Yasuhiro, but AGANO's Captain Matsuda Takatomo took over and continued the evasions and fight. But there was too many. The end came as OITE had just about finished a complete circle to starboard. Seeing torpedoes to port, the turn was aborted and helm put to port. Too Late. The torpedo struck amidships portside and there was a huge explosion of black and white smoke indicating the boilers were exploding.
When the smoke of the blast cleared OITE was in two sections; the stern sinking almost immediately and the forward part from a mere stump of the No.2 stack and with the No.1 stack pouring smoke settling fast on an even keel with the bow rearing up like a shark. There were only about 20 survivors, which included men from both ships. Like FUMIZUKI, she lay on the bottom for four decades undisturbed. Like the former, OITE's wreck was located largely by the efforts of Yoshimura Tomoyuki.
The remains of the OITE were found in March 1986 in about 200 odd feet of water. Attack photos confirmed she had been blown in half by a torpedo in the port side right after entering North Pass, and sure enough, two sections is what was found, lying 40 feet apart from one another. The bow section is upside down, bridge buried in the mud; the afterpart lies on the bottom upright. Its possible to swim into the inverted forward part of the wreck via the open well-deck for the forward torpedo tubes.
The stern section lies alongside but is angled about 45 degrees from the port side of the bottom up forward section so that the wreck almost forms a two arms of a compass shape. It lies in a somewhat shallower depth, some 180 feet. Grim testimony to the combined loss of life from the destroyer and cruiser AGANO was provided by the human remains scattered all through the wreck. The subsequent recovery of these was one of the principal objects of the search. The wreck is relatively clear of marine growth.(For more details, the reader is encouraged to consult the below:
"WW II Wrecks of the Kwajalein and Truk Atolls" by Dan E. Bailey. North Valley Diver Publications, Redding, CA, 1992. Koke Printing Co. ISBN 0-911615-05-9
In March 2010 an individual who had recently dived the OITE made an interesting contribution to a J-Aircraft.com thread and posted a rough sketch of the wreck site and described details of interest.
OITE wreck discussion-J-Aircraft-March_2010
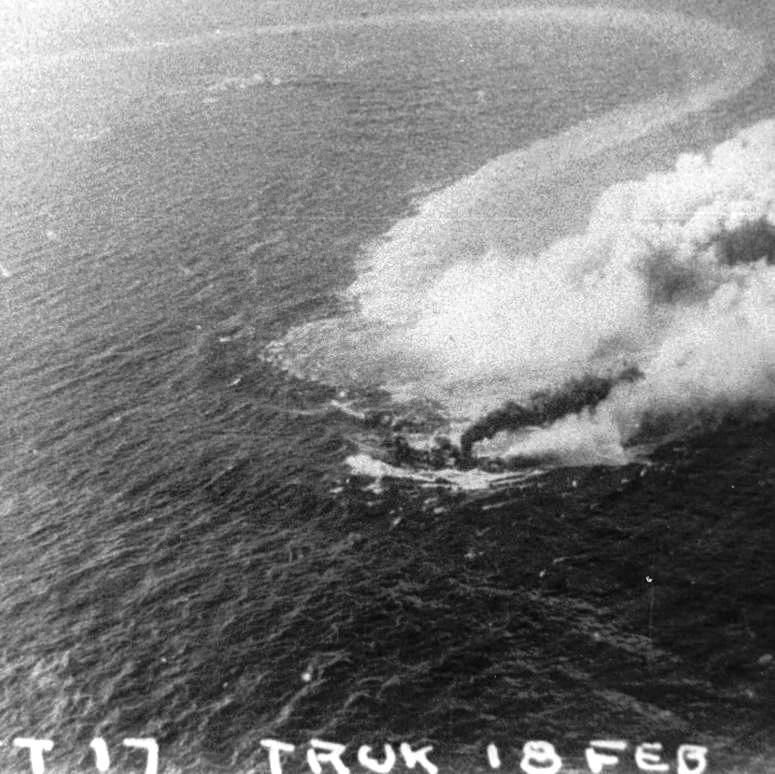
At the time of the large TF 38 air-raid on Manila on November 13 1944 the OKINAMI with cruiser KISO and destroyers USHIO, HATSUHARU, and KASUMI were inside the harbor breakwater. The first wave started a small fire on OKINAMI but KASUMI came alongside to starboard and helped put it out. However the next waves drove KASUMI away. At 1040 a hit in the auxiliary engine room under the mizzenmast knocked out the generators and started another fire. OKINAWA closed to assist; but a third wave at 1330 inflicted killing damage on OKINAMI.
The forward engine room and #2 boiler room were flooded by large bomb blast to starboard which tore a large 3.6 x 2.5 meter hole in the shell. So big was the defect that its forward part warped plates as far forward as #1 boiler room. A direct hit then shattered steam pipes and the steam vented while a fire broke out in #3 boiler room. Though hits were suprisingly few by other near-misses the bow and fantail were holed at the waterline just forward of rudder and at the forepeak. OKINAMI settled inexorably and by the afternoon was on the bottom with stern awash with a 12 degree starboard list. However, she remained manned and at 1830 the fires were all extinguished.
On November 14 during the second day of raids, OKINAMI was again attacked but defended herself and lucked out with no further hits received. Over the ensuing days, important equipment like torpedoes and single moutn machine-guns were removed from the destroyer and put sahore. The last equipment was put ashore on November 29th, 1944. Subsequent to this, in March 1945 before the fall of Manila to MacArthur's forces demolitions charges were placed in the turrets to blast them apart and in other locations and guns spiked to render OKINAMI beyond useful salvage to the enemy.
These measures succeeded in their aim, and after a cursory inspection that managed to recover OKINAMI's historically important Leyte and subsequent action records, the American authorities left her where she was. The post-mortem of OKINAMI's wreck afterward was fairly straight-forward but as the forecastle remained above water level for a time she provided a macabre tourist attraction and stage for posed photographs. She is even seen in classic color film footage of seemingly anonymous wrecks in Manila Harbor. As time passed the wreck settled deeper, but not as much as HATSUHARU (see entry) Her eventual salvage did not take too many years to begin and the images of an almost formless wreck being raised from the Manila Harbor bottom are regularly encountered on the web. This is in fact OKINAMI coming up. This appears to have taken place in 1949. After being raised, the hull was of course scrapped but by whom these actions were done is unknown.

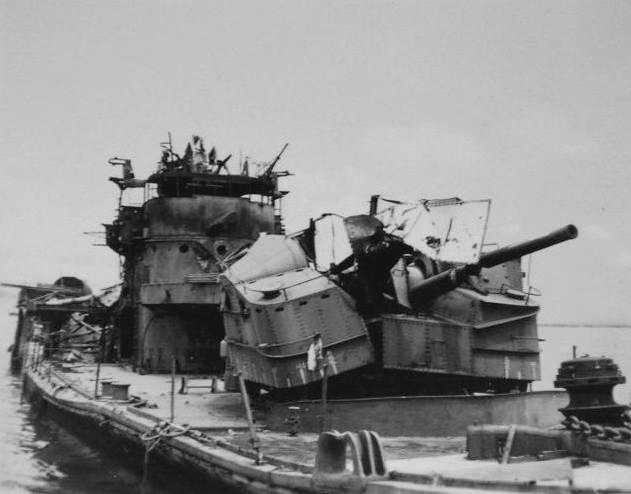
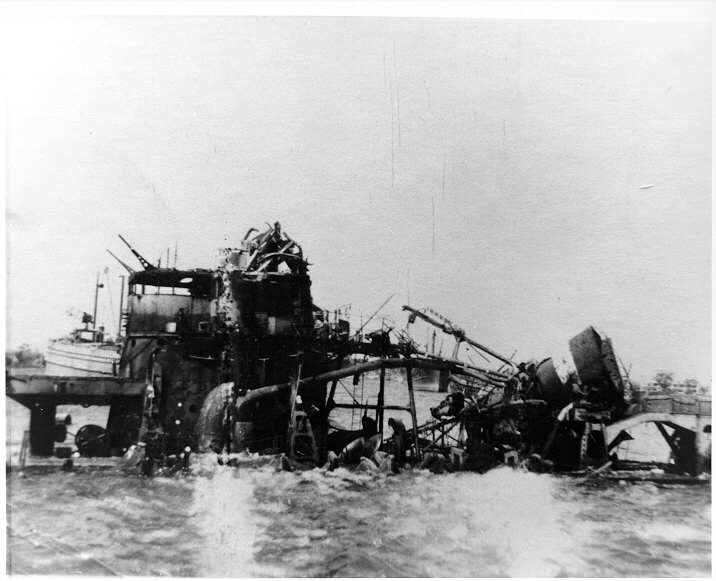
The FUBUKI-class destroyer SAGIRI had an extremely short wartime career, being among three Japanese destroyer losses in the first month of the Pacific War. On Christmas Eve 1941 while supporting Japanese invasion landings there she was torpedoed at 1915 by the Dutch submarine K-XVI off Kuching, Sarawak, Borneo. One torpedo hit the starboard quarter setting off her depth-charges. Raging fires broke out and SAGIRI began to list and settle aft. The fire had reached as far as the rear torpedo mount when came a terrific explosion which severed 7-8 meters of the stern and SAGIRI promptly sank.
[Remark: The Dutch XVI herself was then torpedoed and sunk the next morning in the forenoon by the Japanese submarine I-166. XVI's own blown in half wreck was found by the MV EMPRESS dive team on Oct 4, 2011 and confirmed as such by the Royal Netherlands Navy on October 26th of the same year]
In this century SAGIRI is a well-known dive site, and even advertised by Aquabase Dive Company's Hotel at Kuching, Sarawak of Borneo. It appears in this sense the wreck may be (or was) protected because a tourist attraction. In any case she lies in about 30 meters of water and on her starboard side. Of interest in 2011 it was mentioned that the No.1 turret appears to have loaded rounds in its breeches. This may be consistent with SAGIRI's standing by for possible shore bombardment or air attack. The ship was intact amidships and the torpedo tubes were still in position. This confirms the sinking report which put the damage well aft. At a point just behind the rear turret the stern is completely separated. However, it lays less than 10m/33 feet aft of the main wreck. It does not appear the rear magazines exploded either ---the mortal damage was all the result of the torpedo hit and her depth-charges going off.

(A previous description of SHIGURE's last months here was removed as it turns out nothing is available about her wreck other than the supposed fact that it has been found. That does not meet the desired criteria for inclusion on this page.)
The historical account for those interested has been attached to her TROM in SHIGURE's Notes.
SHIMAKAZE was flagship of the convoy and one of four Japanese destroyers sunk on November 11, 1944 in Ormoc Bay during the disastrous TA-III Operation . Crippled by a combination of rocket and bombs hits the SHIMAKAZE had gone dead in the water and was slowly settling upright when she suddenly exploded and sank in Ormoc Bay late that afternoon after all attacks had ended.
The SHIMAKAZE was found by RV PETREL while searching for USS WARD which had been sunk in the same general central part of the big Ormoc Bay where also lies USS COOPER. This was posted December 15, 2017. The wreck main body lies on its starboard side buried to the near midline. As expected the fantail is blasted and nearly detached from the final explosion that sank her but curiously, it appears the forward section from the bridge on is also severed. It is unclear how close it may lie or when detached. There was no report of a forward explosion when sank. Its worth noting that no torpedo holes were found in the visible port side of the central section. TF 38 reports don't appear to claim any and the bow was still in place in the latest attack photos after SHIMAKAZE apparently left for dead. Enough of the midsection remains to confirm identification for the distinctive arrangement of three of the unique quintuple tube torpedo tube mounts remains visible even though No.3 mount is absent entirely. No.2 is pointed toward the port bow, and No.1 tubes trained abeam to starboard, buried in the mud. The aft two turrets lie toppled upon one another beside the demolished fantail.
New information from diver Kevin Denlay regarding his recent work has contributed the following: The wreck site of the Japanese Akizuki Class destroyer SHIMOTSUKI was originally discovered by Vidar Skoglie / MV EMPRESS on the night of July 6th 2002 using side scan sonar. At the time inclement weather did not allow for dives to be carried out and it wasn't until May 14th 2003 that he could find the time to get back to the site and do one dive to confirm the wreck was actually SHIMOTSUKI. A week later several more dives were conducted in varying conditions and the wreck explored in more detail. SHIMOTSUKI lays well over on her port side in approximately 240 feet of water and although intact amidships has massive damage to hull starboard forward and around the rear main 3.9" gun area and is seemingly missing her very stern. A return exploration was made in September of this same year, and helped confirm or clarify details of anomalies in the wreck observed initially. Of particular interest is the fact that the explosions noted by USS CAVALLA were apparently from gun and powder rooms only. As far as can be determined, the torpedo tube mount remains fixed and more or less intact in its general position. Thus, the condition of the wreck indicates that unlike some of her sisters, the SHIMOTSUKI's torpedoes and their store did not explode. Though the bow area is heavily demolished, the extreme prow remains apparently attached by some buried plating on the port side despite a massive gash-gap forward of No.1 turret and abaft the hawsehole. Though the No.3 turret sits in an odd position on a remnant canted out to port amid and under the wreckage at the end of the wreck, neither No.4 turret or anything clearly belonging to the stern section aft to the fantail was discovered. At present, it is speculated that in accordance with this fact and the evidence of the action report, that SHIMOTSUKI's fantail was severed and lies somewhere further outside the wreck and debris zone.
Author's Note: USS Cavalla's torpedo attack on SHIMOTSUKI and MOMO on 25 November 1944 claimed four torpedo hits on the starboard side of a `cruiser' (SHIMOTSUKI) which exploded violently, appeared to break in two, and sank immediately. The Japanese believed that the havoc was caused by two torpedoes, but it appears that at a minimum, three hit, and probably all four, just as claimed by CAVALLA. The data submitted by Kevin Denlay in response to some queries allows clear matching of at least three torpedo hits, and it may be that a fourth strike indeed took place. Two hits forward, one just under the bridge and the other the starboard bow, exploded those magazines and tore out the whole starboard side forward. A third hit seems to have severed the stern abaft No.3 turret, and the hull also broke at the mainmast. If the last is due to a torpedo hit as seems likely, all four torpedoes fired hit. The accuracy of CAVALLA's record and marksmanship both is remarkable. To date, I still have not confirmed how many survivors if any were rescued, but the number may have been tragically small, as much of the crew was asleep in their bunks at the time. A Japanese website quoting a reliable expert (Endo Akira) gives the figure of only 46 men rescued by MOMO.
One of four Japanese destroyers sunk on November 11, 1944 in Ormoc Bay during the disastrous TA-III Operation the WAKATSUKI was the second one to go down, exploding and sinking after NAGANAMI had capsized off her starboard quarter. Not surprisingly given the photographic evidence of the attack, WAKATSUKI when found was at similar latitude as NAGANAMI and roughly parallel to the latter.
The WAKATSUKI was located during the survey of Ormoc Bay battlefield December 2017 by RV PETREL. Her starboard bow was shattered by one or two torpedoes hits and the destroyer was going down upright when it blew up with a huge explosion that sank her immediately. WAKATSUKI's last moments was so clearly photographed and documented by the attacking aircraft that the wreck arguably obscures the picture and might be misleading. In any case the site gives the impression of simply a long junk-pile comprised of Akizuki-class turrets, davits, and miscellaneous equipment but is otherwise barely recognizable. The wreck lies on the bottom oriented SW-NE and about half of the ship is missing (not unexpected given the explosion photographed just before sank).
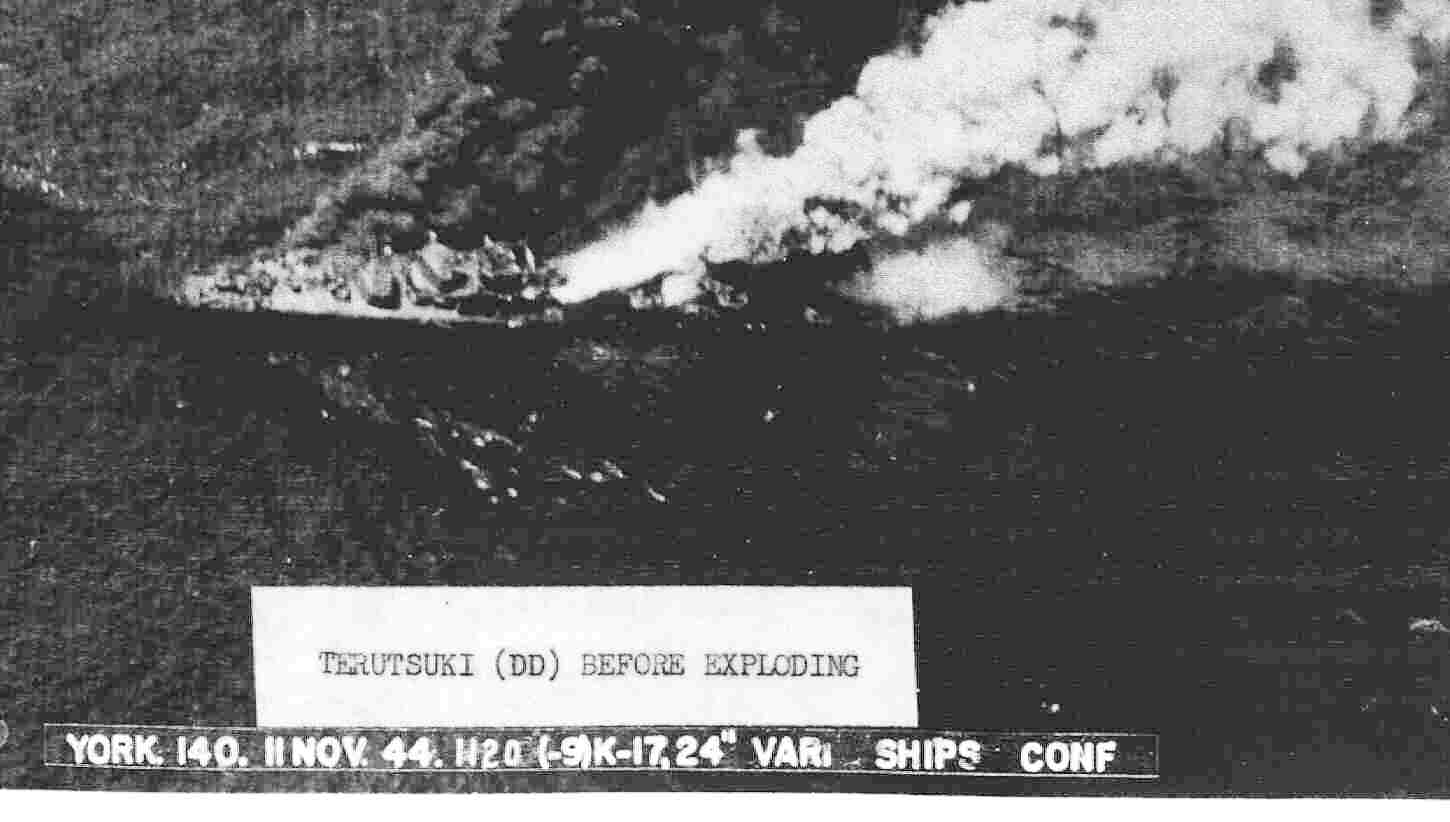
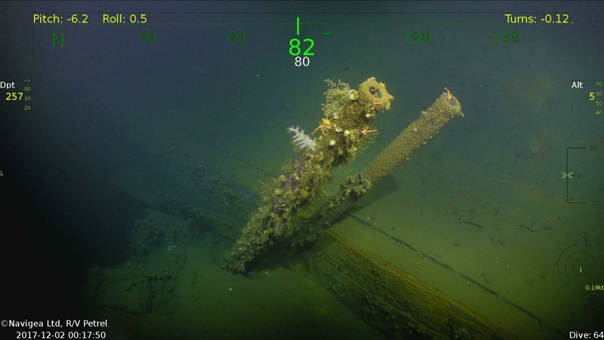
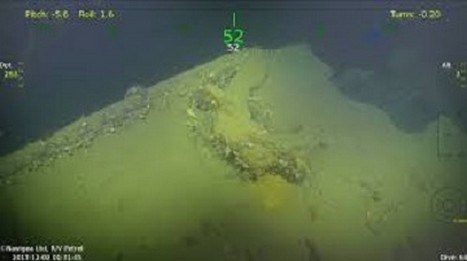
On 26-27 November 2017: Vulcan Inc. of Microsoft co-founder Paul G. Allen and his team of researchers aboard RV PETREL in partnership with National Museum of the Phillipines survey the remains of the YAMAGUMO below the surface of the Surigao Strait. The destroyer was found to be in two completely separate sections close together. A possible third section is likely. Visibility was limited and the wreck is in a very devastated and deteriorated state. However the evidence already reveals that the destroyer's armed torpedoes were apparently the main culprits for the big explosion that demolished the amidships just as reported. Remnants of the base of exploded boilers and other large wreckage lie exposed on the bottom in alignment in what is the main section. Apparently at least two torpedoes struck under the stacks. The forward section was severed from just abaft the bridge and the forepart lies on its starboard side in the sea-floor; the second break was apparently at No.2 torpedo mount. There was no sign of the aftermost part of the ship. The wreck matches the eyewitnesses as the other Japanese ships all agree on observing multiple simultanous torpedo hits that caused YAMAGUMO's "instantaneous" sinking. Even allowing for the overall lack of rescues from the battle, it is easy to see why there ultimately was only two survivors of her complement.
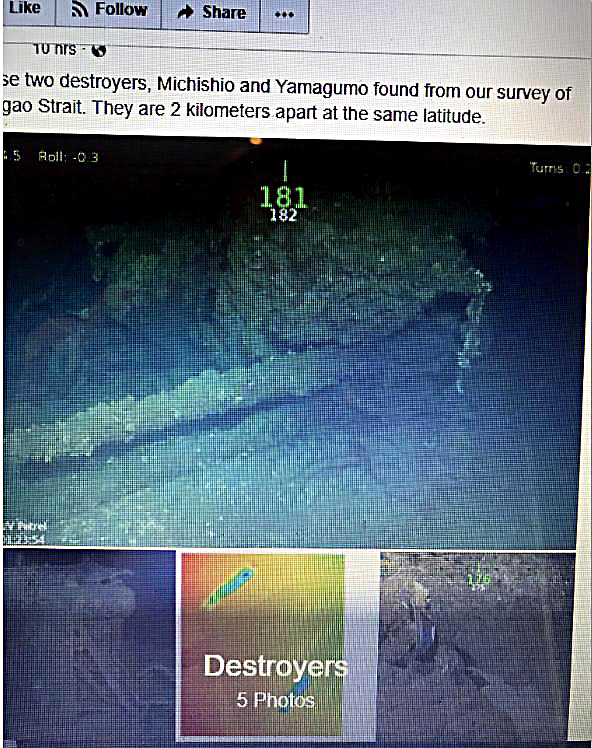
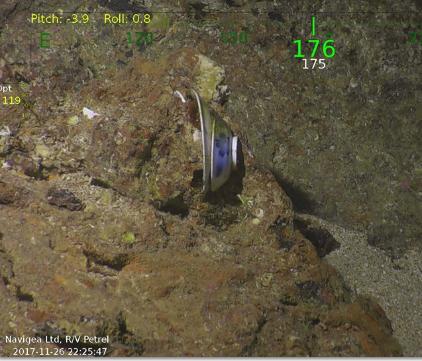
The YUDACHI was the third Japanese warship found by the Ballard/National Geographic expedition, and in this case the wreck's identity was not doubted. For any informed of the pounding she took before sinking, the YUDACHI's condition certainly confirms what one would expect. The main hulk sits upright, though the anchor deck forward of the turret is snapped clean off and skewed to port. It seems this happened after coming to rest on the bottom, not before. Though the ship is upright, the bridge is open on the top where you can look down into the compass bridge and canted to port, apparently due to the collapse of shell-damaged plating as it is only on that side, not the starboard.
Other upperworks are smashed and tangled, no stacks visible, and the whole afterpart of the ship beyond the aft torpedo tube mount appears to be missing. Some of the rear section is even partly folded back over the No.2 tube mount, so great was the blast. Apparently sheared off by the fiery explosion of her aft magazine observed when USS PORTLAND sank the derelict the morning of 13 November. What the wreck spectacularly confirms is that while the torpedoes did not "go off" both aft main battery magazines did. The after part is simply distintegrated. Reportedly only a portion of what appears to be the port shaft remains projecting from the ruins. Notable is that the wreck didn't directly settle the ambiguity of whether a scuttling torpedo was used by SAMIDARE (that failed to sink her in any case) This supposedly went into the destroyer on the starboard side but the bridge sags to port. No mention of a large hole in the side as cause was made in the expedition. The probability is the attempted scuttle-by-torpedo version is true, but it went into the port side under the bridge.
The explorations conducted by Robert Ballard for National Geographic in the 1990's pre-dated the era of FaceBook so there is no live site or blog to go review the imagery as in contemporary expeditions. It is necessary to seek out the associated coffee-table books and videos. Fortunately, they are available on amazon.com and are highly recommended. The paintings often cover two pages or even form fold-outs. A sample is given below of the style.
The coffee-table book:
The Lost Ships of Guadalcanal: Exploring the Ghost Fleet of the South Pacific by Robert D. Ballard with Rich Archbold
ISBN-10: 0446516368 / ISBN-13: 978-0446516365
Recently Re-released (2019)The DVD:
The Lost Fleet of Guadalcanal.(NTSC)

The YUZUKI was sunk while trying to withdraw after the landing of troops at Ormoc on 12 December 1944, but was caught by aircraft. Reportedly, she was damaged by a bomb hit, and slow flooding sank her five hours later. The hit location was not given, but the impression is that the destroyer was in fairly good shape but foundered. This happens to have received fascinating confirmation. Divers from USS CHANTICLEER reportedly inspected the sunken YUZUKI on 2 August 1945. They reported that she sank in only 70 feet of water and was upright on the bottom in nearly perfect condition. Only one sign of impact was found, a bomb hit between No.2 stack and the radio shack aft. The radio shack aft was in fact the object of the salvage, and after decoding machines were brought up, the operations were finished on 4 August. Short as the description is it neatly supplies the location of the bomb hit not given in the historical record. Presumably the wreck has long since disappeared but this is unknown.
The I-1 ended up with bow sharply upraised projecting above the water a starboard list of about degrees. It might bear mention here that a connection sometimes drawn between the captured materials of I-1 and the interception and shooting down of CinC Combined Fleet Yamamoto is erroneous. A thread on Tully Port of Combinedfleet.com June 2013 thoroughly explored the issue.
As for the subsequent fate of the wreck, in 1972 an Australian treasure hunter, in search of valuable metals, set off one or two of the live torpedoes left aboard and blew up the bow section of I-1. (One suspects that part was not intentional) The bow section of the sub is still there, but split open. Which is to say the front one-third of the submarine is destroyed but the remaining section is still intact. I-1 lies with the forward part in 45 feet and her stern in 90 feet of water.
wreck-CapeEsperance.jpg )
For more details, see:
On the morning of March 20, 2005 it was announced that a research team from the University of Hawaii had three days earlier discovered the wreckage of the huge ex-Japanese submarine I-401. The discovery was made during exploratory trial dives off Oahu, whose divers first mistook the upright huge hulk for an outcropping of underwater rocks. However, it was soon determined with examination and video by the submersible PISCES IV that it was in fact I-401, one of the giant Japanese subs designed to carry and launch three specially designed float bomber aircraft. Identification of type was fairly straight-foward, even if the the number "I-401" had not remained so readily distinguishable, and the submarines anti-aircraft guns in nearly perfect condition. With her sister I-400, the submarine that gave the famous class its name and others, the I-401 had been taken to Pearl Harbor in winter of 1946 for study and evaluation. It was later then scuttled off the coast on 31 May 1946, apparently in part to forestall Soviet demands to examine Japanese submarine technology, where they remain to the present day.
Two torpedoes fired by an American submarine, USS CABEZON (SS-334), had sent I-401 to the bottom; apparently shattering the forward
section in front of the aircraft hanger. The two sections remain in close proximity, and rest in position 21-12'N, 158-07'W some 870 meters
deep off Kaleola coast. For more details, see:
< ahref = " ">some
RO-500's wreck on the Sustainabilty Society.
So extensive and so many ships were involved in the so-called `Final Destruction' of the Imperial Japanese Navy units mostly in Homeland waters in summer of 1945 that they require a separate page and feature. In addition, they are more like the wrecks of NACHI, KINU, and AMAGIRI of this page in that they no longer "exist" as wrecks. Having long since been removed for scrap metal. However, like those three and others, they had ample record of how they did look like being sunk and how they had looked on the bottom. Like some of the wrecks on this page, they also have their share of inconsistencies and gaps in the record that merit clarification. In the future a feature page will eventually chronicle these last wrecks and their poignant ends, some from unswept mines post-war, but mostly from a scrapper's torch.
As Preview, present two example entries of Empire waters wrecks from the letter `K' :
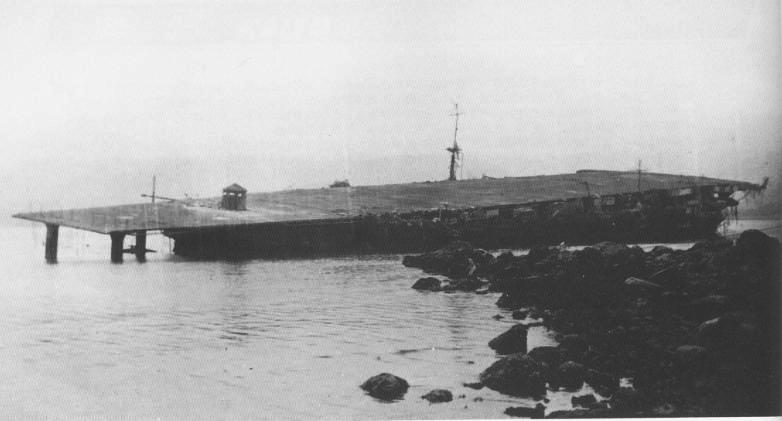
For nearly exactly a year after finally sunk KAIYO's wreck remained officially undisturbed. Then on August 3 1946 KAIYO's hulk was inspected and photographed in preparation for salvage and scrapping operations. The preliminaries were swiftly worked out, and the operation commenced at the start of the next month. Slowly but surely from September 1 1946 to January 1948 the wreck was first lightened enough to refloat, then scrapped mostly where it lay.
The scrapping was performed by Nissan Salvage. The flight deck was dismantled and the boilers and heavy equipment were first lifted out of the hulk. The hull then was refloated and pushed closer to shore for final scrapping. This is the period of an often seen but sometimes confusing late 1947 apparently reversed photo of her hull seemingly beached. KAIYO's remains yielded 5,937 tons of viable metal.

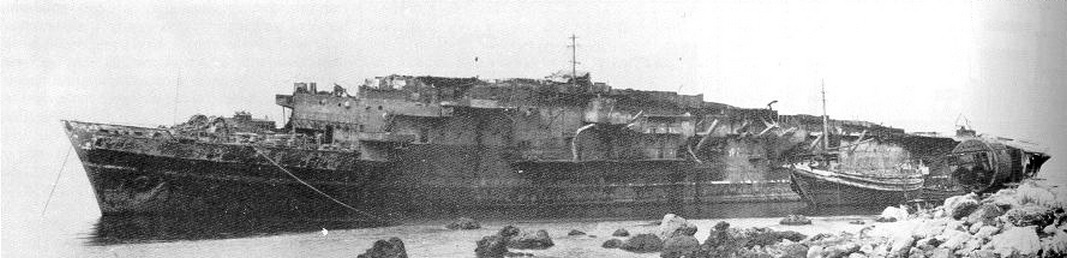
The destroyer KAMIKAZE was surrendered in Johore Strait on September 12, 1945 the same day as the nearby TAKAO and MYOKO when the Royal Navy re-occupied Singapore. Unlike the two cruisers, KAMIKAZE remained operational and fit for whatever duty was appropriate. That turned out to be repatriation of Japanese personnel from front areas back to Japan, and KAMIKAZE was modified for this task.
Additional superstructure and deckhouses were erected between the stacks and aft to provide expanded above-decks accomodation. The forward torpedo tubes had already been removed before the voyage with the doomed HAGURO (much to Captain Kasuga's irritation at the time) to provide space for provisions. Now that space and well deck was completely plated-in to provide quarters for troops forward. In this rig the old workhorse that had seen the end of HAGURO and ASHIGRA now provided her final service of the Imperial Navy, and did it dutifully.
However in poor weather and visibility on June 7 1946 both KAMIKAZE and the Coast Defense Ship KUNASHIRI ran aground. Attempts to free them were futile and in a matter of hours the waves and tide had driven them full on port broadside up onto the beach. In a case analagous to the grounded light cruiser USS MILWAUKEE everything tried afterward to free them failed. There both vessels became large and unusual tourist attractions until the frustrated authorities eventually completed srapping them in-situ.


This list will be ever-growing of course as recall or learn about them (Ex: I know several submarines have been found), or new discoveries are made. Each will be moved up into the detailed entry column as time permits and/or details of finding and condition of wreck become available.
CV Kaga
BB Yamato
BB Musashi
BB Nagato
BB Mutsu
BB Fuso
BB Yamashiro
BB Hiei
BB Kirishima
CA Ashigara
CA Chokai
CA Furutaka
CA Haguro
CA Kumano
CA Maya
CA Mogami
CA Myoko
CA Nachi
CA Takao
CL Jintsu
CL Kinu
CL Kiso
CL Kuma
DD Akebono
DD Akishimo
DD Amagiri
DD Arare
DD Asagumo
DD Ayanami
DD Fubuki
DD Fumizuki
DD Hamanami
DD Hatsuharu
DD Hayashimo
DD Isokaze
DD Kikuzuki
DD Kuroshio
DD Kuwa
DD Michishio
DD Minazuki
DD Naganami
DD Nagatsuki
DD Niizuki
DD Oite
DD Okinami
DD Sagiri
DD Shigure
DD Shimakaze
DD Shimotuski
DD Wakatsuki
DD Yamagumo
DD Yudachi
DD Yuzuki
Minelayer Hatsutaka
Minelayer Istukushima
Minesweeper W-12
I-52
I-401
RO-68
RO-500

