SENSUIKAN!
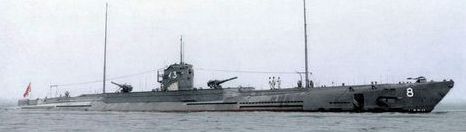 (Type J1 submarine - colorized photo by Irootoko Jr)
IJN Submarine I-1:
(Type J1 submarine - colorized photo by Irootoko Jr)
IJN Submarine I-1:
Tabular Record of
Movement
© 2001-2016 Bob Hackett & Sander Kingsepp
Revision 8
12 March 1923:
Laid down at Kawasaki's Kobe Shipyard as
submarine cruiser No. 74.
15 October 1924:
Launched
1 November 1924:
Renumbered I-1.
1 April 1925:
LtCdr (later Rear Admiral) Kasuga Atsushi (37)(former
acting CO of RO-11) is appointed Chief Equipping Officer.
Late February 1926:
I-1 is completed. She undergoes acceptance trials
in the Inland Sea, off Awaji Island. Several German submarine constructors also
participate in the trials.
10 March 1926:
I-1 is officially taken over by the IJN and attached
to Yokosuka Naval District. LtCdr Kasuga is appointed Commanding Officer.
1 August 1926:
Assigned to SubDiv 7, SubRon 2, Second Fleet with I-2.
29 July 1927:
LtCdr (promoted Cdr 1 December 1927; later Captain)
Kasuga Sueaki (37)(former CO of RO-14) is appointed CO.
28 November 1928:
At 1035, I-1 returning to Yokosuka with the rest of
SubDiv 7, in limited visibility and heavy seas, runs aground. The damage is
minor and no flooding occurs. The submarine is briefly dry-docked at Yokosuka
for hull inspection.
10 December 1928:
LtCdr (Later Rear Admiral) Nakamura Motoji (39)
(former CO of I-121) is appointed CO.
5 November 1929:
Placed in reserve for modernization until 15
November 1930. During the modernization, her German-built diesel engines and the
entire battery are replaced.
15 November 1930:
LtCdr (later Rear Admiral) Sato Shiro (43)(former
CO of I-121) is appointed CO.
1 December 1931:
LtCdr (later Rear Admiral) Nagai Mitsuru (45)
(former CO of RO-56) is appointed CO.
1 November 1933:
LtCdr (Rear Admiral, posthumously) Imazato Hiroshi
(45)(former CO of RO-59) is appointed CO.
15 November 1934:
Reassigned to SubDiv 7, SubRon 1, First Fleet.
15 November 1935:
Placed in reserve until 15 February 1936. LtCdr
(later Cdr) Nagai Komei (48)(former CO of RO-58) is appointed CO of I-1 and I-3
as an additional duty.
During a rebuild the conning tower receives a more streamlined shape.
The American-built K-tube sonar is replaced with a domestic set.
15 February 1936:
LtCdr (Rear Admiral, posthumously) Otake Toshio
(45)(former CO of I-62) is appointed CO.
2 November 1936:
LtCdr (Rear Admiral, posthumously) Kobayashi
Hitoshi (48)(current CO of I-2) is appointed CO of I-1 and I-3 as an
additional duty.
1 December 1936:
Cdr (Rear Admiral, posthumously) Miyazaki Takeji
(46)(former CO of I-69) is appointed CO.
27 March 1937:
Departs Sasebo.
6 April 1937:
Arrives at Ariake Bay, then departs for training in
the area of Tsingtao (Qingdao), China.
7 July 1937: The Marco Polo Bridge (The "First China Incident"):
Hun
River, Lugouqiao, China. Japanese troops on night maneuvers fire blank
cartridges. Nearby Chinese troops fire back, but do not cause injuries. At
morning roll call, the Japanese discover a soldier missing and assume the
Chinese captured him. They demand entry to a Peking suburb to look for the
soldier. The Chinese refuse. The Japanese then shell the city and an undeclared
war on China begins.
28 July 1937:
In SubDiv 7, SubRon 1, First Fleet, with I-2 and I-3.
21-23 August 1937:
East China Sea. Submarines I-1, I-2, I-3, I-4,
I-5 and I-6 provide distant cover for BatDiv 1's NAGATO, MUTSU, and BatDiv 3's
HARUNA and KIRISHIMA and light cruiser ISUZU ferrying troops from Tadotsu,
Shikoku, to the Shanghai area.
5 October 1937:
LtCdr (later Captain) Hamano Motoichi (47)(former CO
of I-58) is appointed CO.
20 November 1939:
Cdr (Rear Admiral, posthumously) Kato Ryonosuke
(48)(former CO of I-74) is appointed CO.
1939-1940:
During an extensive refit, I-1's Type 15 torpedo tubes are
fitted with impulse tanks. Collapsible radio masts are landed.
6 July 1940:
Cdr (Captain, posthumously) Oda Tamekiyo (43)(current
ComSubDiv 7) is appointed CO of I-1 as an additional duty.
16 September 1940:
Cdr Kato Ryonosuke (48) is appointed CO (his
second tour as the CO of that boat).
30 October 1940:
Cdr (later Captain) Otani Kiyonori (49)(former CO of
I-121) is appointed CO.
15 November 1940:
SubRon 2 is reassigned to Sixth Fleet. I-1 is
reassigned to SubDiv 7 in SubRon 2.
25 August 1941:
Cdr (Rear Admiral, posthumously) Ankyu Eitaro
(former CO of I-53) is appointed CO.
10 November 1941: Operation "Z":
At Saeki Bay. In Vice Admiral Shimizu
Mitsumi's (former CO of ISE) Sixth Fleet with Rear Admiral (later Vice Admiral)
Yamazaki Shigeaki's (former CO of old CA YAKUMO) SubRon 2. I-1 is in Captain
(later Rear Admiral) Shimamoto Hisagoro's SubDiv 7 with I-2 and I-3.
Admiral Shimizu convenes a meeting of all his commanders aboard his
flagship, light cruiser KATORI. Cdr Ankyu and the other commanders are briefed
on the planned attack on Pearl Harbor.
16 November 1941:
The boats of SubRon 2 depart Yokosuka for the
Hawaiian Islands. I-1, undergoing engine repairs, is unable to sortie with the
rest of her unit. Prior to departure, she is fitted with a long range very low
frequency (VLF) receiver.
23 November 1941:
In the afternoon, I-1 departs Yokosuka. After an
overnight stop at Tateyama Bight she departs for the Hawaii area at flank speed,
conducting her first dive once within 600 miles of Oahu.
6 December 1941:
Off Hawaii. SubRon 2 is arrayed to the northeast and
northwest of Oahu. I-1 arrives at her prescribed patrol area in the westernmost
section of Kauai Channel, between Oahu and Kauai islands. I-1's mission is to
reconnoiter and attack any ships that try to sortie from Pearl Harbor.
7 December 1941: The Attack on Pearl Harbor:
Kauai Channel. Around
0730, I-1's lookouts spot an Aichi E13A1 "Jake" floatplane returning to heavy
cruiser TONE after a flight over Lahaina Roads. During the next days, I-1 is
repeatedly attacked by aircraft, but receives no damage. To avoid being caught
on the surface, Cdr Ankyu orders the negative buoyancy tank flooded when
surfaced.
15 December 1941:
SubRon 2 bombards Kahului, Maui. [1]
10 December 1941:
At 0530 (local), I-1 sights a carrier 24 nm NNE from
Kahala Point, Kauai (probably USS ENTERPRISE). Forced underwater, Cdr Ankyu
reports his sighting to ComSubRon 2 after an almost 12-hour delay.
27 December 1941:
I-1 receives an order from ComSubRon 2 (aboard I-7)
to shell Hilo harbor, Hawaii, on 30 December.
30 December 1941:
Arrives off Hilo and conducts periscopic
reconnaissance. I-1 sights a small transport moored in the bay (actually
converted seaplane tender (ex-DD-342) USS HULBERT (AVD-6). After sundown, I-1
surfaces and fires ten HE shells at the old four stack vessel claiming moderate
damage. HULBERT returns fire, joined by a local Coast Artillery unit. I-1 scores
one hit to the pier next to HULBERT. Another shell starts a small fire in
vicinity of Hilo Airport.
7 January 1942:
S of Kauai Channel. I-1 chases and attacks a
transport, but fails to score a hit.
9 January 1942:
Departs her patrol area to join the hunt for USS
LEXINGTON (CV-2), detected by I-18.
22 January 1942:
Arrives at Kwajalein with I-2 and I-3.
24 January 1942:
Departs Kwajalein for Yokosuka with I-2 and I-3.
1 February 1942:
Arrives at Yokosuka.
8 February 1942:
I-1 is assigned to the Dutch East Indies Invasion
Force in Rear Admiral (later Vice Admiral) Ichioka Hisashi's (former CO of
YURA) SubRon 2 with I-2, I-3, I-4, I-6 and flagship I-7.
13 February 1942:
Departs Yokosuka for Staring Bay, SE Celebes (now
Sulawesi).
16 February 1942:
Arrives at Palau and refuels from oiler FUJISAN
MARU. Departs the next day with I-2 and -3.
23 February 1942:
At 1700, I-1 departs Staring Bay for the Timor Sea
on her second patrol. Soon after departure, her starboard diesel crankshaft
breaks down. For the better part of the patrol, she travels on one shaft.
3 March 1942:
Indian Ocean, 250 miles NW of Shark Bay, off western
Australia. Early in the morning, I-1's lookouts sight smoke from 8,806-ton Dutch
armed cargo vessel SIANTAR escaping to Australia from Tjilatjap, Java. I-1
submerges and fires a torpedo at SIANTAR, but misses. At 0630, she battle
surfaces off SIANTAR’s port beam and opens fire with her forward deck gun.
SIANTAR goes to full speed and returns fire from her 75-mm deck gun, but
it jams after the first shots. The second shell from I-1 brings down the radio
antenna of the Dutch merchant. A fire breaks out and the crew abandons ship.
Following some 30 direct hits, I-1 fires a second torpedo. Ten minutes later,
around 0700, SIANTAR sinks by the stern at 21-20S, 108-45E. 21 sailors are
killed and 37 rescued by Dutch steamer VAN SPIELBERGEN.
9 March 1942:
Timor Sea. I-1 captures a canoe carrying Allied military
personnel escaping from Dutch West Timor. They are identified as a sergeant and
four soldiers. [2]
11 March 1942:
At 1120, returns to Staring Bay and ties up alongside
submarine tender SANTOS MARU. The prisoners are transferred to a hospital ship.
16 March 1942:
Vice Admiral, the Marquis, Komatsu Teruhisa (former CO
of CA NACHI) assumes command of the Sixth Fleet (Submarines).
15 March 1942:
Departs Staring Bay for Yokosuka.
27 March 1942:
Arrives at Yokosuka. Docked in No. 4 drydock for
starboard diesel repairs. Her 7.7-mm bridge-mounted machine gun is replaced with
a 13.2-mm Type 93 machine gun and her Zeiss 3-meter rangefinder with a Japanese
Type 97 rangefinder. Some of the armor protecting the torpedo storage
compartment is removed and an automatic trim system is installed.
10 April 1942:
Reassigned to Advance Unit with I-2 and I-3.
18 April 1942: The First Bombing of Japan:
Vice Admiral (later Fleet
Admiral) William F. ("Bull") Halsey's Task Force 16 USS HORNET (CV-8), cruisers,
destroyers and an oiler accompanied by USS ENTERPRISE (CV-6), cruisers,
destroyers and another oiler approach to within 668 nautical miles of Japan. Led
by Lt Col (later General/Medal of Honor) James H. Doolittle, 16 Army North
American B-25 "Mitchell" twin-engine bombers of the 17 Bomb Group takeoff from
Captain (later Admiral) Marc A. Mitscher's carrier HORNET and strike targets in
Tokyo, Yokohama, Osaka, Nagoya and Kobe.
Yokosuka. I-1's crew on deck witness the raid. A B-25 damages dry-docked
carrier RYUHO undergoing conversion from submarine depot ship TAIGEI.
1 May 1942:
Captain (later Vice Admiral, posthumously) Tamaki Tomejiro
is assigned as ComSubDiv 7 in SubRon 2.
7 June 1942:
Tokyo Bay. I-1 participates in the tests of a kite
balloon intended for the merchants, making several runs against a ship converted
to carry the prototype balloon.
10 June 1942:
Reassigned to Northern Unit with I-2 and I-3.
11 June 1942:
Departs Yokosuka for the Aleutians in company of I-2,
I-3, I-4 and I-7.
20 June 1942:
Joins K patrol line with I-2 and I-3, patrolling along
178W longitude, 48 to 50N latitude until 3 July
Mid-July 1942:
S of Adak Island, Aleutians. I-1 is attacked and
chased for 19 hours by an unidentified American warship. She escapes the chase
after diving to 260 ft depth. [3]
20 July 1942:
I-1 is reassigned to Advance Unit. On the same day, I-1
receives an order to depart her patrol area for Yokosuka.
1 August 1942:
Returns to Yokosuka.
7 August 1942: American Operation "Watchtower" - The Invasion of
Guadalcanal, Solomons:
Rear Admiral (later Admiral) Richmond Kelly Turner's
Amphibious Task Force 62, covered by Vice Admiral (later Admiral) Frank J.
Fletcher's Task Force 61 and Rear Admiral (later Admiral) John S. McCain's Task
Force 63's land-based aircraft, lands Maj Gen (later General/Commandant)
Alexander A. Vandegrift's 1st Marine Division on Florida, Tulagi, Gavutu,
Tanambogo and Guadalcanal opening a seven-month campaign to take the island.
20 August 1942:
SubRon 2 is disbanded.
Late August to early September 1942:
Yokosuka Navy Yard. I-1 is
converted to carry a special 46-ft waterproofed Daihatsu-type landing barge
mounted abaft the conning tower. Her 5.5-in aft deck gun is landed. I-1
commences joint exercises with the Maizuru 4th SNLF detachment designated as
Special Landing Unit (S-Tokuriku) for a planned raid on Espiritu Santo, New
Hebrides.
8 September 1942:
Departs Yokosuka for Truk with I-2, I-3, I-4 and
I-5.
14 September 1942:
Arrives at Truk.
15 September 1942:
I-1 and its barge installation are inspected by
Vice Admiral Komatsu Teruhisa, C-in-C, Sixth Fleet.
17 September 1942:
Departs Truk for Rabaul, New Britain.
22 September 1942:
Arrives at Rabaul.
24 September 1942:
Reassigned to Outer South Seas Force (the Eight
Fleet) with I-2 and I-3.
25 September 1942:
Departs Rabaul to participate in the planned
landing at Rabi, Papua New Guinea, but is recalled soon after departure.
27 September 1942:
Returns to Rabaul.
1 October 1942:
At 1830, departs Rabaul for a supply run to Goodenough
Island, D’Entrecasteaux archipelago. I-1 carries a Daihatsu landing barge and
its three-strong crew along with a cargo of food and ammunition intended for the
stranded survivors of Cdr Tsukioka Torashige's Sasebo 5th SNLF.
3 October 1942:
At 2240, I-1 surfaces off Kilia Mission on the SW tip
of Goodenough Island. After contacting the survivors, the landing barge delivers
its cargo, embarking 71 wounded and the ashes of 13 SNLF marines, then departs
for Rabaul.
6 October 1942:
At 1330, I-1 arrives at Rabaul, where her passengers
are debarked.
11 October 1942:
Departs Rabaul for her second supply run to
Goodenough Island, carrying a fresh cargo of food and ammunition.
13 October 1942:
At 1830, I-1 surfaces off Kilia, contacts the
Japanese garrison and launches her barge. A Lockheed "Hudson" Mk. IIIA patrol
bomber of RAAF No. 32 Sqadron, alerted by Allied intelligence, sweeps over the
landing area and drops flares and bombs. Considering his mission compromised,
Cdr Ankyu dives I-1 and departs the area, leaving his barge behind.
14 October 1942:
At dawn, a floatplane from I-7 conducts a recce
flight over Espiritu Santo and confirms the presence of several warships. The
approaches to the harbor are found to be regularly patrolled. The Combined Fleet
staff decides to cancel the raid on the base.
16 October 1942:
Returns to Rabaul.
17 October 1942:
Reassigned to Advance Unit.
22 October 1942:
Departs Rabaul for the area S of San Cristobal to
join a patrol group prior to the Battle of Santa Cruz.
28 October 1942:
Redirected to Stewart Islands (now Sikaiana) area to
search for downed IJNAF pilots.
29 October 1942:
Arrives at the Steward Islands area, but aborts the
search soon thereafter as a result of the starboard diesel's crankshaft failure.
[4]
31 October 1942:
LtCdr (Cdr, posthumously) Sakamoto Eiichi (57)(former
CO of I-154) is appointed CO.
3 November 1942:
LtCdr Sakamoto assumes command of I-1. Cdr Ankyu, who
has dengue fever, remains aboard the submarine until 9 November.
13 November 1942:
At 1700, departs Truk for Yokosuka.
16 November 1942:
Truk. Vice Admiral Komatsu convenes a meeting of his
submarine captains. He announces that the submarine force has been ordered by
Admiral Yamamoto, CINC, Combined Fleet to organize a supply system for the IJA
garrison on Guadalcanal.
20 November 1942:
At 1630, arrives at Yokosuka for the repair of the
starboard diesel and electrical engines. The landing barge installation is
reworked.
16 to 23 December 1942:
Docked at No. 5 drydock for hull maintenance.
30 December 1942:
The repairs are complete.
2 January 1943:
At 0830, departs Yokosuka for landing barge launch
tests off Nojima Zaki, returns by 1200.
3 January 1943:
At 1400, departs Yokosuka for Truk, carrying a
Daihatsu landing barge. Enroute the starboard shaft develops a clutch problem.
10 January 1943:
At 1800, I-1 arrives at Truk, where all torpedoes
except two are landed. LtCdr Sakamoto participates in a staff conference aboard
HIE MARU.
12 January 1943:
At 0630, departs Truk for landing barge launch
tests, returning by 0830. Commences the repairs of her diesel engines' air
induction valve.
14 January 1943:
Conducts the second series of landing barge launch
tests.
15 January 1943:
At 1300, departs Truk for landing night-time barge
launch tests, returning by 2000.
16 January 1943:
At 1900, departs Truk for Rabaul.
20 January 1943:
At 0730, arrives at Rabaul. Begins preparations for a
supply run to Guadalcanal. Embarks a cargo of food in rubber containers (two-day
rations for 3,000 men), most of which is stowed inside the submarine. [5]
24 January 1943:
At 1600, departs Rabaul for Kamimbo Bay, NW
Guadalcanal.
26 January 1943:
Commander Navy Solomons informs all ships in
Guadalcanal-Tulagi area about the possible arrival of a Japanese supply
submarine at Kamimbo Bay that night, and 27 and 29 January. RNZN 25th
Minesweeping Flotilla corvettes HMNZS KIWI under the command of LtCdr Gordon
Bridson (DSC) and LtCdr Peter Phipps' (DSC, later Vice Admiral Sir) HMNZS MOA
are directed to that area for an anti-submarine patrol.
28 January 1943:
Sixth Fleet staff sends a warning to SubDiv 7
regarding the presence of enemy torpedo boats off Kamimbo, advising to debark
the supplies only after sundown.
29 January 1943:
At 2030, I-1 surfaces off Kamimbo Bay in a heavy rain
squall and heads for the anchorage, trimmed with decks awash. Suddenly, one of
aft lookouts reports sighting of two torpedo boats. Sakamoto orders a turn to
port and crash-dives to 100 feet, rigging for silent running.
HMNZS KIWI and MOA are patrolling a line off Kamimbo Bay at 2105, when
KIWI's Asdic officer reports a contact at a range of 3,000 yds. MOA is unable to
confirm it. KIWI closes the range until the phosphorescent silhouette of a
submerging submarine can be seen. KIWI drops two six-depth-charge patterns.
I-1 is heavily buffeted by close explosions; several sailors are knocked
off their feet. A leak appears in the aft provision room.
At 2040, the next attack disables the pumps, the steering engine and the
port shaft. One explosion ruptures the high-pressure manifold, sending a fine
water mist across the control room. The main switchboard is partially shorted
and all lights go out. I-1 develops a 45-degree down-angle and plunges to an
estimated depth of 590 feet, well below its designed limit of 210 ft. A serious
leak appears in the forward torpedo room.
Sakamoto orders the forward group of main ballast tanks blown and full
reverse on the remaining shaft. The descent is stopped, but seawater floods the
broken batteries, releasing chlorine gas. Around 2100, the crippled submarine,
down by the bow, surfaces 2,000 yds away on KIWI's starboard beam. I-1 switches
over to her starboard diesel and heads for the shore at 11 knots in an attempt
to run aground. Sakamoto orders the forward deck gun and the 13.2-mm machine gun
atop the conning tower manned. He personally takes the helm.
HMNZS KIWI targets the submarine at point-blank range with her 4-in deck
gun and 20-mm Oerlikon bow gun, illuminating its adversary with a 10-in signal
searchlight. MOA supports her sister, firing starshells. KIWI's gunners quickly
find the range and rake I-1's superstructure with accurate gunfire, disabling
her machine gun and setting the barge afire. Sakamoto, most of the bridge crew
and gunners are killed. Bereft of guidance, the sub commences a slow turn to
starboard.
I-1's navigator appears on the bridge to find the entire topside
personnel either dead or crippled. Torpedo officer Lt Koreeda Sadayoshi (future
CO of RO-115 and -63) takes command. He orders what is perceived to be an
attempt to capture the boat beaten back. A reserve gun crew is sent up and all
officers fetch their swords. Four Arisaka Type 38 carbines carried aboard are
passed out to best shooters among the crew. At 2120, KIWI alters course to ram
the submarine at full speed. She hits I-1's port side abaft the conning tower.
I-1's gunners are unable to hit the attacker, partially shielded by the conning
tower structure.
The corvette backs off and comes under fire from the submarine. Its
gunners claim one of the attackers "set afire"; in addition I-1's lookouts
report no less than three torpedoes near-missing their submarine. HMNZS KIWI
rams I-1 again. This time the glancing blow crushes one of I-1's foreplanes. A
gunshot mortally wounds Acting Leading Signalman Campbell H. Buchanan handling
the corvette’s searchlight. I-1's navigator (a Kendo 3rd dan swordsman) grabs
KIWI’s upper deck rail and attempts to board her, but is thrown overboard when
the corvette recoils. [6]
KIWI mounts a third ramming from starboard, holing one of the main
ballast tanks and then sliding up on the submarine’s afterdeck. The corvette
damages her stem and Asdic gear in the process, necessitating later repairs in
Auckland. The impact disables all I-1’s bilge pumps except one and she develops
an increasing list to starboard.
HMNZS MOA continues the chase, illuminating the submarine with her
searchlight and starshells. I-1 is again hit repeatedly, but the splashes thrown
up by close misses put out the fire raging on her afterdeck. Several shells are
deflected by submarine's upper hull armor.
At 2315, I-1 runs hard aground on Fish Reef some 330 yards N of Kamimbo
coast. The entire after half of the hull is flooded. The foundering submarine
develops a heavy list to starboard. Lt Koreeda orders "Abandon Ship." Soon
thereafter, I-1 sinks as a result of progressive flooding at 09-13S, 159-40E.
Only her bow projects 15 ft out of the water at an angle of 45 degrees.
A total of 27 sailors are killed or missing; 66 survivors reach the shore
and join the IJA garrison by the following morning. I-1's Chief Paymaster
rescues the current codebooks (prpobably the JN-25D-13 version), which are
immediately destroyed on the beach. Only later one case containing code-related
material, as well as I-1’s own log, are found to be missing.
30 January 1943:
HMNZS MOA continues to patrol in the vicinity until
sunrise and then proceeds to inspect the wreck. Two survivors are found, one of
whom is killed by machine-gun fire; the wounded gunnery officer Ens Oikawa Ko
(70) is captured. The crew of MOA also recovers a code book (more likely the
log of I-1) and some naval charts. [7]
1 February 1943:
First evacuation run from Guadalcanal. 63 survivors
from I-1 are evacuated to Rabaul, where they are questioned by a liaison officer
of Naval General Staff's 10th Bureau from Truk. The latter concludes that the
entire code material involved is liable to being compromised.
2 February 1943:
After 1900, Lt Koreeda and two junior officers from
I-1, aided by 11 destroyermen, return to the wreck with a Daihatsu barge. Two
depth charges and four small explosive charges are strapped to the bow and lower
hull of the sub in an attempt to detonate the torpedoes aboard. While this
attempt fails, the depth charges alone cause enough damage to foil all future
attempts to salvage the sub.
7 February 1943:
Last evacuation run from Guadalcanal. Lt Koreeda and
two other officers are evacuated to Rabaul, where they report their failure to
destroy the wreck.
10 February 1943:
Second attempt to destroy the wreck of I-1. Between
1445 and 1450 nine Aichi D3A2 Val
dive-bombers from the Buin-based 582nd NAG escorted by 28 Zeke
fighters, arrive to bomb the wreck. Most bombers fail to locate the target,
but FPO2C Suzuki Yoshitame of 3rd Shotai scores a 551-lb bomb hit near the
conning tower.
11 February 1943:
US Army intelligence personnel aboard PT-65 examines
the wreck of I-1. I-2, with Lt Koreeda aboard, departs Shortland in an attempt
to destroy the wreck.
13 February 1943:
Converted submarine rescue vessel USS ORTOLAN
(ASR-5) inspects the wreck of I-1. Her divers salvage a number of water-logged
documents from its conning tower, which are delivered to AL Station on
Guadalcanal and later to Pearl Harbor. A total of five code books are recovered,
including one of superseded JN-25 version. The bounty also includes a list of
call signs (ships and stations) dating from 1942. After sundown I-2 penetrates
Kamimbo Bay, but cannot locate the wreck.
15 February 1943:
Considering the entire code material aboard I-1 now
compromised, the Naval General Staff's 10th Bureau upgrades three major naval
codes. JN-25D-13 and D-17 are replaced by JN-25E-17, featuring a new additive
book. Simultaneously, the IJN cancels Japanese-German Navy joint codes Nos. 1
("Sumatra 1") and 2 ("Togo 1"). That night, I-2 returns to Kamimbo Bay and
closes to within 1.4 miles of the coast, but is depth-charged and chased away by
torpedo boats. [8]
1 April 1943:
Removed from the Navy List.
5 April 1943:
LtCdr Sakamoto is promoted Cdr posthumously.
1972:
An Australian treasure hunter, in search of valuable metals,
blows up the bow section of I-1. This causes a great deal of damage since there
are one or two live torpedoes still inside. The bow section of the sub is still
there, but split open. The front one-third of the submarine is destroyed but the
remaining section is still intact. I-1 lies with her bow in 45 feet and her
stern in 90 feet of water.
Authors' Note:
[1] I-1 is often credited with shelling Kahului on 15
December, but this is incorrect. The real culprit was I-75 of SubDiv 11.
[2] Australian author David Jenkins identified these PoWs as members of
Tasmanian-recruited Australian 2/40th Battalion.
[3] I-1's pursuer may have been USCG cutter ONONDAGA (WPG-79).
[4] I-1 is the most likely candidate for the submarine attacked by Lt.
F.J. Hill's PBY-5 "Catalina" from VP-11 on 29 October at 13-15S, 162-45E.
[5] The exact nature of I-1's last sortie has been subject to
speculation. Several sources credit her with carrying no less than 60
"fully-equipped IJA soldiers" in addition to her regular crew; other references
suggest that I-1 was involved in distributing future code material to advance
naval bases. Several popular accounts claim that I-1 was carrying more than one
barge when sunk. None of above legends is confirmed by Japanese sources and the
War Diary of SubDiv 7 in particular.
On the other hand, the sight of the Daihatsu barge prompted some I-1 crew
newcomers to speculate that she was going to land the first IJN invasion party
on Australia.
[6] A number of popular accounts suggest that I-1's navigator was
captured and became a PoW. This is incorrect: Lt(jg) Sakai Toshimi was rescued
with the rest of the crew and went on to become navigating officer of I-10. He
was KIA in 1944 as torpedo officer of RO-114. A non-commissioned officer from
I-1 (CPO Kuboaki Takeo) was captured by Americans on that same day. Therefore,
there were a total of 68 survivors, rather than 66.
[7] KIWI's CO is awarded the DSO and receives the US Navy Cross. Acting
Leading Signalman Buchanan receives the Navy Cross posthumously. MOA's CO
receives a Bar to his DSC and the US Navy Cross.
[8] A popular myth, perpetuated in many accounts, claims that more than
200,000 secret documents (or alternatively 200,000 pages) were captured from
I-1. This legend goes back to a regrettable typo in the English translation of
the postwar "Operational History of Japanese Naval Communications, December
1941-1945” and is not confirmed by the wartime personnel of Guadalcanal AL
Station. Several messages exchanged between CINCPAC and COMSOPAC during February
1943 discuss the presence of a coding machine aboard I-1, but there was none.
Thanks go to Dr. Higuchi Tatsuhiro of Japan. Thanks also go to Mssrs.
Drew Cumming, Steve Eckart and Jan "Visje” Visser. Special thanks go to Mr.
Richard Watanabe for sharing his research on IJN naval codes and the I-1
incident in particular.
– Bob Hackett and Sander Kingsepp
Back to Submarine
Page

