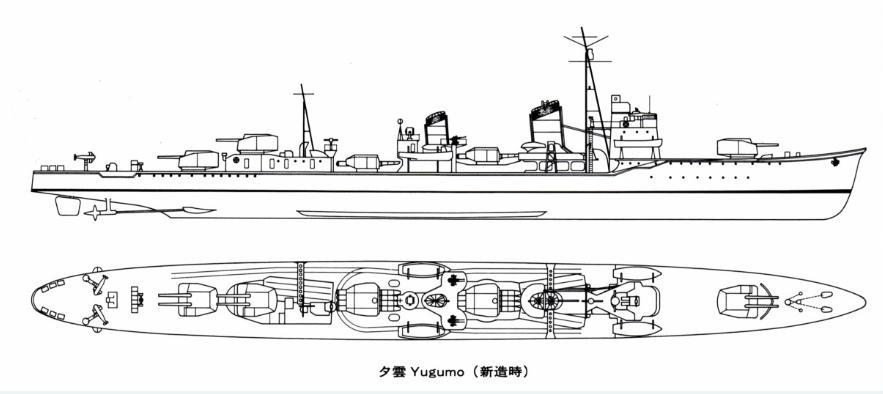
 © 1998 Allyn D. Nevitt

@Updated - January 16, 2012 - Allyn Nevitt
@Enhanced - Anthony Tully with Allyn Nevitt - August 2014
Name Translation:"Early Frost"
20 February 1944:
Completed at Maizuru; assigned same date to 11th Destroyer Squadron (Desron 11) First Fleet, for training. Ship's captain: Commander Arai Yasuo [53] (prev. C.O. ASAGIRI).
22 February:
Arrived at Kure.
24 February:
Desron 11 reassigned to Combined Fleet.
23 March:
Departed Saginoseki, Kyushu with RYUHO. Arrived Kagoshima.
24 March:
HAYASHIMO and RYUHO departed Kagoshima for Ise Bay.
25 March:
Arrived Ise Bay. Departed.
26 March:
HAYASHIMO and RYUHO arrived at Kure.
27 March:
Departed Kure; anchored at Yashima.
28 March:
Departed Yashima with TAIHO; arrived at Hashirajima the next day.
2 April:
Commander Arai relieved by Lieutenant Commander Hirayama Toshio [55] (prev. C.O. AKISHIMO).
13 April:
Departed Yashima anchorage on towing and other exercises with JUNYO. Returned to Yashima.
14 April:
Arrived Kure. Carried out maintenance work, then departed for Hashirajima.
21 April:
Departed Hashirajima for Yokosuka.
23 April:
Arrived at Yokosuka.
30 April:
Assigned to Desron 2, Second Fleet.
2 May:
Departed Yokosuka for West Inland Sea.
3 May:
Arrived at Iwakuni.
5 May:
Departed Iwakuni with RYUHO for Yashima anchorage.
6 May:
With RYUHO departed Iwakuni for training. Arrived at Tokuyama.
8 May:
With RYUHO sails to Saeki Bay, Kyushu.
11-16 May:
- 1100: Departed Saeki Bay with carrier task force: CarDiv 2's JUNYO and RYUHO and CarDiv 3's ZUIHO, CHIYODA, CHITOSE super-battleship MUSASHI and Desron 11's AKISHIMO and HAYASHIMO, DesDiv 4's MICHISHIO, NOWAKI and YAMAGUMO, DesDiv 27's SHIGURE and DesDiv 32's TAMANAMI.
19 May:
Departed Tawi Tawi with HARUSAME on overnight anti-submarine sweep.
9 June:
Alerted of submarines detected outside the bay, departed with TANIKAZE, SHIMAKAZE and ISOKAZE on anti-submarine sweep. However, TANIKAZE is torpedoed and sunk during this operation.
10 June:
- 0700: Meets TAIHO at sea for increased protection while training, and five hours later they arrived back at Tawi Tawi.
13 June:
- 1700: Joins Mobile Fleet with Desdiv 4's MICHISHIO in departing heading towards the Philippine Sea. Screens Force "B" consisting of CarDiv 2's JUNYO and RYUHO, BatDiv 1's NAGATO, CruDiv 7's MOGAMI.
17 June:
- 0230: HAYASHIMO refueled from SEIYO MARU, then rejoins Main Body.
19-20 June 1944: Battle of the Mariana (Battle of the Philippine Sea)
Escorted Rear-Admiral Joshima Takatsugu's Force B.
19 June 1944:
- 1640: Three "Tenzans" from a ZUIKAKU strike return, but are unable to land. Two land on JUNYO and one ditches. HAYASHIMO rescues the aircraft crew.
20 June:
Anti-Aircraft action defending Force B's CarDiv 2:
With JUNYO, HIYO and RYUHO, covered by NAGATO and MOGAMI and eight destroyers in screen (MICHISHIO, AKISHIMO, HAYASHIMO, SHIGURE, SAMIDARE, HAMAKAZE, NOWAKI, and YAMAGUMO)
- 1932: Carrier HIYO sinks after bomb and torpedo hits from enemy carrier planes. HAYASHIMO participates in the rescue efforts, taking aboard 16 officers and 216 men.
21 June:
- 0630: HAYASHIMO attacked by two aircraft, repulsed them with gunfire.
- 0905: Heads for Okinawa via Guimaras with HAMAKAZE, SHIGURE, MICHISHIO, and AKISHIMO.
23 June:
- 0905: Arrived at Nakagusuku Bay, Okinawa.
- 1430: Departed with CruDiv 7 for the homeland.
24 June:
- 2120: Arrived with Crudiv 7 in West Inland Sea.
1-12 July:
With AKISHIMO escorted MYOKO and HAGURO on troop transport mission from Kure via Manila (5 -6 July) and Zamboanga (8 July) to Singapore.
9 July:
- 0715: Stopover at Guimaras Island; departed two hours later.
12 July
With AKISHIMO arrived at Singapore with MYOKO and HAGURO.
15 August:
Assigned to Desdiv 2 (HAYASHIMO, AKISHIMO, KIYOSHIMO), Desron 2, Second Fleet. Flagship of Comdesdiv 2, Captain Shiraishi Nagayoshi [49] (prev. C.O. URAKAZE).
14 October:
- 1600: With AKISHIMO departed Singapore for Manila assigned to independent duty for Southwest Area Fleet to transfer HQ of Thirty-First Army from Manila to Saigon.
17 October:
- 2005: Because of invasion threat to Leyte Desdiv 2 (HAYASHIMO, AKISHIMO) is recalled to Brunei by Kurita at 2005 while still en-route to Manila. (However, they fail to receive this message till the next morning.)
18 October:
- 0800: HAYASHIMO and AKISHIMO arrived off Manila Bay, remaining outside due to air attack in progress.
- 1030: Belatedly receiving Kurita's recall order, HAYASHIMO and AKISHIMO abandon entering Manila and reverse course heading for Borneo.
19 October:
- 1100: HAYASHIMO and AKISHIMO attacked by USS DARTER and DACE with four torpedoes. No damage.
20 October:
- 0930: HAYASHIMO and AKISHIMO arrived at Brunei. HAYASHIMO refuels from YAMATO.
23-26 October 1944: Battle of Leyte Gulf
Escorted Vice-Admiral Kurita Takeo's First Diversion Attack Force as part of Desron 2: Desron 2 flagship NOSHIRO, DesDiv 2's HAYASHIMO, AKISHIMO, KIYOSHIMO, DesDiv 31's KISHINAMI, OKINAMI, ASASHIMO, DesDiv 32's FUJINAMI, NAGANAMI, HAMANAMI, and SHIMAKAZE attached.
23 October:
Anti-submarine action in Palawan Passage. Cruisers ATAGO and MAYA sunk; cruiser TAKAO damaged.
- 1305: Submarine detected; HAYASHIMO attacks with depth charges.
24 October:
In Battle in Sibuyan Sea, HAYASHIMO claims three aircraft shot down. No damaged received.
25 October:
(Battle off Samar)
- 1323: HAYASHIMO halted after near-misses from bombs puncture and contaminate fuel tanks, one tearing a 30 meter wide hole. Engines rendered unusable till fuel situation corrected. Hove to so to attempt temporary repairs. While doing so at 1640 approximately 40 aircraft caused further damage by strafing and near-misses. Communications and gyro-compass are destroyed.
- 1757: With AKISHIMO ordered to guard and tow if necessary, HAYASHIMO gets back underway, and the two destroyers proceed to follow the main Kurita force retiring through San Bernardino Strait. A half-hour later they
enter the strait.
26 October:
- 0614: Kurita Force sighted at western end of Tablas Strait, when AKISHIMO and HAYASHIMO begin to catch up. However, HAYASHIMO is down to 7 tons of useable fuel and has to slow to 12 knots. Because of this, at 0750 Comdesdiv 2 Captain Shiraishi releases AKISHIMO and orders her to speed up to rejoin the Main Body.
- 0910 Comdesron 2 orders AKISHIMO to return to HAYASHIMO. However Captain Shiraishi in turn orders AKISHIMO to assist torpedoed NOSHIRO. At 1000 HAYASHIMO was down to 5 tons of fuel. Captain Shiraishi decided she must temporarily anchor near Semirara Bay. The ship will be lightly grounded on a reef at low tide for temporary repairs to plug the leaks. The torpedo warheads jettisoned as a precaution.
- 1045-1050: HAYASHIMO attacked by torpedo planes. One torpedo hits the port bow far forward around frame 12 so that it collapses the forecastle deck forward of frame 17 and No.1 turret in such as way as to fold down to form a `blunt' bow. All personnel in No.1 turret are killed. The folded bow forms an artificial bulkhead and the destroyer is thus able to remain navigable but has burned up nearly all of her fuel. Lt.Cdr. Hirayama is wounded, and Captain Shiraishi takes direct command.[2]
- 1118: OKINAMI (loaded with SUZUYA survivors) sights HAYASHIMO "lying to" west side of Semirara Island. Learning by blinker that the latter is down to a mere 5 tons of fuel, OKINAMI comes alongside to transfer some fuel.
- 1440: OKINAMI is forced to suspend the refuel attempt because of enemy planes. Her skipper recommends that HAYASHIMO be abandoned, but Hirayama refuses. Therefore OKINAMI leaves the area and proceeds to Coron. She
carries a report of HAYASHIMO's situation since her radio is inoperable. By this time, 15 tons of fuel had been pumped into an undamaged tank, and Hirayama plans to steam stern-first to Coron, but more fuel and escort is needed before can continue the voyage. Therefore it was decided to "park" HAYASHIMO overnight just north next to Dalit Island at the mouth of Semirara Bay. (Also known as Ilogao Bay) The water was shallow enough to prevent sinking from further attacks, and Dalit Island offered shelter for the crew if required.
27 October:
- 0235 Coron: Comdesron 2 Hayakawa Mikio aboard HAMANAMI orders FUJINAMI (then somewhere between Tablas Strait and Coron) "after 60% refueling, to proceed to HAYASHIMO at Semirara, refuel her," and bring her home.
- Morning: Not long after sunrise at 0645 the first of several harassing air attacks begin in the Mindoro-Semirara Island area. FUJINAMI arrived and attempts to assist, only to be hit by a bomb amidships, broken in half, and sunk at approximately 0920. HAYASHIMO herself is attacked again, and unable to send boats to rescue due to strafing. A second rescue ship, destroyer SHIRANUHI, arrives, only to herself be sunk by dive-bombers around 1330. Ultimately the entire crew of both destroyers and the CHOKAI survivors aboard FUJINAMI all perish.[3] In exchange, HAYASHIMO claimed one plane shot down in turn.
- Sunset: At day's end repeated near-misses have rendered HAYASHIMO's rudder inoperable and flooded her steering room; causing her to settle aft with fantail awash and become firmer aground. That evening a fire broke out in the engine room and raged unchecked, further gutting the vessel.
28 October:
Sunk (Bottomed): With stern firmly settled and aground on the reef, HAYASHIMO is judged out of action. Lt.Cdr. Hirayama has the ensign lowered and most crew trasferred to the nearby islet. [4]
1 November:
1015: A floatplane from NACHI looking for SHIRANUHI spots the grounded HAYASHIMO and lands. ComDesdiv 2 Shiraishi writes a letter for the pilot to take back to Manila to arrange for the rescue of 50 wounded and 150 other survivors gathered on the islet. Rescue is not urgent, as provisions for two months are on hand.
8 November:
At orders of Special Base Force 31 in Manila, NO.3 ASAHI MARU and two motor sailing vessels - "kihansen" (Combination wood screw-sail boats) - are en-route to pick up the survivors from Semirara.
12 November:
Nearly all remaining crew removed from the ship and island by the rescue force. Approximately 120 survivors, including Comdesdiv 2 (Captain Shiraishi) and Lieutenant Commander Hirayama (to C.O. SUZUTSUKI). Most of her officers and crew leave HAYASHIMO for Manila. A caretaker crew of 30 men armed with rifles and pistols led by Lt. Tanaka Giichi is charged to remain behind with provisions on the adjacent islet to stand watch over the wreck to prevent capture, until sufficient explosives arrive to destroy the vessel.
14 November:
The lighter bearing HAYASHIMO's officers and crew arrives at Manila.
25 November:
An enemy patrol plane makes a low level run over grounded HAYASHIMO. This is repeated each day after.
30 November:
Because of the increased air attack danger; all remaining personnel of the caretaker crew leave HAYASHIMO and moved ashore. There engaged in "observation duties." No further casualties had been sustained.
3 December:
- 1420: HAYASHIMO is attacked and bombed by a low-flying B-24. One direct bomb hit in the vicinity of the galley on the port-side of the bridge was received, and the area heavily damaged. All sections below the water line except No.3 crew space and No.1 magazine were flooded. HAYASHIMO settled down 1 meter further. The charges in No.1 turret were burnt and fire broke out elsewhere. The phone system was also put out of action. After this attack HAYASHIMO is finally and truly abandoned. The caretaker crew leaves the islet and proceeds in two cutters over to Mindoro Island, where they join the army garrison there.
15 December:
- 1340: The abandoned wreck was
shelled briefly again during the Mindoro landings by USS Walke which fires more than 100 rounds into HAYASHIMO and sets her afire again, but the damage is unknown.[5]
10 January 1945:
Removed from Navy List.
April-May 1946:
The grounded wreck of HAYASHIMO is inspected by the Americans and items of interest documented or removed. Thereafter, disposition is unclear. It is unknown if ever fully salvaged. At this time the destroyer was still upright, but with fantail submerged to top of No.3 turret.
For full context, see Anthony Tully's book:
The Battle of Surigao Strait
See Also Hayashimo on:
Shipwrecks of the IJN
Acknowledgements: Special thanks to Anthony Tully and Bill Somerville for contributing from their works to this TROM.
