JUNYOKAN!
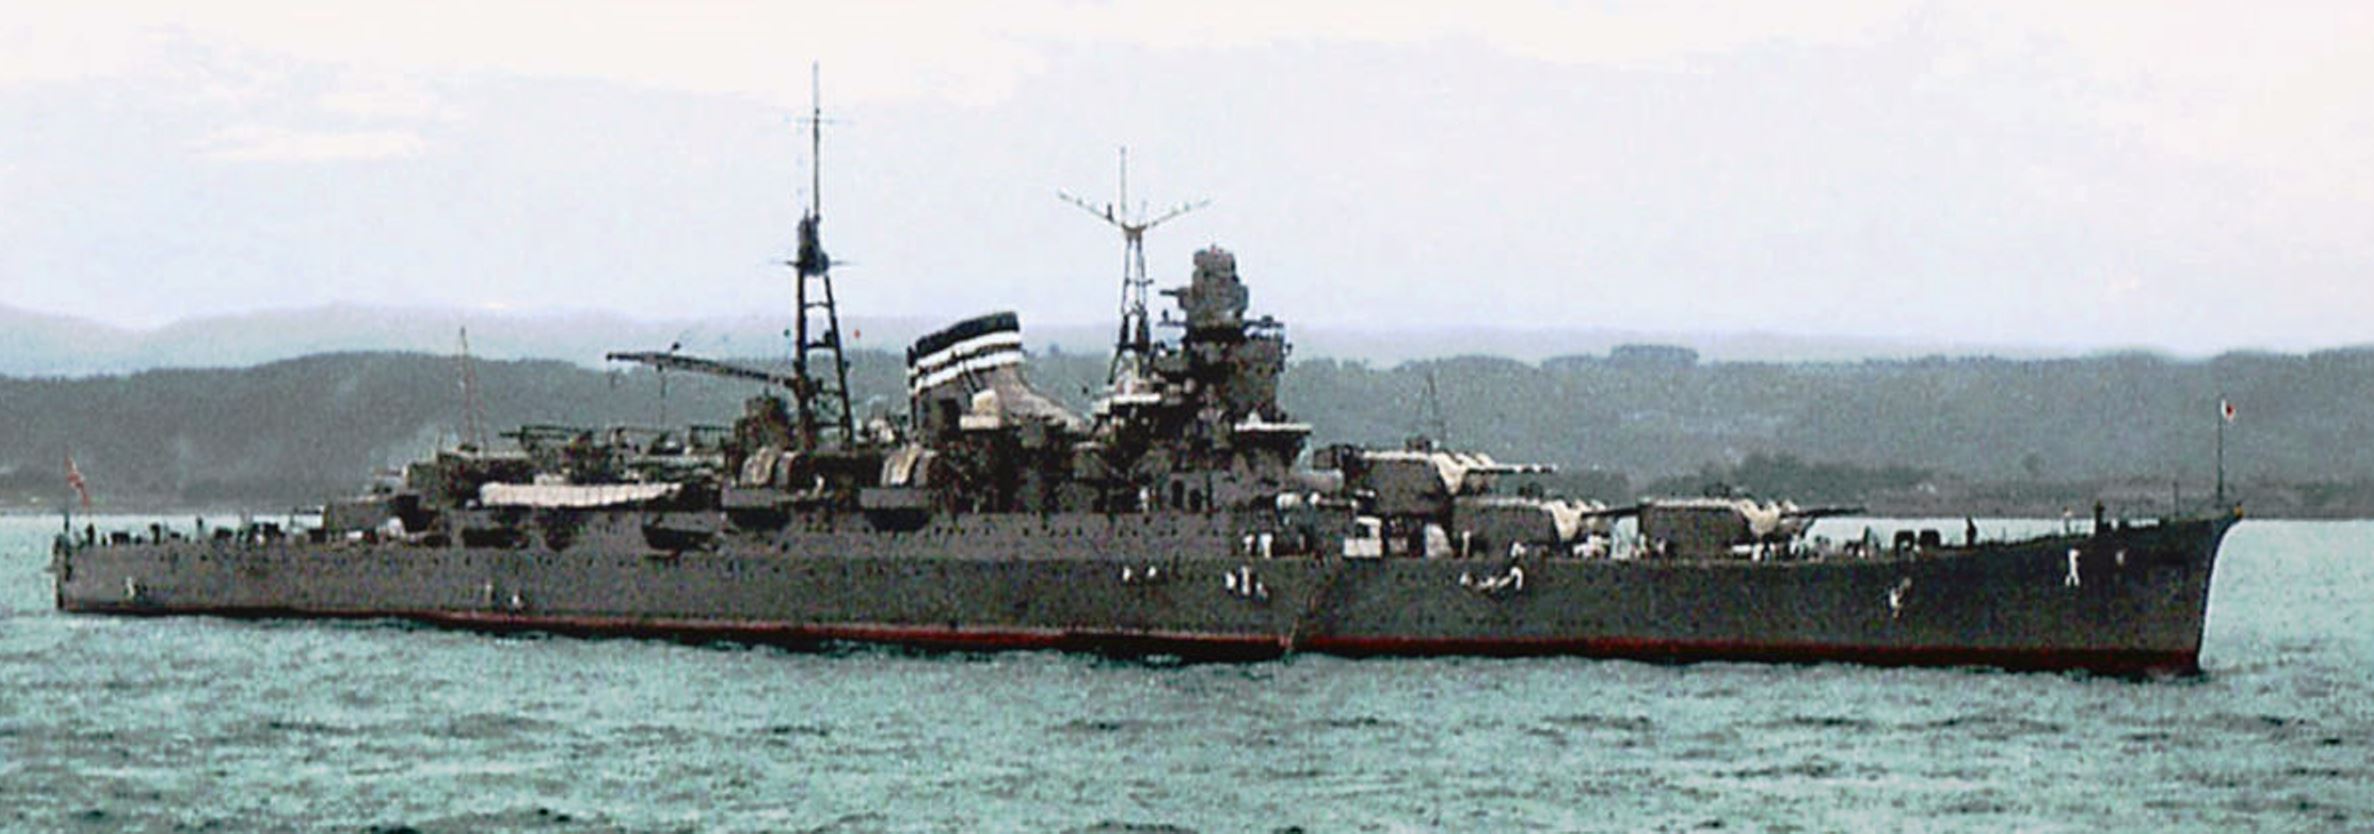
(MIKUMA in
1939 - colorized by Irotooko, Jr)
IJN MIKUMA: Tabular Record of
Movement
© 1997-2019 Bob Hackett and Sander Kingsepp
Revision 9
24 December 1931:
Nagasaki. Laid down at Mitsubishi's shipyard.
31 May 1934:
Launched and named MIKUMA.
1 June 1934:
Captain (later Rear Admiral) Yoshida Tsunemitsu
(36)(former ComDesDiv 7) is appointed the Chief Equipping Officer (CEO).
4 July 1934:
Captain Suzukida Kozo (37)(former CO of SENDAI) is
appointed the CEO.
29 August 1935:
Completed and registered in the IJN. Captain Suzukida
Kozo is the CO.
26 September 1935:
During the Annual Grand Exercise MIKUMA and
MOGAMI are caught by a typhoon and experience deformation of their hulls.
15 November 1935:
Captain (later Vice Admiral) Takeda Moriji
(38)(former CO of KINUGASA) is appointed the CO.
1 December 1936:
Captain (later Rear Admiral) Iwagoe Kanki
(38)(former CO of IZUMO) is appointed the CO.
1 December 1937:
Captain (later Vice Admiral) Irifune Naosaburo
(39)(former Naval Gunnery School instructor) is appointed the CO.
15 November 1938:
Captain (later Vice Admiral) Hiraoka Kumeichi
(39)(former CO of ASAHI) is appointed the CO of HIEI and MIKUMA as additional
duty.
15 December 1938:
Captain (later Vice Admiral) Abe Koso (40)(former
CO of TENRYU) is appointed the CO.
20 July 1939:
Captain (later Vice Admiral) Kubo Kyuji (38)(current
CO of SUZUYA) is appointed the CO of MIKUMA as additional duty.
15 November 1939:
Captain (later Vice Admiral) Kimura Susumu
(40)(former chief of the experimental navigating section at Yokosuka Navy
Yard) is appointed the CO.
1 November 1940:
Captain (Rear Admiral, posthumously) Sakiyama
Shakao (42)(former CO of ABUKUMA) is appointed the CO.
22 September 1940:
Vichy France cedes airfields and agrees to
admission of Japanese troops into northern Indochina (Cambodia, Laos and
Vietnam). The United States responds by placing a ban on the export of steel,
scrap metal and aviation fuel to Japan.
16 July 1941:
CruDiv 7's MOGAMI, MIKUMA, KUMANO and SUZUYA depart
Kure.
22 July 1941:
Arrives at Samah, Hainan Island, China.
23 July 1941: Operation "FU"- The Occupation of South Indochina
(Cochinchina) :
Japanese and Vichy French authorities arrive at an
"understanding" regarding the use of air facilities and harbors in Southern
Indochina. From the next day on, Japanese forces occupy the country.
25 July 1941:
CruDiv 7 departs Samah escorting an army convoy, perhaps
also with ASHIGARA and CarDiv 2's HIRYU and SORYU.
30 July 1941:
Arrives at Saigon.
31 July 1941:
Departs Saigon.
7 August 1941:
Arrives at Sukumo Bay, Japan.
19 August 1941:
Departs Sukumo Bay.
20 August 1941:
Arrives at Kure.
20 November 1941:
MIKUMA is in Vice Admiral (later Admiral) Inoue
Shigeyoshi's (former CO of HIEI) Fourth Fleet in Rear Admiral (later Vice
Admiral) Kurita Takeo's (former CO of KONGO) CruDiv 7 with MOGAMI, SUZUYA and
KUMANO (F).
That day, CruDiv 7, except KUMANO, departs Kure with CruDiv 4's CHOKAI.
KUMANO, with Admiral Kurita embarked, departs Kure three days later.
26 November 1941:
CruDiv 7 and CHOKAI arrive at Samah, Hainan Island,
Occupied China.
29 November 1941:
KUMANO arrives at Samah.
2 December 1941:
CruDiv 7 receives the signal "Niitakayama nobore
(Climb Mt. Niitaka) 1208" from the Combined Fleet. This signifies that X-Day
hostilities will commence on 8 December (Japan time). [1]
4 December 1941:
CruDiv 7 departs Samah southward in Vice Admiral
Ozawa Jisaburo's (former CO of HARUNA) First Southern Expeditionary Fleet with
CHOKAI, SubRon 5's light cruiser YURA and destroyers FUBUKI, SHIRAKUMO, AYANAMI,
ISONAMI, SHIKINAMI, MURAKUMO, SHIRAYUKI and HATSUYUKI.
8 December 1941: Operation "E" - The Invasion of Malaya:
CruDiv 7's
operates off Cap Camau during the landings at Singora, Patani and Kota Bharu.
Provides close support.
9 December 1941:
CruDiv 7 and DesRon 3's light cruiser SENDAI, DesDiv
19's AYANAMI, ISONAMI, SHIKINAMI and URANAMI are ordered to make night attack on
the new battleship HMS PRINCE OF WALES and old battlecruiser REPULSE.
10 December 1941:
At dawn, CruDiv 7 and DesRon 3 join BatDiv 3's KONGO
and HARUNA, CruDiv 4's ATAGO and TAKAO. After the British ships are reported
sunk by aircraft, CruDiv 7 departs the area for Poulo Condore, Indochina.
12 December 1941:
Departs Poulo Condore.
14 December 1941:
Provides cover for the Second Malaya Convoy NE of
Kuantan.
19 December 1941:
Arrives at Camranh Bay, Indochina.
22 December 1941: Operation "Q" - The Invasion of Kuching:
Departs
Camranh with MOGAMI.
23-27 December 1941:
Covers the landings at Kuching.
29 December 1941:
Returns to Camranh.
16 January 1942:
CruDiv 7 departs Camranh with CHOKAI, light cruisers
SENDAI and YURA and destroyers to intercept British units out of Singapore. The
orders are later cancelled.
19 January 1942:
Arrives at Camranh.
23 January 1942:
Departs Camranh with MOGAMI to the Cap St Jacques
area to cover the landings at Endau.
28 January 1942:
Arrives at Camranh.
10 February 1942:
In the morning, CruDiv 7 departs Camranh Bay with
CHOKAI to escort 25 invasion transports.
That same day, LtCdr Theodore Aylward in the USS SEARAVEN (SS-196)
receives an "Ultra" message from Captain (later Vice Admiral) John Wilkes,
ComSubAsia in Java alerting SEARAVEN that a convoy departed Camranh Bay heading
towards Sumatra. Aylward races to the position given, submerges and waits.
11 February 1942:
In the morning, in heavy seas, the convoy appears
on the horizon. Aylward sets up on two heavy cruisers and at close range fires
two torpedoes at each cruiser, but all four torpedoes – unreliable Mark 14s –
miss.
13 February 1942: Operation "L" - The Invasion of Borneo and Sumatra:
CruDiv 7 covers the invasion landings at Palembang and Bangka Island, Sumatra.
17 February 1942 :
CruDiv 7 detaches for refueling and resupply at
Anambas Island.
24 February 1942:
CruDiv 7 departs Anambas Island for the invasion of
Java. Detaches with MOGAMI to cover the landings in Bantam Bay.
28 February 1942: The Battle of the Sunda
Strait:[2]
USS HOUSTON (CA-30) and Australian cruiser HMAS PERTH
sortie for Tjilatjap via the Sunda Strait. At 2215, they attack Japanese troop
transports screened only by destroyers HARUKAZE, HATAKAZE and FUBUKI. The
destroyers make smoke to mask the transports. FUBUKI charges and launches a
salvo of torpedoes at HOUSTON and PERTH.
At 2300, the Western Support Force's MIKUMA and MOGAMI, destroyer
SHIKINAMI, Third Escort Force's light cruiser NATORI and destroyers SHIRAKUMO,
MURAKUMO, SHIRAYUKI, HATSUYUKI and ASAKAZE arrive and engage HOUSTON and PERTH
with gunfire and torpedoes. During the battle, MIKUMA loses six men and eleven
others are wounded.
At 2308, torpedoes strike both HOUSTON and PERTH. At 2342, PERTH sinks at
05-51-42S, 106-07-52E.
1 March 1942:
At 0036, HOUSTON sinks at 05-48-45S, 106-07-55E.
4 March 1942:
CruDiv 7 departs Java.
5 March 1942:
Arrives at the Seletar Naval Base, Singapore.
9 March 1942:
CruDiv 7 and CHOKAI depart Singapore.
12 March 1942: Operation "T" - The Invasion of Northern Sumatra:
Covers the landings at Sabang and Iri.
15 March 1942:
Arrives at Singapore.
20 March 1942:
CruDiv 7 and CHOKAI depart Singapore to support the
seizure of Andaman Islands.
26 March 1942:
Arrives at Mergui, Burma.
1 April 1942:
At 1100, Vice Admiral Ozawa Jisaburo's Second
Expeditionary Fleet departs Mergui and steams into the Bay of
Bengal to attack merchant shipping with CruDiv 4's CHOKAI (F) and CruDiv 7's
SUZUYA, KUMANO, MIKUMA and MOGAMI, light cruiser YURA and destroyers FUBUKI,
SHIRAYUKI, HATSUYUKI and MURAKUMO, which are replaced on 3 April by AYANAMI,
YUGIRI, ASAGIRI and SHIOKAZE. YURA and CHOKAI support CarDiv 4's light carrier
RYUJO.
5 April 1942:
At 2030, Ozawa's Mobile Force separates into three
groups to attack merchant shipping in the Bay of Bengal. CruDiv 7/1's KUMANO
and SUZUYA, under Rear Admiral Kurita, form the Northern Group with destroyer
SHIRAKUMO. Carrier RYUJO, CHOKAI, SubRon 5's light cruiser YURA, DesDiv 20's
YUGIRI and ASAGIRI form the Center Group under Admiral Ozawa. MIKUMA (F), MOGAMI
and destroyer AMAGIRI form the Southern Group with MIKUMA's skipper Captain
Sakiyama Shakao in tactical command.
6 April 1942:
Bay of Bengal (16N, 81-40-82-25E). Sakiyama's Southern
Group sinks two ships. They first encounter the British 7,726-ton
passenger-cargo ship DARDANUS, towed by the 5,281-ton cargo steamer GANDARA.
The three Japanese ships promptly open fire on the two merchantmen, which are
finished off with torpedoes from AMAGIRI. The 6,622-ton cargo steamer INDORA
is sunk later. MIKUMA expends 120 8-in and 22 12.7-cm rounds.
In all Ozawa's commerce raiding detachment sinks twenty ships of about
93,247 tons during their brief foray in the Bay of Bengal.
11 April 1942:
Ozawa's Force arrives at Singapore.
13 April 1942:
CruDiv 7 departs Singapore.
16 April 1942:
CruDiv 7 arrives at Camranh.
17 April 1942:
CruDiv 7 departs Camranh.
22 April 1942:
CruDiv 7 arrives at Kure.
4 May 1942:
Drydocked for overhaul and hull cleaning.
12 May 1942:
Undocked.
15 May 1942:
CruDiv 7 departs Kure for three-day exercises with
BatDiv 1's YAMATO, NAGATO and MUTSU in the area around Hashirajima.
18 May 1942:
Arrives back at Kure. Liberty is granted that evening.
22 May 1942:
CruDiv7 departs Hashirajima that night with DesDiv 8's
ASASHIO and ARASHIO that provide close escort.
26 May 1942:
CruDiv 7 arrives at Guam (renamed Omiyajima) to provide
close support for Rear Admiral (later Vice Admiral) Tanaka Raizo's (former CO of
KONGO) Midway Invasion Transport Group's oiler AKEBONO MARU and transports
KIYOSUMI, ZENYO, ARGENTINA, BRAZIL, AZUMA, KEIYO, GOSHU, KANO, HOKURIKU,
KIRISHIMA and NANKAI MARUs and TOA MARU No. 2. The transports carry 5,000
troops.
MIKUMA refuels from an oiler.
28 May 1942:
CruDiv 7 departs Guam covering Rear Admiral (later Vice
Admiral) Fujita Ruitaro's (former CO of FUSO) Seaplane Tender Group's CHITOSE
and KAMIKAWA MARU of the Close Support Group. MIKUMA's crew is informed of the
plan to attack Midway. It is also announced that upon the completion of the
Midway operation they will proceed to the Aleutian Islands and from there to
Australia.
30 May 1942:
CruDiv 7 and DesDiv 8 rendezvous with the Transport
Group and oiler NICHIEI MARU.
4 June 1942: Operation "MI" - The Battle
of Midway:
The Commander-in-Chief of the Combined Fleet, Admiral
(Fleet Admiral, posthumously) Yamamoto Isoroku (former CO of AKAGI) orders
Midway to be shelled. CruDiv 7 is tasked to accomplish the shelling at 1050 (I).
CruDiv 7 and DesDiv 8 are 410 miles away from the island, so they make a
high-speed dash at 35 knots. The sea is choppy and the destroyers lag behind. At
2120, the order is canceled.
At 2138, flagship KUMANO spots the surfaced submarine USS TAMBOR
(SS-198). KUMANO signals a 45° simultaneous turn to starboard to avoid possible
torpedoes. The emergency turn is correctly executed by the flagship and SUZUYA,
but the third ship in the line, MIKUMA, erroneously makes a 90° turn. Behind
her, MOGAMI turns 45° as commanded. MOGAMI's navigator, watching SUZUYA, does
not see MIKUMA's movement. This results in a collision in which MOGAMI rams
MIKUMA's portside below the bridge. MOGAMI's bow caves in and she is badly
damaged. MIKUMA's portside oil tanks rupture and she begins to spill oil, but
otherwise her damage is slight.
After learning about the collision, the Commander of the Second Fleet,
Vice Admiral (later Admiral) Kondo Nobutake (former CO of KONGO) orders Vice
Admiral Kurita to have DesDiv 8's ARASHIO and ASASHIO stay behind and escort
MOGAMI and MIKUMA. Flagship KUMANO and SUZUYA are detached. The MOGAMI group
retires westward at a reduced speed of 12 kts with MIKUMA leading the group.
5 June 1942:
At 0630 the cruisers are sighted by a PBY "Catalina"
flying boat from Midway. At 0805, VMSB-241's six Douglas SBD-2 "Dauntless"
dive-bombers and six Vought-Sikorsky SB2U-3 "Vindicators" from Midway, led by
Captain Marshall A. Tyler, attack MIKUMA and MOGAMI, but they only score several
near misses. Captain Richard E. Fleming's "Vindicators" target MIKUMA,
steaming on MOGAMI's port bow. Fleming's dive-bomber is hit by the 25-mm flak,
setting his aircraft afire. Fleming drops his bomb and crashes into the sea. [3]
At 0834, MIKUMA and MOGAMI are bombed from high altitude by eight
Boeing B-17 "Flying Fortresses" from Midway, led by LtCol Brooke E. Allen, but
they score no hits. After the attack the speed of the group is increased to 14
kts.
6 June 1942:
MIKUMA and MOGAMI are heading for Wake Island. After
0950 they are attacked by 26 SBD-3 dive-bombers from USS HORNET (CV-8).
MIKUMA, erroneously identified as a battleship, escapes with a near miss.
She reports three dive-bombers shot down (two were actually lost).
After 1245 MIKUMA and MOGAMI are attacked by 31 SBD-3 dive-bombers from
USS ENTERPRISE (CV-6). MIKUMA receives five direct hits and two near misses.
The first bomb strikes the roof of No. 3 main gun turret. Captain Sakiyama,
stationed in the air defense station, is severely injured by its blast. His XO,
Cdr Takashima Hideo (47) takes over the conn. Two hits devastate the starboard
forward engine room; the port aft engine room is likewise disabled by a direct
hit. A hit near the bridge sets off ready service AA shells and causes
considerable damage to the bridge structure and personnel. Several
fires break out amidships and MIKUMA goes dead in the water. At 1358 several
torpedoes explode, wrecking the catapult deck and the mainmast and blowing
out a section of the hull below the waterline. After receiving the reports
from the damage control teams Cdr Takashima gives the order to abandon ship.
MOGAMI and ARASHIMA come alongside to pick up the survivors.
Around 1500 MIKUMA and MOGAMI are attacked by 23 dive-bombers from USS
HORNET. MIKUMA receives another bomb hit, killing Cdr Takashima among the
others. Several of MIKUMA's survivors are killed aboard ARASHIO when the
latter receives a direct hit.
By 1525 MIKUMA and ARASHIO complete the rescue of 240 survivors and
depart the area, heading west. Around 1715 the foundering cruiser is
photographed by two SBD-3s from USS ENTERPRISE.
Around 1930 MIKUMA turns on her port side and sinks at 29-28N, 173-11E.
A total of 700 crewmen are killed.
Later, Admiral Kondo orders ASASHIO back to search for more survivors
from MIKUMA and to scuttle her. She searches, but fails to find the cruiser.
8 June 1942:
MOGAMI, ASASHIO and ARASHIO rendezvous with CruDiv 7.
MIKUMA's survivors are transferred to KUMANO and SUZUYA.
9 June 1942:
USS TROUT (SS-202) passes through a large oil slick and
some debris, then rescues Chief Radioman Yoshida Katsuichi and Fireman, 3rd
Class Ishikawa Kenichi of MIKUMA from a large wooden hatch cover. TROUT takes
them to Pearl Harbor as POWs five days later.
13 June 1942:
Captain Sakiyama dies aboard SUZUYA. He is promoted Rear
Admiral, posthumously. [4]
10 August 1942:
Removed from the Navy List.
Authors' Notes:
[1] Mt. Niitaka, located in Formosa (now Taiwan), was the
highest point in the Japanese Empire at the time.
[2] See "Naval
Alamo" for more about the 1942 naval battles off Java.
[3] Captain Richard Fleming was posthumously awarded the Medal of Honor.
Contrary to a popular legend he did not crash his dive-bomber into MIKUMA. The
wreckage atop her No. 4 turret, shown on a photo from 6 June appears to be
a section of the mainmast.
[4] The best account about the loss of MIKUMA to date is provided in the
book "Shattered Sword: The Untold
Story of the Battle of Midway" by Jonathan Parshall and Anthony Tully.
Special thanks for assistance in researching the IJN officers mentioned
in this TROM go to Mr. Jean-François Masson of Canada. Thanks also go to "Adm.
Gurita" of the Netherlands, Andrew Obluski of Poland and Randy Stone of the
United States. - Bob Hackett and Sander Kingsepp.
Thanks also go to Rob Stuart of Canada for additional info about
"Operation C". For more info on "Operation C" please see Rob's splendid 20
Ships, Not 23: Ozawa’s Score, 5-6 April 1942. NB: Older map on this TROM
page erroneously shows 23 ships sunk.
- Bob Hackett and Sander Kingsepp.
Back to
Cruiser Page

