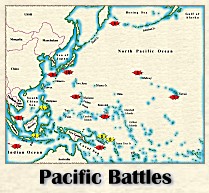
The Solomon Islands were the scene of the Pacific war's lengthiest and most bitterly fought naval campaign. Including the fighting in the immediate vicinity of Guadalcanal, more than a dozen battles raged in these confined waters. Most of them were night surface battles, where the weapons and tactics of the Japanese Navy were at their finest. Unfortunately, the Japanese were faced with a foe willing to accept heavy losses in order to prevail, and also one who learned from past mistakes.
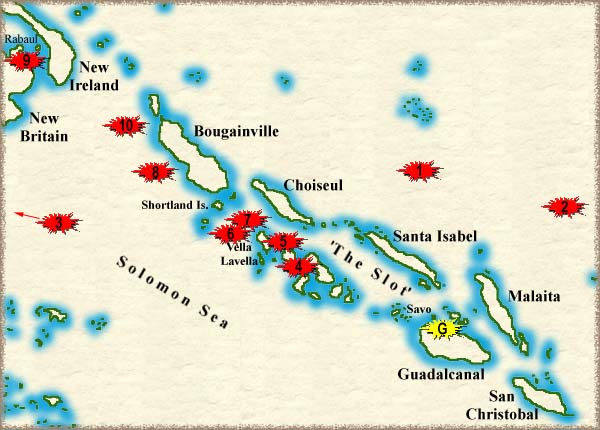
(Map developed from Dull, "A Battle History of the Imperial Japanese Navy." Original map by Donald Hoegsburg)
Legend:
 = Battle
 = Campaign
#1 = Battle of Eastern Solomons, August 23-25, 1942
#2 = Battle of Santa Cruz, October 25-27, 1942
#3 = Battle of the Bismarck Sea, March 3-4, 1943
#4 = Battle of Kula Gulf, July 6, 1943
#5 = Battle of Vella Gulf, August 6-7, 1943
#6 = Battle off Horaniu, August 18, 1943
#7 = Battle of Vella Lavella, October 6, 1943
#8 = Battle of Empress Augusta Bay, November 2, 1943
#9 = Carrier Raid on Rabaul, November 5, 1943
#10 = Battle of Cape St. George, November 26, 1943
Aftermath
G = Battles off of Guadalcanal
#1. Battle of Eastern Solomons
(August 23-25, 1942)
The first major carrier battle over the Solomons occurred shortly after the American landings. The Japanese realized that reinforcements were desperately needed on the island. Simultaneously, they needed to knock out the American airbase at Henderson Field, which was quickly becoming a menace to Japanese shipping in the area. Consequently, Admiral Yamamoto put together a powerful expeditionary force whose aim was first to destroy any American fleet units that might be in the area, and then eliminate Henderson Field. This force sortied from Truk on August 23rd. Simultaneously, several other reinforcement, support, and bombardment groups sortoed from both Truk and Rabaul.
The Americans would have had three carriers with which to meet the Japanese force, but Wasp was detached to refuel on the 23rd, so she would be out of the coming action. Thus, the Americans would field two carriers (Saratoga and Enterprise) and 176 aircraft to the Japanese two heavy carriers (Shokaku, Zuikaku) and one light carrier (Ryujo) and 177 aircraft; pretty much a straight-up fight. As he was prone to, however, Yamamoto divided his forces, sending Ryujo off by herself in advance of the main force, ostensibly to be in a position to attack Henderson Field, as well as supporting the Guadalcanal reinforcement convoy under Raizo Tanaka coming down the Slot from Rabaul.
As usual, division of forces cost the Japanese, as the Americans got in the first blow. Catching Ryujo by herself, and with most of her fighters either gone (on a strike against Guadalcanal) or (inexplicably) still on her decks, they quickly turned her into a burning, sinking wreck. The Japanese heavy carriers, however, counterattacked and damaged Enterprise badly with three bomb hits. However, she managed to transfer the majority of her airwing to Henderson Field before limping away to the southeast. A second Japanese strike failed to find the Americans (which meant that Enterprise would live to fight another day). After an abortive attempt to engage the Americans in a night surface fight with battleships and cruisers, the Japanese Main Force began retiring to Truk.
This was a mistake. The Japanese heavy carriers were thus far unscathed, while they had rendered one of the American CVs impotent, thus leaving them with the advantage. Instead, by withdrawing, Yamamoto had left Tanaka's reinforcement convoy practically unprotected in the Slot. On the morning of the 25th, as the Japanese began approaching Taivu Point, American aircraft from Henderson found the convoy and gave it a pasting. A transport was sunk, and an older destroyer so badly hit that she had to be scuttled. Several other warships were damaged. At this point, Tanaka wisely withdrew.
The Japanese had an opportunity for a decisive victory and had failed to grasp it. American carrier power in the region was diminished, but not broken. Further, with the installation of Enterprise's aircraft at Henderson, the American airfield was a more prickly target than ever. This established an operational precedent, as Henderson would be fed a steady stream of carrier-borne reinforcements. Because of American airpower, the waters around Guadalcanal would continue to be a very dangerous place during the daylight hours.
| Battle of the Eastern Solomons | Japan | Allied |
| Starting Forces |
The following are the main Japanese groups involved. Some additional forces which did not contribute directly to the battle have been omitted.
Main Body (Nagumo)
 x2 x2
 x6 x6
Detached Carrier Strike Force (Hara)
 x1 x1
 x1 x1
x2
Vanguard Force, Main Body (Abe)
 x2 x2
x3
 x1 x1
x3
Support Force, Main Body (Kondo)
x5
x1
x6
+ 1 seaplane tender
Support Group, Reinforcement Force (Mikawa)
x4
Reinforcement Force
x1
x8
+ 3 transports, 4 patrol boats
 x177 (total for three carriers) x177 (total for three carriers)
|
TF 61 (Fletcher)
 x1 x1
 x2 x2
 x5 x5
TF 16
x1
 x1 x1
x1
 x1 x1
x6
 x176 (total for two carriers) x176 (total for two carriers)
|
| Losses |
x1 sunk (Ryujo)
1 seaplane tender damaged (Chitose</EM>)
x1 damaged (Jintsu)
x1 sunk (Mutsuki)
+1 transport sunk
x75 destroyed
|
x1 severely damaged (Enterprise)
x25 destroyed
|
Back to Top
#2. Battle of Santa Cruz
(October 25-27, 1942)
Yamamoto's second attempt to achieve naval superiority in the area around Guadalcanal came in late October. Shokaku and Zuikaku again formed the core of Combined Fleet's carrier forces, although Zuiho was along for the ride as well. And again, Yamamoto divided his forces into a van, main body, and a plethora of weak and mutually non-supportive support groups (oxymoron intended).
The Americans got their licks in early, punching a 50-foot hole in Zuiho's flight deck and sending her back to Truk. However, the Japanese put together a very effective attack against Hornet which left her dead in the water. Enterprise and several other American ships were also damaged. Several attacks later in the day crippled Hornet beyond repair, and as attempts to tow her had proved futile, she was abandoned. An American counterattack had badly damaged Shokaku, necessitating her withdrawal, and both the Japanese and the Americans quit the field soon thereafter. American losses had been more serious, but again they had managed to stave off the Japanese efforts to nullify Henderson Field.
| Battle of Santa Cruz | Japan | Allied |
| Starting Forces |
The following are the main Japanese groups involved. Some additional forces which did not contribute directly to the battle have been ommitted.
Main Body (Nagumo)
x2
x1
x1
x8
Vanguard Force (Abe)
x2
x3
x1
x8
Airgroup Force (Kakuta)
x1
x2
Advance Force (Kondo)
x4
x1
x6
x200 (approx.)
|
TF 16
x1
x1
x1
x1
x8
TF 17
x1
x2
x2
x6
x170 (approx.)
|
| Losses |
x1 badly damaged (Shokaku)
x1 badly damaged (Zuiho)
x1 badly damaged (Chikuma)
x4 damaged (Teruzuki)
x91 destroyed
|
x1 sunk (Hornet)
x1 badly damaged (Enterprise)
x1 damaged (South Dakota)
x1 damaged (San Juan)
x1 sunk (Porter)
x81 destroyed
|
Back to Top
#3. Battle of the Bismarck Sea
(March 3-4, 1943)
At the same time as the Guadalcanal campaign was raging, an equally bitter series of battles was occurring on the island of New Guinea. In early march, a convoy set out from Rabaul to land much-needed reinforcements in the Buna - Gona area. It was composed of eight transports escorted by eight destroyers, and screened by an inadequate light combat air patrol.
Unbeknownst to the Japanese, the American air force had been experimenting with a new aerial tactic called skip-bombing, wherein the attacking airplane drops a bomb with a long-delay fuze close to the surface and lets it skip into the side of the target ship. This was the first occasion in which the Americans would use this new tactic. As soon as the Japanese came under the radius of American airpower, the convoy was attacked relentlessly. The first day's attack (by high altitude B-17s) sank two transports and damaged a third. Two destroyers were tasked with rescuing the survivors and making a high speed run to New Guinea to deposit them. This they did, and returned to the plodding convoy before dawn the next day.
March 4 proved to be a disaster for the Japanese. Coming within range of American and Australian medium bombers, the convoy was savaged by skip-bombing and strafing. By noon, all six remaining transports and four of the destroyers were sinking or sunk. The remaining four destroyers recovered what few survivors they could and fled north to Rabaul. After this, the Japanese would never again attempt to run slow transports into the face of American airpower.
| Battle of the Bismarck Sea | Japan | Allied |
| Starting Forces |
x8
+ 8 transports
|
x120 (approx.)
|
| Losses |
x4 sunk (Arashio, Asashi, Shirayuki, Tokitsukaze)
+8 Transports sunk
|
x? destroyed
|
Back to Top
#4. Battle of Kula Gulf
(July 6, 1943)
On the night of July 5th, an American cruiser and destroyer task force was notified of the approach of a Japanese destroyer reinforcement group outbound from Buin. The Americans reversed course and moved to meet them off of Kolombangara. First contact was made at 0106 by Japanese radar (!) aboard Niizuki The Americans enjoyed an advantage in terms of gunfire, and the Japanese had several ships loaded with combat troops, but as usual the Japanese advantage in torpedoes and tactices made up the difference.
The Americans maintained a line-ahead formation and began firing at 0157. They quickly demolished Niizuki, which drew fire from every American cruiser. Japanese torpedoes were already in the water, however, and at 0203 they hitHelena, which lost her bow back to the No. 2 turret, and then took another two hits which sank her. Meanwhile, the Japanese had several vessels damaged by gunfire, and Nagatsuki had run aground. Both forces began a general retirement.
However, both sides still had destroyers in the area attempting to rescue survivors; one Japanese and two American. Around 0500 Amagiri and Nicholas exchanged torpedoes and then gunfire. Amagiri was hit and retired, leaving Niizuki's survivors to their fate. The Americans, by contrast succeeded in rescuing many of Helena's survivors. The final casualty was Nagatsuki; abandoned by her crew in the morning after they failed to get her afloat, she was bombed into a sinking state by US planes.
The losses were about even for both sides. Given the disadvantages the Japanese had labored under, the Americans really ought to have done better. This battle is intriguing, too, for the fact that it was the Japanese who used their search radar effectively. However, American radar gunfire control (which the Japanese still did not have) had allowed them to inflict rapid damage to the opposing force.
| Battle of Kula Gulf | Japan | Allied |
| Starting Forces |
x10
|
x3
x4
|
| Losses |
x2 sunk (Niizuki, Nagatsuki)
x2 damaged (Hatsuyuki, Amagiri, Suzukaze, Tanikaze)
|
x1 sunk (Helena)
|
Back to Top
#5. Battle of Vella Gulf
(August 6-7, 1943)
Yet another Japanese destroyer reinforcement group, this time headed for Kolombangara, was intercepted by an American destroyer force near Vella LaVella. The Americans used the black backdrop of Kolombangara to hide their ships. They also avoided using their guns until their torpedoes were in the water. By the time Shigure, which was at the tail end of the Japanese column (with Tameichi Hara aboard) spotted the Americans at 2344, the American fish were about a minute away from their targets. As Shigure began launching an eight-fish salvo, the three lead Japanese destroyers were hit within moments of each other. Shigure, too, was hit by a dud torpedo as she turned away. The fish punched a hole in her rudder.
The Americans then closed in to finish the job with gunfire. Practically no resistance came from the crippled Japanese DDs. Shigure had no choice but to run for her life. In all, the Japanese had lost three ships and over 1,200 men. The Americans suffered not a single casualty.
This battle is important because for the first time American destroyers had demonstrated that, given the opportunity, they could meet and best their opposite numbers. By being relieved of their normal duties of screening cruisers, and the linear tactics that role had thus far imposed, the American DDs were able to employ innovative torpedo tactics which had worked beautifully. The Japanese Navy had been served notice that its reign of nighttime torpedo supremacy was at an end.
| Battle of Vella Gulf | Japan | Allied |
| Starting Forces |
x4
|
x6
|
| Losses |
x3 sunk (Arashi, Kawakaze, Hagikaze)
x1 damaged (Shigure)
|
Nothing.
|
Back to Top
#6. Battle off Horaniu
(August 18, 1943)
By mid-July, the situation on Kolombangara was such that the Japanese were making every effort to remove heir troops. A Japanese barge convoy, escorted by destroyers, was sent out on the 17th to attempt the mission. An American destroyer force had come north that night to intercept and destroy the barges.
Both forces spotted each other at 0029 on the 18th. The Japanese launched torpedoes at very long range, but the Americans had formed up line abreast and thus combed their wakes. After another series of manuevers, however, the two destroyer forces found themselves line abreast and within long gunfire range. Both groups hammered away at each other, but were generally ineffective. At around 0100 the Isokaze's radar (erroneously) detected another American force closing from the south, at which point the Japanese retired. In the interim, though, most of the Japanese barges had scattered, leaving only two for the Americans to find and sink.
Neither side had been particularly impressive this night. The only redeeming feature for the Americans was the fact that with radar controlled gunfire they had at least scored more near-misses and straddles than their enemy. The other important thing to note is that, once again, the Americans had demonstrated that their destroyers (at least) were beginning to learn how to take the sting out of Japanese torpedo tactics.
| Battle off Horaniu | Japan | Allied |
| Starting Forces |
x4
+ 20 barges
|
x4
|
| Losses |
x1 lightly damaged (Isokaze, Hamakaze)
+ 2 barges sunk
|
Nothing.
|
Back to Top
#7. Battle of Vella Lavella
(October 6, 1943)
In October, the Japanese ran another /destroyer barge force towards Vella Lavella to try and rescue the 600-some soldiers stranded there. An American destroyer group was dispatched to block this movement. For once, the Japanese would enjoy a numerical advantage as they outnumbered the American destroyers nine to six, although three of their DDs also carried troops. Further, the American commander (Captain Walker) decided not to join his two groups of three destroyers before approaching the likely scene of battle. Thus he would bring his three 'tin cans' up against a much superior force.
The Japanese actually spotted the Americans visually a minute before American radar returned the favor, but the Japanese were unsure of their sighting for another several minutes. As luck would have it, their course and speed were such that they stood a good chance of crossing the American 'T'. However, the Japanese commander then engaged his squadron in a complex series of evolutions which wasted the intial advantage. At 2256, both columns opened up on each other simultaneously.
The Americans lost one ship (Chevalier) crippled almost immediately to a torpedo, and the next destroyer in line (O'Bannon) then proceeded to ram her sister. However, American gunfire was simultaneously tearing Yugumo apart. After a brief exchange of further gunnery between Selfridge, Shigure and Samidare, the Japanese retreated the way the came, apparently fearing larger American forces were approaching the area. The Japanese barges, however, accomplished their mission and rescued all the remaining Japanese troops on the island. All in all, not an impressive showing for the Americans, who should have waited to join forces before attacking the Japanese.
| Battle of Vella Lavella | Japan | Allied |
| Starting Forces |
x9
+ 20 barges
|
x6
|
| Losses |
x1 sunk (Yugumo)
|
x1 sunk (Chevalier)
x2 damaged (O'Bannon, Selfridge)
|
Back to Top
#8. Battle of Empress Augusta Bay
(November 2, 1943)
On November 1, 1943, the Americans landed a large amphibious force on the important island of Bougainville. They expected a vigorous response from the Japanese, and they got one. Admiral Sentaro Omori sortied from Rabaul at once with a powerful surface force of two heavy and two light cruisers, and six destroyers. The Americans, having sent most of their assault transports out of the danger zone before nightfall, awaited the Japanese with four light cruisers and eight destroyers. The advantage in both gunfire and torpedoes clearly lay with the Japanese.
Fortunately for the Americans, the Japanese force was a 'pick-up' team which hadn't practiced together, and Omori tried playing a game that was a little over his head. Confused by conflicting reports he was receiving from his scout planes as to the composition of the American force to his south, he executed a series of 180-degree turns (in pitch blackness) which were designed to give his aircraft more time to bring him information. Instead, all they did was throw his squadron into disarray, leaving his screening force far out of position, just as the Americans arrived on the scene. The Americans, coming upon the Japanese screen, launched torpedoes first, and then opened with guns. The Japanese screening force, upon spotting American destroyers, tried desperately to evade the torps they knew to be in the water, and ended up either colliding with each other or suffering near-misses. Sendai nearly hit Shigure, and Samidare sideswiped Shiratsuyu, staving in her hull and putting her out of the fight. Sendai was then buried in 6-inch gunfire.
Omori tried bringing his main bodyinto the battle. This only succeeded in causing further collisions, as Myoko tore Hatsukaze's bow off, and Haguro nearly hit two other destroyers. A brief, inconclusive fight followed between the two Japanese heavies and the four American lights. Although the Japanese launched a large salvo of torpedoes, they were ineffective. The Americans achieved several gunfire straddles, but failed to hit their targets. At 0229 Omori ordered a general withdrawal. The Americans found the hapless Hatsukaze (Myoko was still wearing her bow when she returned to Rabaul) and sank her with gunfire.
The Japanese had clearly lost this fight, failing to bring their heavy units to bear conclusively, and wiping out most of their own screening destroyers through their own ill-considered maneuvers. The invasion of Bougainville wouldn't be stopped this night.
| Battle of Empress Augusta Bay | Japan | Allied |
| Starting Forces |
x2
x2
x6
|
x4
x8
|
| Losses |
x1 sunk (Sendai)
x1 damaged (Agano)
x1 sunk (Hatsukaze)
x1 damaged (Shiratsuyu, Samidare)
|
Diddly.
|
Back to Top
#9. Carrier Raid on Rabaul
(November 5, 1943)
Rabaul was the stronghold of Japanese defense in the Solomons. Five separate airfields ringed the base there, stocked with several hundred aircraft maintained by 20,000 of the Empire's best aircraft technicians. The anchorage at Simpson's Harbor could usually be counted upon to be swarming with a variety of Japanese warships. As a result, it had never been seriously threatened by the Americans.
However, with the invasion of Bougainville, Rabaul was now directly jeopardized for the first time. Because the Battle of Empress August Bay had not turned out to Japan's advantage, she needed to act quickly to stomp out this threat. The Navy therefore reacted to reinforce Rabaul and prepare a counterstroke against the Bougainville invasion by moving a variety of additional cruisers to Rabaul. This was potentially very bad news for the Americans, because they had barely come away from the battle on the 2nd with a margin of victory. Against the forces now massing at Rabaul, there would be little chance of the American light surface units in the neighborhood of Bougainville prevailing. Furthermore, most of the US battleships and cruisers were elsewhere preparing for the invasion of Tarawa. In order to pre-empt a move by the Japanese, Rear-Admiral Frederick Sherman put together a bold operational plan to attack the Japanese force at its base. Racing in under a weather front with two carriers, Sherman relied on land-based airpower from New Guinea to protect his ships, while launching every one of his own planes to attack Rabaul. His sagacity was rewarded by near-total surprise and clear weather over the target.
Simpson's Harbor was crowded with ships, and most of them were refueling and in no way prepared to get underway. As they frantically cast off and scrambled for the harbor entrance, American aircraft had a field day. While no Japanese ships were sunk, many were damaged and would have to be sent back to Japan for months of repair work. Fewer than a dozen attacking aircraft were shot down. Upon recovering their aircraft, Sherman's raiders then raced away southward towards friendly air cover. The Japanese were unable to locate them before they escaped. Any Japanese hopes of contesting the Bougainville landings had vanished.
No one realized it at the time, but Rabaul was essentially finished as a prime naval base for the Japanese. Land-based airpower would now keep it under constant air attack, and its own air groups would be steadily depleted. As time passed, Rabaul would become a backwater, it's garrison of nearly 100,000 men left to 'wither on the vine,' its large group of skilled aircraft mechanics left with less and less to do.
| Carrier Raid on Rabaul | Japan | Allied |
| Starting Forces |
x7
x3
x11
|
x1
 x1 x1
+ escorts
x97
|
| Losses |
x6 damaged (Atago, Maya, Chikuma, Mogami, Takao, Suzuya)
x2 damaged (Agano, Noshiro)
x3 damaged (Fujinami, Amagiri, Wakatsuki)
|
x10 destroyed
|
Back to Top
#10. Battle of Cape St. George
(November 26, 1943)
With the Americans now consolidating their hold over Bougainville, the Japanese began beefing up troops and supplies on the island of Buka. On November 25, they put together yet another 'Tokyo Express' of five destroyers, three of them laden with troops, and sent them out of Rabaul. Waiting for them were six American destroyers. The Japanese succeeded in dropping off their loads at Buka, but trouble began on the way back home.
American radar spotted the Japanese first, allowing the Americans to close and launch torpedoes without being initially detected. Both of the Japanese screening destroyers were hit, sinking one (Onami) and crippling the other (Makinami). The Americans then closed in on the destroyer-transports, who scattered and ran for it. Yugiri didn't make it, being pounded by several opponents. The crippled Makinami was also sunk. The American forces tried a stern chase of the other two fleeing Japanese destroyers, but were unable to catch them.
No realized it at the time, but this was the last 'Tokyo Express', and the last surface fight in the Solomons. Freed from screening duties, US destroyers had again held their own against their vaunted Japanese adversaries. There would be no more major naval battles until the invasion of Saipan.
| Battle of Cape St. George | Japan | Allied |
| Starting Forces |
x5
|
x6
|
| Losses |
x3 sunk (Onami, Makinami, Yugiri)
|
Nada.
|
Back to Top
Aftermath
The end of the Solomon Islands campaign marked the snapping of the logistical backbone of the Japanese Navy. After months of grueling fighting in the region, the critical cruiser and destroyer contingents of Nihon Kaigun had been depleted past the point of recovery. Many vessels had been sunk in the course of the conflict, and many more seriously damaged and put out of action for months. Even those vessels still in some semblance of fighting trim had largely been denied regular maintenance and refits, making them less and less efficient as time wore on. The net result was a fleet that was in no position to assume the multiple burdens being placed upon it. Japan no longer had enough escorts to shield its remaining carriers, and guard convoys against submarine attacks, and retain sufficient strength (and profficiency) to engage in surface battles.
The Americans, by contrast, had now gained the initiative in the entire Pacific theatre. While American ship losses in the Solomons had been severe, they had been more than made up by the prodigious output of its hyperactive shipbuilding programs. The Americans had also done a better job of rescuing their surviving sailors and airmen than their Japanese opponents, meaning that the US Navy was preserving its cadre of veteran combat men. By the end of the Solomons campaign, therefore, the US Navy had not only begun to achieve material superiority, it was also pulling ahead technologically, tactically, and in terms of training. The Americans had now forged the naval power that would hand Japan an unbroken string of defeats until the end of the war.
Links From Related Partner Sites
WW2DB article on Solomon Islands Campaign
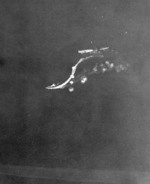 | 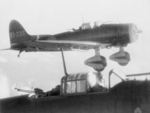 | 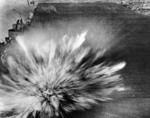 | 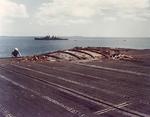 | 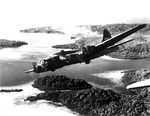 |
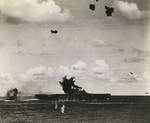
| Aerial view of Ryujo during the Battle of the Eastern Solomons, 24 Aug 1942 | Akimoto Tamotsu and Koitabashi Hiroshi flying their D3A carrier dive bomber (foreground) returning to carrier Shokaku after attacking USS Enterprise during Battle of the Eastern Solomons, 24 Aug 1942 | Bomb dropped by Japanese pilot Kazumi Horie exploding on the flight deck of USS Enterprise during Battle of the Eastern Solomons, 24 Aug 1942 | Upward bulge in the flight deck of USS Enterprise as the result of a bomb exploding below decks. The damage occurred in the Battle of the Eastern Solomons on 24 Aug 1942 but the photo was taken 2 Sep 1942 at Tongatabu, Tonga Islands. Note the cruiser USS San Juan. | B-17F Fortress “The Aztec’s Curse” of the 26th Bomb Squadron immediately after an attack on Ghizo Island in the Solomon Islands, 5 Oct 1942. |
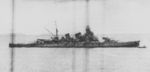 | 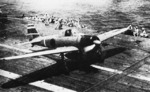 |  | 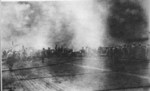 |  |
| Damaged cruiser Aoba off Buin, Bougainville, Solomon Islands, 13 Oct 1942; photo taken from cruiser Chokai | A6M2 Model 21 Zero fighter of Lieutenant Hideki Shingo preparing to take off from carrier Shokaku during Battle of Santa Cruz, 26 Oct 1942 | Bomb from Shigeyuki Sato’s Aichi D3A ‘Val’ dive bomber exploding on the deck of USS Hornet (Yorktown-class) during Battle of the Santa Cruz Islands, 26 Oct 1942. | Crew of Shokaku fighting fires during Battle of the Santa Cruz Islands, 26 Oct 1942 | Cruiser USS Northampton making preparations to take the stricken USS Hornet (Yorktown-class) under tow, Battle of Santa Cruz Islands, 26 Oct 1942. Note destroyer USS Russell alongside Hornet's port side. Photo 1 of 2. |
See all photos of Solomon Islands Campaign on WW2DB
Return to Pacific War Maps Page