Java Naval Battles

The campaign against Java and the Dutch East Indies in early 1942 demonstrated to the Allies, if any confirmation were still needed, that Pearl Harbor and the destruction of Force Z were anything but flukes. The Allied command, named ABDA for its American, British, Dutch, and Australian components, was by definition a polyglot force which suffered from all the normal disadvantages of differences in languages and lack of common training. By contrast, the Japanese forces ABDA would face were finely honed and supported by vastly superior airpower. The campaign that was about to unfold would reflect these disparities in full measure.

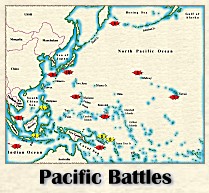
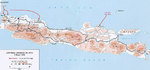
(Map developed from Dull, "A Battle History of the Imperial Japanese Navy." Original map by Donald Hoegsburg)
Legend:
 = Battle
#1 = Battle of Makassar Strait, February 4, 1942
#2 = Battle of Badung Strait, February 19-20, 1942
#3 = Battle of the Java Sea, February 27-March 1, 1942
#4 = Battle of Sunda Strait, February 28, 1942
Aftermath
#1. Battle of Makassar Strait
(February 4, 1942)
Another early demonstration of the value of air superiority came in this abortive attempt by ABDA to block a Japanese invasion force coming down the Makassar Strait. Sallying forth on the 3rd and heading north through the Strait, the Allies had a fairly sizable naval contingent at their disposal to stop this force. However, on the morning of the 4th, Japanese two-engine bombers began continuous attacks against the Allied ships. They succeeded in damaging two cruisers and forcing the entire squadron to withdraw south to Tjilitjap without ever firing a shot at the approaching Japanese invasion convoy. Makassar fell shortly thereupon.
| Battle of Makassar Strait | Japan | Allied |
| Starting Forces |
 x1 x1
 x1 x1
 x16 x16
 x numerous x numerous
+ 2 Seaplane Tenders
|
 x1 x1
 x2 x2
 x6 x6
|
| Losses |
x1 plane shot down
|
x1 damaged
x1 moderately damaged
|
Return to Top
#2. Battle of Badung Strait
(February 19-20, 1942)
The invasion of Bali was carried out by a relatively small advance force of Japanese warships covering a pair of transports. The transports successfully disgorged their troops in Sanur Roads, but were attacked during the day by Allied airpower. One of the transports was severely damaged. The Japanese withdrew the majority of their force to the north, detailing one pair of destroyers (Michishio and Arashio) to escort the cripple, and another pair (Oshio and Asashio) to bring up the rear with the undamaged Maru. Just as this latter pair was getting underway, the first of two Allied squadrons charged with breaking up the landings appeared. Composed of a Dutch and Australian light cruiser and three destroyers, it heavily outgunned the Japanese force. However, the Japanese bravely gave battle, first driving off the light cruisers through the channel northward, and then turning to attack the Allied destroyers. A successful torpedo attack resulted in the sinking of one of the Allied destroyers, which then shortly drew off to the south.
Shortly afterwards, however, the second Allied squadron of four U.S. destroyers and a Dutch light cruiser came up the Strait from the south as well. Oshio and Asashio again returned to defend the damaged transport against a second superior enemy force. In short order they had attacked the U.S. destroyers so fiercely as to force them to withdraw through the Strait to the north, leaving only the Dutch light cruiser Tromp to be dealt with. This they quickly did, hitting the cruiser eleven times in the superstructure in rapid succession. She, too, fled.
The final act was played out as some of the Allied warships retreating northward ran into Michishio and Arashio. A sharp fight developed, in which Michishio was heavily damaged. However, the Allied ships continued on their way without giving a serious fight.
The final result of this rather confusing action was that two superior Allied squadrons had been manhandled almost singlehandedly by a lone pair of audacious Japanese destroyers. It was a most embarrassing performance by the Allies, who were admittedly heavily fatigued, but who possessed more than enough firepower to deal handily with their Japanese adversaries. This was the first of the impressive night-fighting performances the Japanese Navy would turn in throughout the war.
| Battle of Badung Strait | Japan | Allied |
| Starting Forces |
x4
|
Flight One
 x2 x2
x2,  x1 x1
Flight Two
x1
x4
|
| Losses |
x1 moderately damaged
x2 lightly damaged
|
x1 moderately damaged
x1 sunk (Piet Hein)
|
Return to Top
#3. Battle of the Java Sea
(February 27-March 1, 1942)
This large, multi-staged fight was the first major stand-up surface fight between the Allies and Nihon Kaigun. It's outcome sealed the grim fate of ABDA, and presaged the fall of the entire Malay barrier to the Japanese.
The battle began as a large Japanese invasion convoy approached the east end of Java and Surabaja. Thereupon ABDA mustered every warship available to them and sortied to intercept the transports. They were met by a large Japanese force, including two heavy cruisers who hustled in at the last minute (leading to questions afterwards as to what might have been if the Allies had reacted a little sooner). In the fight that followed, the Allies again suffered from both a lack of modern warships and (even more so) from a lack of training time together as unit. The Japanese immediately used their 24" torpedoes to effect (sinking a destroyer) and their gunfire was accurate as well (damaging the HMS Exeter). The Allies thereupon began to withdraw to cover the crippled Exeter, but were continually harried by Japanese long-range gunfire and torpedo attacks which gradually whittled away at their destroyer force. Further, they were forced to detach four of the older American destroyers to return to port to refuel.
In the failing light conditions of the late afternoon and evening, the ABDA force's Dutch commander, Admiral Doorman, tried on several occasions to double back and attack the Japanese transports. But he was intercepted each time, and lost another destroyer to an uncharted minefield. Finally, in a devastating torpedo attack from the Japanese heavy cruisers, both Dutch light cruisers were hit and sunk in a matter of minutes, taking Admiral Doorman to his death. At this point the remaining two Allied ships, the cruisers Perth and Houston, fled westward towards Batavia.
The final grim phase of this battle was played out a day later, as the damaged Exeter and two destroyers tried to exit Surabaja to the north on the 28th and make a run for it. They were surrounded by several groups of patrolling Japanese cruisers and destroyers and summarily dispatched. Amazingly, the four older American destroyers who had exited the battle early on also departed Surabaja on the 28th. These refugees headed south through the Bali Strait and managed to give the Japanese squadron there the slip, and thereupon escaped to Australia.
The final result of this large and rather untidy action was the virtual elimination of ABDA as a naval threat to the Japanese advance. The invasion of western Java was delayed a mere twenty-four hours by the heroic sacrifices of the Allied forces.
| Battle of the Java Sea | Japan | Allied |
| Starting Forces |
 x2 x2
x2
x14
|
x1,  x1 x1
x3
x4, x5
|
| Losses |
x1 moderately damaged
|
x1 sunk (Exeter)
x2 sunk (Java, DeRuyter)
x1 sunk (Kortenaer, Electra, Jupiter, Encounter, Pope)
|
Return to Top
#4. Battle of Sunda Strait
(February 28, 1942)
The final act in the slaughter of ABDA occurred off western Java, as the Houston and Perth, fleeing from the debacle in the Java Sea, tried to break out through the Sunda Strait. And as it happened they came upon a Japanese landing force at Bantam Bay, covered by widely dispersed force of cruisers and destroyers. Houston and Perth immediately charged the exposed transports, which were protected at first by the destroyer Fubuki alone. The Allied cruisers were quickly mobbed by the various converging Japanese warships, which fired an unprecedented eighty-seven torpedoes at the two unexpected interlopers. Hit by gunfire and torpedoes, they both were sunk in relatively short order. The Japanese, however, paid the price for their profligate use of torpedoes, because they managed to sink two of their own vessels (a minesweeper and a transport), and severely damaged three more transports with friendly torpedo fire.
| Battle of Sunda Strait | Japan | Allied |
| Starting Forces |
x2
x1
x9
|
x1
x1
|
| Losses |
1 minesweeper sunk, 1 transport sunk, 3 transports damaged
|
x1 sunk (Houston)
x1 sunk (Perth)
|
Return to Top
Aftermath
The termination of the Java battles witnessed the Japanese not only securing the vast resources of the Southwest Pacific, but also firmly establishing a defensive perimeter along the arc of large islands stretching from Singapore east through Sumatra and Java, across the north shore of New Guinea, and finally on to its eastern anchor at Rabaul in New Britain. Nihon Kaigun had demonstrated conclusively that it was a naval power to be reckoned with. The Japanese were consummate fighters, and every bit the equal of the Western navies they had faced so far.
Return to Top
Links From Related Partner Sites
WW2DB article on Dutch East Indies Campaign, Java
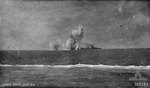 | 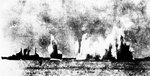 |  | 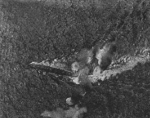 | 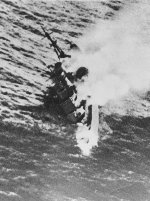 |
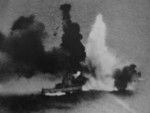
| Bombs from a Japanese aircraft falling around the Dutch cruiser Java in the Gasper Strait east of Sumatra, Dutch East Indies, 15 Feb 1942 | Cruiser Exeter under air attack by B5N aircraft in the Gaspar Strait, 15 Feb 1942; note bombs falling astern of the cruiser | HMS Exeter firing on Japanese aircraft, Gaspar Strait, 15 Feb 1942; photograph taken from HMAS Hobart | HMS Exeter under attack by B5N aircraft during the Gasper Strait sortie, 15 Feb 1942 | HMS Exeter sinking south of Borneo, Dutch East Indies, 1 Mar 1942, photo 1 of 2 |
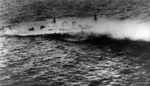 |  |  | 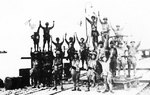 | 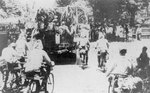 |
| HMS Exeter sinking south of Borneo, Dutch East Indies, 1 Mar 1942, photo 2 of 2 | HMS Exeter under attack during the Second Battle of the Java Sea, 1 Mar 1942, photo 1 of 2 | Map noting Japanese landings on Java, 1 Mar 1942 | Men of the Japanese 2nd Division celebrating successful landing, Merak, Java, 1 Mar 1942 | Japanese bicycle infantry, Java, Mar 1942 |
See all photos of Dutch East Indies Campaign, Java on WW2DB
Return to Pacific War Maps Page