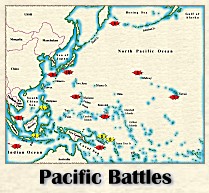
Guadalcanal Naval Battles

The island of Tulagi had been occupied by the Japanese during the Battle of the Coral Sea in May, 1942. The Japanese quickly established a seaplane base there. However, in June the Japanese began constructing a full-fledged airbase on the nearby island of Guadalcanal. Allied intelligence actually knew of Japanese intentions in the area shortly before the first Japanese construction units landed. An American response, in the form of the 1st Marine Division, was not long in coming. For the next four months, the waters around Guadalcanal would be the unlikely scene of the most bitter, protracted naval struggle of the Pacific War. Although neither party realized it at the time, the Japanese had found the "Decisive Battle" their naval doctrine called for. Unfortunately, it wasn't just a battle, it was a campaign; a campaign they could not hope to win, as the material superiority of their adversary, and the willingness of the Americans to accept stunning naval losses to hold the island gradually eroded the vital cruiser and destroyer strengths of the Japanese Navy.
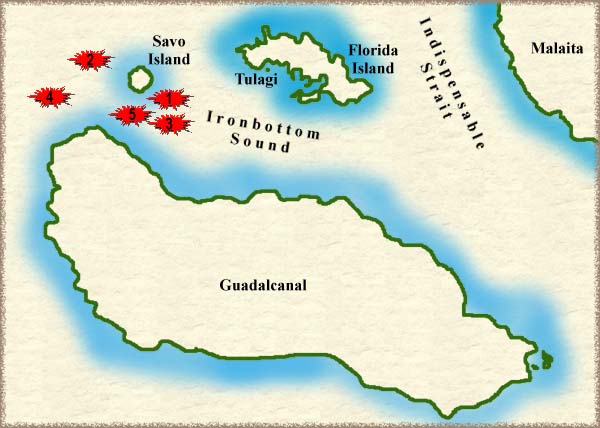
(Map developed from Dull, "A Battle History of the Imperial Japanese Navy." Original map by Donald Hoegsburg)
Legend:
 = Battle
#1 = Battle of Savo Island, August 9, 1942
#2 = Battle of Cape Esperance, October 11, 1942
#3 = First Naval Battle of Guadalcanal, November 13, 1942
#4 = Second Naval Battle of Guadalcanal, November 14, 1942
#5 = Battle of Tassafaronga, November 30, 1942
Aftermath
#1. Savo Island
(August 9, 1942)
On 7th August, 1942, the U.S. 1st Marine Division landed on the islands of Guadalcanal and Tulagi and either killed or drove the Japanese garrisons there into the jungle. Some six hundred miles northwest, at the major Japanese base of Rabaul, Vice Admiral Gunichi Mikawa, the newly installed commander of the Eighth Fleet, immediately pulled together every warship at his disposal and headed south. He arrived off of the southern shore of Savo Island in the small hours of the morning of August 9th. Ahead of him were several groups of Allied warships, their crews exhausted from days of continuous combat operations. Due to the three entrances to the soon-to-be-infamous Ironbottom Sound, the Allied forces were compelled to divide their strength into three patrolling squadrons: Southern, Northern, and Eastern. The Allied vessels were unalert, and their commanders were in some cases either asleep or away from the actual scene of the action. Beyond the Allied warships lay a transport anchorage off of Lunga Point whose merchant vessels were still packed with equipment for the Marines ashore. The stage was set for the most humiliating defeat ever inflicted upon the US Navy.
Mikawa's ships slipped unseen past the destroyer pickets at the mouth of the Sound, and soon came upon the southern group of Allied warships; two heavy cruisers (HMAS Canberra and USS Chicago) and two US destroyers. True to standard Japanese tactics, Mikawa's force first launched torpedoes and then followed up with devastating salvos of 8- and 6-inch gunfire. Canberra was in a sinking condition almost before she was aware that a battle had been joined. Chicago fared slightly better (she wasn't sunk), but never properly got into action, and (even worse) never alerted the Northern Force as to the presence of Mikawa's squadron. Fifteen minutes later, curving northward around Savo Island's eastern shore, the Japanese came upon the Northern Force, still steaming sedately along in a box patrol pattern. Mikawa's forces had become divided in the earlier exchange, and by chance enveloped the Allied Northern force from both sides. Taken unawares, and caught in a devastating crossfire, Northern Force's three heavy cruisers, Vincennes, Quincy, and Astoria, were quickly gunned into sinking hulks.
At this point, having slaughtered the Allied escorts, the transport anchorage behind him lay open for Mikawa's taking. But the Japanese admiral's position was not as rosy as he would have wished. He had no idea that the US carriers (under Admiral Fletcher) covering the invasion had been withdrawn from the general vicinity. Attacking the transport anchorage would require his slowing, reassembling his scattered squadron, coming about, finding the anchorage, and then attacking it. It was now close to 2:00 AM. An attack on the anchorage, according to one of Mikawa's staff officers, would have added nearly two hours to the operation, placing Mikawa's force in a dangerous position when dawn broke at around 0400. Further, Mikawa had no idea as to what Allied vessels still remained unfought in the Sound. Consequently, shortly after 2:00 AM, he ordered a general retirement up The Slot. Ironically, having survived the fray around Savo, Kako fell victim to three torpedoes from the American submarine S-44 as a portion of the Japanese force approached the safety of Kavieng the next day. Thus ended the first installment in a series of grim night battles around Guadalcanal. It was a spectacular tactical victory for the Japanese, but it was also shorn of the strategic advantage it might have achieved.
| Battle of Savo Island | Japan | Allied |
| Starting Forces |
 x5 x5
 x2 x2
 x1 x1
|
 x6 x6
 x3 x3
 x8 x8
(Includes Eastern screening force (TG 62.4), not engaged during battle. Does not include DDs with Allied transports)
|
| Losses |
x2 moderately damaged (Chokai, Aoba)
|
x4 sunk (Canberra, Astoria, Vincennes, Quincy)
x1 damaged (Chicago)
x2 damaged (Ralph Talbot, Patterson)
|
Return to Top
#2. Battle of Cape Esperance
(October 11, 1942)
The night of October 11, 9142, found a U.S. task force commanded by Rear Admiral Norman Scott standing off the entrance to Ironbottom Sound. His mission was to screen the Sound from possible intrusion by any Japanese bombardment forces. As it happened, such a Japanese group, commanded by Rear Admiral Aritomo Goto, was approaching the entrance to the Sound at around midnight.
Scott's battle plan was simple. He knew that his force could not hope to match the night tactics of his adversaries. Instead, he would keep his ships in line-ahead formation, using the destroyers to illuminate targets, and his cruisers to neutralize the opponent with gunfire. His two light cruisers, Boise and Helena, each sported fifteen 6" guns, and could pump out prodigious quantities of shells. Unfortunately, Scott's choice of flagship, the heavy cruiser San Francisco, while nominally the more powerful vessel than either of his CLs, had an inferior radar suite.
Helena detected the approaching Japanese force on radar at 2325, but owing to Scott's distrust of the information he was receiving from San Francisco's set, he first executed a 180-degree turnabout, and then allowed the range to close to perilous proximity before opening fire. As a result, two of his destroyers fell out of formation, and found themselves between the Japanese and US main bodies when firing commenced.
The Japanese force was taken largely by surprise. However, the Japanese vessels quickly realized that Scott had crossed their 'T', and executed individual turns to port and starboard to clear the area. The flagship Aoba was hit hard early on, and Admiral Goto was mortally wounded in the opening moments. Seeing the Aoba in distress, the captain of Furutaka swerved to interpose his vessel between the American force and the flagship. It was to prove her undoing, as she was buried in an avalanche of 6" fire. Destroyer Fubuki, sailing in the van, was also quickly gunned into submission. The Japanese fled as best they could back up The Slot, with the Americans breaking off the pursuit at 0245.
The Americans had not come away unscathed. Destroyer Duncan, finding herself between the two main forces, had closed the Japanese and attempted to attack with torpedoes. She was heavily hit in the process, by both Japanese and American shells, and would eventually sink. More important, Boise sustained a pair of 8" hits which detonated her forward 6" ready ammunition, killing practically everyone in turrets #1 and #2. Fortunately, her magazine crews had scrupulously kept a minimum of ammunition and powder exposed, meaning that while they paid with their lives, the lives of their shipmates were spared from a more catastrophic explosion.
The net result was another flawed victory, this time for the Americans. Given their numerical advantage, the element of surprise, and their superior tactical position, they ought to have inflicted heavier casualties on the Japanese. Instead, they had sunk a cruiser and a destroyer, at the cost of destroyer sunk and a very valuable light cruiser badly damaged. More important, this half victory did nothing to dissuade the Americans from their linear, line-ahead tactics, which would have importance in later fights. Superior gunfire had won the day here, but the Japanese torpedo was the mightier nighttime weapon still, and linear gun-line tactics invited disaster from torpedo-armed craft.
| Battle of Cape Esperance | Japan | Allied |
| Starting Forces |
x3
x2
|
x2
x2
x4
|
| Losses |
x1 sunk (Furutaka)
x1 heavily damaged (Aoba)
x1 sunk (Fubuki)
|
x1 severely damaged (Boise)
x1 sunk (Duncan)
x1 damaged (Farenholt)
|
Return to Top
#3. First Naval Battle of Guadalcanal
(November 13, 1942)
By early November, the Japanese had finally come to two important (if belated) realizations: one, that the Americans had far more troops on Guadalcanal than earlier estimates had indicated, and two, Henderson Field had to be neutralized in order for the Japanese to control the seas around the island. Consequently, on November 11th, the Japanese assembled a large convoy of merchant vessels, loaded with enough supplies and ammunition for a month's worth of fighting. And in order to assure the delivery of those supplies, they assembled a very powerful force, centered on the battleships Hiei and Kirishima, whose job would be to bombard Henderson Field into impotence. Around 1:00 AM on the 13th, this bombardment force entered Ironbottom Sound. Waiting for them was an American force of heavy and light cruisers, and destroyers.
The Japanese force had fallen into disarray during the night's steaming through rain squalls. The American formation, under Rear Admiral Daniel Callaghan, was hampered by poor radio discipline, and the fact that an American commander had once again decided to hoist his flag in a vessel with inferior sensors. As a result, even when the Japanese force was detected on radar, Callaghan suffered from a murky perception as to their composition, speed, and course. His attempt to cross the Japanese 'T' instead placed his ships on a collision course with the enemy. By the time fighting commenced at 0148, the range between the leading elements of each force had closed to a ludicrous 1000 yards.
The result was a point-blank brawl of monstrous proportions as both formations passed through each other. Damage was severe on both sides, with the Americans getting the worse end of the deal. However, the Japanese bombardment mission was foiled, which would spell Hiei's doom the next morning as she tried to struggle back up The Slot. More important, neither side was willing to give up the struggle to maintain control over the Sound, and thereby deny supply to the other side's land forces. The stage was set for another brutal battle just two nights later.
| First Naval Battle of Guadalcanal | Japan | Allied |
| Starting Forces |
 x2 x2
x1
x9
|
x2
x2
x8
|
| Losses |
x1 sunk (Hiei)
x2 sunk (Akatsuki, Yudachi)
x3 damaged (Amatsukaze, Ikazuchi, Murasame)
|
x2 heavily damaged (Portland, San Francisco)
x1 sunk (Atlanta)
x2 heavily damaged (Helena, Juneau)
x4 sunk (Barton, Cushing, Laffey, Monssen)
x1 heavily damaged (Aaron Ward)
|
Return to Top
#4. Second Naval Battle of Guadalcanal
(November 14-15, 1942)
Having lost practically every cruiser in the inventory either sunk or damaged, the American forces left to dispute Japan's ability to reinforce Guadalcanal were running thin. As the damaged survivors of the Battle of Friday the Thirteenth withdrew, the Americans knew that the Japanese were moving another force into the area. The American theatre commander, William Halsey, reacted by detaching the fast battleships of Enterprise's screen to the constricted waters of the Sound. Under the command of Rear Admiral Willis Lee, the South Dakota and Washington, along with a nominal screen of four destroyers, arrived off of Savo on November 14.
Down from the north came another Japanese force bent on bombarding Henderson Field. The Kirishima, a survivor of the battle two nights before, along with heavy cruisers Atago and Takao, formed the bulk of the force. In the resulting melee, South Dakota had a bad go of it, repeatedly losing power due to faulty electrical equipment, and was unable to contribute much to the battle. Taken under fire by Kirishima and practically every ship in the Japanese main body, her superstructure was riddled and her radar disabled. However, her watertight integrity was never damaged a whit. And in the meantime, Washington had approached undetected to within 8,400 yards of the Japanese force. Taking Kirishima under fire at 0005, she quickly buried the Japanese battlewagon under an avalanche of 16" and 5" fire. By 0012 she was a floating wreck. Washington proceeded to sink Ayanami, and then began a gradual disengagement from the action, avoiding several torpedo attacks in the process. For the Japanese, it was the end of any hope of wresting Guadalcanal from the Americans; in the course of three days of constant fighting in and around the area, they had lost two battleships, one heavy cruiser, three destroyers and eleven combat transports, not to mention 5,000 infantrymen drowned, and several thousand naval casualties. From this point on, the Japanese would never stop retreating in the Pacific.
| Second Naval Battle of Guadalcanal | Japan | Allied |
| Starting Forces |
x1
x2
x2
x8
|
 x2 x2
x4
|
| Losses |
x1 sunk (Kirishima)
x1 sunk (Ayanami)
|
x1 moderately damaged (South Dakota)
x3 sunk (Preston, Walke, Benham)
x1 heavily damaged (Gwin)
|
Return to Top
#5. Battle of Tassafaronga
(November 30, 1942)
Having made the decision to abandon Guadalcanal, the Japanese were left to perform the evacuation with the only surface units which could survive in the area around Henderson Field: destroyers. Running down at night to drop supplies and evacuate Japanese infantry units, the famed Tokyo Express made frequent runs into the area. On the night of November 30, Rear Admiral Raizo Tanaka led a force of eight Japanese destroyers down the slot. Of the eight, six were heavily loaded with supply drums and had landed their torpedo reloads, drastically reducing their combat effectiveness. Only Naganami (Tanaka's flagship) and Takanamii were fully combat ready.
Waiting in Ironbottom sound was a dramatically superior US force of 4 heavy cruisers, a light cruiser, and six destroyers. Unfortunately for the Americans this night, Tanaka's lookouts were very alert, and managed to detect the ambush before it happened. Once again, the linear battle tactics of the Americans cost them, as the Japanese destroyers wheeled, fired torpedoes, and 'ran for the exits'. The Americans got in enough gunfire to scupper Takanami (which had moved to screen her sisters from the Americans). And then the Long Lances hit. The end result was one US heavy cruiser sunk, and three more incapacitated. Not only that, but Tanaka had managed to drop off his supply barrels. It was a humiliating defeat for the US Navy, and a difficult one to swallow in light of their material superiority and the recent victory off of Guadalcanal.
| Battle of Tassafaronga | Japan | Allied |
| Starting Forces |
x8
|
x4
x1
x4
|
| Losses |
x1 sunk (Takanami)
|
x1sunk (Northamptom)
x3 heavily damaged (Minneapolis, New Orleans, Pensacola)
|
Return to Top
Aftermath
With the fall of Guadalcanal, Japan was presented with a stunning setback. For the first time in the war, the Imperial military had been defeated decisively on the ground, in the air, and on the sea. Now it would have to shift its stance from the offense to the defense, as the ever-strengthening Allied forces began pushing their way up the Slot towards Rabaul. For the Americans, difficult fighting still lay ahead, and they would suffer several more tactical defeats at the hands of the Japanese Navy as the battles in the Solomons continued. Yet with the victory at Guadalcanal, both combatants recognized that the momentum of the Pacific war had shifted decisively in the Allies favor.
Return to Top
Links From Related Partner Sites
WW2DB article on Guadalcanal Campaign
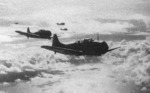 | 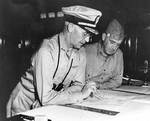 |  | 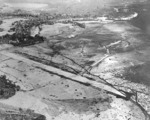 | 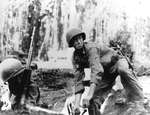 |
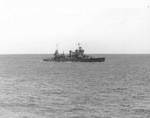
| SBD Dauntless aircraft in flight back to USS Yorktown after an attack on Tulagi, Solomon Islands, 4 May 1942 | Richmond Turner and Alexander Vandegrift aboard USS McCawley looking at maps of the Tulagi-Guadalcanal operation in the Solomon Islands, circa Jul-Aug 1942 | Heavy cruiser USS Vincennes on her way to Guadalcanal, Solomon Islands, early Aug 1942. Vincennes was lost within a week. Note modified Measure 12 paint scheme. | Lunga Point Airfield/Henderson Field, seen from USS Saratoga aircraft, Guadalcanal, Solomon Islands, Aug 1942 | United States Marine preparing to throw a Mark II “pineapple” grenade on Guadalcanal, Solomon Islands, 1942. Note Browning Automatic Rifle at left. |
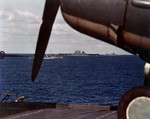 |  | 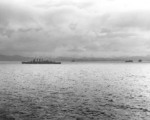 | 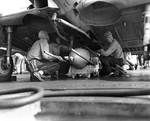 | 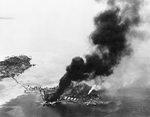 |
| US fleet sailing toward Guadalcanal, Solomon Islands, early Aug 1942; note USS Saratoga at center, New Orleans-class heavy cruiser in background, USS Enterprise in foreground | Astoria off Tulagi during the American invasion, 6 Aug 1942 | Canberra off Tulagi during landings, 7-8 Aug 1942 | Crew aboard Enterprise loaded a 500 lb demolition bomb on a SBD scout bomber for strike on Guadalcanal and Tulagi, 7 Aug 1942 | Japanese facilities afire, Tanambogo Island, east of Tulagi, Solomon Islands, 7 Aug 1942 |
See all photos of Guadalcanal Campaign on WW2DB
Return to Pacific War Maps Page