TOKUSETSU JUNYOKAN!
|
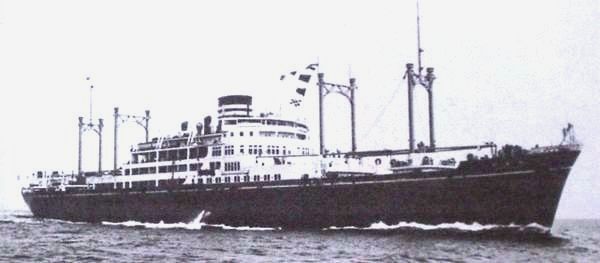
(AIKOKU MARU as a prewar OSK liner)
IJN AIKOKU MARU: Tabular Record of Movement
© 1998-2014 Bob Hackett and Sander Kingsepp
Revision 10
29 December 1938:
Laid down at the Tama Zosensho K. K. shipyard as a
high-capacity passenger-cargo ship for the Osaka Shosen KK Line's South America
and around-the-world service.
25 April 1940:
Launched and named AIKOKU MARU.
31 August 1941:
Completed.
1 September 1941:
Requisitioned by the IJN.
5 September 1941:
Registered in the Kure Naval District. Rear Admiral-Retired (Vice Admiral, posthumously) Okamura Masao (38) is the Commanding Officer. Okamura simultaneously assumes joint command of KIYOSUMI MARU.
Tamano. Begins installation of four 41st Year Type single mount 152-mm guns, two 76-mm/40 cal AA guns, Type 93 13.2-mm MGs and two 533-mm torpedo tubes at Mitsui Engineering & Shipbuilding.
15 October 1941:
Fitted with one 1100-mm and one 900-mm search light and special heavy-duty booms for handling floatplanes. Carries one Type 94 Kawanishi E7K2 “Alf” floatplane and one spare E7K2. Equipment installation is completed.
That same day, the 24th Squadron (Raider) is officially established under Rear Admiral Takeda Moriji (former CO of ASHIGARA) and attached directly to the Combined Fleet. AIKOKU, HOKOKU and KIYOSUMI MARUs are assigned to CruDiv 24.
31 October 1941:
Departs Tamano. Arrives at Kure.
13 November 1941:
Departs Kure. Arrives at Iwakuni.
15 November 1941:
At 1735, AIKOKU and HOKOKU MARUs depart Iwakuni.
24 November 1941: Operation "Z":
Arrive at the standby position at
Jaluit Atoll, Marshall Islands. They refuel and replenish from the naval supply base on Emidj Island.
26 November 1941:
Depart Jaluit.
8 December 1941: The Opening of Hostilities:
S Pacific, NE of the
Tuamotu islands. AIKOKU and HOKOKU MARUs head SE.
13 December 1941:
S Pacific, N of Pitcairn Island. AIKOKU and HOKOKU MARUs overtake and attack 6,210-ton American merchant SS VINCENT, bound from Sydney, Australia, for Panama, carrying a cargo of rice. At 1907, HOKOKU MARU starts shelling the freighter and fires a total of eight shells. About 1935, as a fire breaks out aboard VINCENT, her crew begins abandoning ship in three life boats. Later, the Japanese fire a single torpedo that sends her to the bottom at 22-41S, 118-19W. All nine officers and twenty-seven crewmen survive and are picked up by HOKOKU MARU.
31 December 1941:
AIKOKU MARU launches her E7K2 on a reconaissance mission. That afternoon, the floatplane approaches from the west and circles unarmed 3,275-ton American freighter MALAMA en route from San Francisco via Honolulu to Manila. After circling the ship several times, the plane flies off to the east. Soon, the same plane returns and again circles the ship twice before flying off to the west. The "Alf" fails to return to AIKOKU MARU. Despite long searching by both ships and the second Alf, no trace is found of the missing aircraft.
2 January 1942:
S of the Cook and Society Islands. At 0910, a second E7K2 from AIKOKU MARU circles and begins strafing MALAMA. Using international code, the plane orders the ship to stop. At 1415, the plane returns armed with bombs. At 1430, the crew scuttles the ship and they and the passengers leave in two lifeboats. After all hands escape, the plane drops four bombs that set the ship afire. MALAMA sinks at 26-39S, 151-24W. At 1530, AIKOKU MARU and HOKOKU MARU arrive and pick up all hands.
January 1942:
Pacific. AIKOKU and HOKOKU MARUs nearly encounter Vice Admiral (later Fleet Admiral) William F. Halsey’s (former CO of SARATOGA, CV-2) Task Forces 17 and 18 that are enroute to raid the Gilberts and Eastern
Marshalls.
20 January 1942:
AIKOKU MARU and HOKOKU MARUs leave their assigned
area, terminating the sortie.
30 January 1942:
Off the Gilberts. False markings on CruDiv 24's ships and aircraft are removed.
4 February 1942:
The 24th Squadron arrives at Truk.
5 February 1942:
Departs Truk for Hashirajima. While en route HOKOKU and AIKOKU MARUs are redirected to proceed to Oita Bay to disembark their prisoners. Rear Admiral Takada recommends that suitable preparations be made as the prisoners are practically naked and have no winter clothing.
11 February 1942:
During the night, the AMCs intercept and inspect a suspicious vessel that turns out to be 5,114-ton Soviet transport KIM. 13 February 1942:
Arrives at Oita Bay. Disembarks 76 POWs rescued from SS VINCENT and MALAMA. Departs that same day and arrives at Hashirajima in the the evening.
14 February 1942:
Arrives at Kure. Begins refit and armament modernization. AIKOKU MARU's four old 152-mm guns installed the previous autumn, are removed and replaced by eight 3rd Year Type 140-mm/50 cal guns.
March 1942:
AIKOKU MARU and HOKOKU MARUs are converted to carry a
supply of submarine torpedoes in one of their holds.
10 March 1942:
Departs Kure for Hashirajima. AIKOKU MARU and HOKOKU MARU are attached to Vice Admiral Komatsu Teruhisa's Sixth Fleet (Submarines). They are to carry torpedoes and stores for subs including 1,300 tons of diesel fuel, and go with the new SubRon 8 to the East Coast of Africa
and the Mozambique.
29 March 1942:
The 24th Squadron is disbanded. AIKOKU MARU and HOKOKU MARU are temporarily attached to SubRon 8.
12 April 1942:
Departs Kure.
15 April 1942:
In the evening, arrives at the Hashirajima fleet anchorage with HOKOKU MARU, KATORI, CHIYODA and other vessels.
16 April 1942:
Battleship YAMATO moored at Hashirajima, Hiroshima Bay. Vice Admiral Komatsu accompanied by ComSubRon 8 Captain (later Rear Admiral) Ishizaki Noboru (former CO of HYUGA) and their staffs with Captain Okamura of
AIKOKU MARU, Captain (later Rear Admiral) Komazawa Katsumi (former CO of CHOGEI) CO of tender NISSHIN, Captain (later Vice Admiral) Harada Kaku (former CO of HOSHO) CO of tender CHIYODA and SubRon 8's midget submarine
crews pay a courtesy call on the CINC, Combined Fleet, Admiral Yamamoto Isoroku (former CO of AKAGI) aboard his flagship.
At 1100, departs Hashirajima with training cruiser KATORI. AIKOKU MARU's destination is the Indian Ocean via Singapore and Penang, Malaya and her mission is to supports SubRon 8's, SubDiv 1's I-10, I-16, I-18, I-20, and I-30 in the Western Indian Ocean.
20 April 1942:
Refuels I-30.
27 April 1942:
Refuels I-30.
30 April 1942:
Arrives at Penang.
5 May 1942:
Departs Penang with HOKOKU MARU.
9 May 1942:
480 miles SSE of Diego Suarez, Madagascar. Captures 7,987-ton Dutch tanker GENOTA at 17-40S, 76.20E. [1]
10 May 1942:
Refuels a submarine.
15 May 1942:
Refuels a submarine, perhaps I-10.
5 June 1942:
Indian Ocean, S of the Mozambique Strait. In the early morning, AIKOKU MARU shells and sinks 6,757-ton British merchant ELYSIA, carrying some Allied troops, at 27-19S, 37-01E.
17 June 1942:
AIKOKU MARU and HOKOKU MARU again rendezvous with the submarines of SubRon 8's Ko Detachment.
12 July 1942:
Indian Ocean, near Ceylon. HOKOKU and AIKOKU MARUs capture 7,113-ton New Zealand Union SS Co. merchant HAURAKI at 17-36S, 80-27S. She was enroute from Fremantle via Colombo for Egypt with supplies. After her capture, a Japanese prize crew is put aboard. The deck crew are locked below, but the engine crew are engaged under guard to run the ship's machinery. In the course of the voyage back to Japan the engine crew manages to pitch most of the spare machinery parts over the side. As a result, the Japanese never obtain much use from the ship.[2]
Summer 1942:
AIKOKU MARU's floatplanes are changed to two Aichi E-13A "Jakes".
26 July 1942:
Departs Penang.
27 July 1942:
Arrives at Singapore.
10 August 1942:
Arrives at Seletar Naval Base, Singapore. A reserve aircraft is taken aboard. AIKOKU MARU's submarine torpedo supply is increased to 70 for replenishment of SubDiv 1's subs. Two Type 96 dual 25-mm (2x2) AA are fitted.
25 August 1942:
Penang. Cdr (later Rear Admiral) Oishi Tamotsu assumes command. Rear Admiral-Retired Okamura is mobilized on 1 September and reassigned to the Kure Naval District.
Late August 1942:
Temporarily attached to the Southeast Area Fleet to ferry troops from Singapore to Rabaul.
September 1942:
Singapore. The dazzle camouflage painting previously painted at Kure is replaced by a new experimental design devised by LtCdr Fukui. The new dazzle camouflage is painted in in three colours: black, dark grey and light grey.
20 September 1942:
AIKOKU MARU is assigned to the Southwest Area Fleet (Eighth Fleet). She is tasked to transport elements of LtGen Sano Tadayoshi's 38th Infantry "Hiroshima" Division to Rabaul for the reinforcement of Guadalcanal. HOKOKU MARU remains at Singapore.
24 September 1942:
Arrives at Brown Island, Eniwetok, embarks provisions, then departs for Rabaul.
6 October 1942:
Departs Rabaul for Singapore via Penang.
9 October 1942:
Departs Rabaul with HOKOKU MARU.
10 October 1942:
Reattached to the Commerce Raiding Unit.
12 October 1942:
Arrives at Truk.
13 October 1942:
Departs Truk with HOKOKU MARU.
23 October 1942:
Arrives Singapore.
24 October 1942:
Departs Penang.
1 November 1942:
Cdr Oishi is promoted Captain. Departs Singapore with
HOKOKU MARU for a raiding mission in the Indian Ocean.
7 November 1942:
AIKOKU MARU and HOKOKU MARU negotiate the Sunda Strait and enter the Indian Ocean.
11 November 1942:
Indian Ocean. SW of the Cocos Islands. HOKOKU MARU attacks 6, 341-ton Royal Dutch Shell tanker ONDINA and her escort, Australian-built minesweeper HMIS BENGAL at 19-45S, 92-40E. BENGAL's CO,
LtCdr William J. Wilson, RNR, closes the range with HOKOKU MARU to protect the tanker.
At 1545 (JST), HOKOKU MARU opens fire. Both ships are damaged in the ensuing action. AIKOKU MARU is 6 miles NW of the scene and closing. A lucky shot from ONDINA's 4-inch gun hits HOKOKU MARU's starboard torpedo tube that detonates, a fire breaks out, rages out of control and reaches the aft magazine. More explosions follow that blow out her sides. A 1752, HOKOKU MARU sinks by the stern. [3]
AIKOKU MARU arrives and hits BENGAL. LtCdr Wilson, confident that ONDINA can outrun the AMC, disengages at best possible speed. AIKOKU
MARU scores six hits on ONDINA and virtually disables her. Then AIKOKU MARU fires two torpedoes at the tanker, but both miss. With her ammunition expended, ONDINA's crew abandons ship.
AIKOKU MARU rescues 278 of the HOKOKU MARU’s crew. She fires a last
torpedo at ONDINA and departs. Later, AIKOKU MARU departs the Indian Ocean for Penang, then proceeds via Singapore to Rabaul.
ONDINA's crew reenters the ship, effects temporary repairs and departs the area for Fremantle, Australia.
16 December 1942:
Rabaul. AIKOKU MARU is assigned to Vice Admiral Mikawa Gunichi's Eighth Fleet. Departs for Madang, New Guinea in an Attack Force
with her sister-ship GOKOKU MARU, light cruiser TENRYU and destroyers ISONAMI, INAZUMA, SUZUKAZE and ARASHIO.
17 December 1942:
The aircraft carried by AIKOKU MARU are transferred to the 9th Base Unit.
18 December 1942:
Arrives at Madang and unloads her cargo. At 0732, the Attack Force is bombed unsuccessfully. At 1744, GOKOKU MARU is hit by a bomb from B-17s of the 43rd Bomb Group, Fifth Air Force. AIKOKU MARU is not damaged.
19 December 1942: Operation C (HEI-GO) - The Reinforcement of New Guinea:
Orders for Operation C (HEI-GO) are issued. The objective of this transport operation is to rush the 20th and 41st Army Division to Wewak. The operation consists of three separate operations, two of them divided into sub echelons sailing at different dates: The first operation HEI-ICHI GO (HEI-GO 1) is to land the main strength of the 20th Army Division consisting of 9,443 men, 82 vehicles, arms and 12,267 bundles of provisions at Wewak.
That same day, AIKOKU MARU departs Madang and later that day arrives at Rabaul.
20 December 1942:
Departs Rabaul with GOKOKU and KIYOSUMI MARUs.
E 27 December 1942:
Torpedo boat HATO joins AIKOKU and KIYOSUMI MARUs at 28-50N, 134-17E. (It is unclear whether GOKOKU MARU had been detached.)
29 December 1942:
2
Off Fukajima. HATO is detached. Later that day, AIKOKU and KIYOSUMI MARUs arrive at Kure.
4 January 1943:
Departs Kure. Arrives at Fusan (Pusan), Korea.
5 January 1943:
Fusan. AIKOKU MARU embarks the IJAAF 209th Airfield Battalion, 14th Aerial Repair Shop and others, a total of 691 men plus 34 vehicles, a very small passenger and cargo load for so large a ship.
6 January 1943:
Operation "C" (HINOE-GO) - The Reinforcement of New Guinea:
At 1530, AIKOKU MARU departs Fusan for Rabaul.
14 January 1943:
At 1030, arrives at Rabaul. Lands troops and 18 vehicles.
15 January 1943:
At 1700, departs Rabaul for Tsingtao..
16 January 1943:
ENE of Admiralty Islands. AIKOKU MARU is attacked by an enemy submarine that fires two torpedoes at her, but she evades both.
24 January 1943:
Arrives at Tsingtao.
28 January 1943: Operation HINOE-GO-3 ("C-3") - The Reinforcement of New Guinea:
The 2nd echelon of transport group HINOE-GO No. 3 departs Tsingtao, China. The 2nd echelon consists of AIKOKU, KIYOSUMI and GOKOKU MARUs escorted by destroyers ASAGUMO and SAMIDARE. The 2nd echelon carries elements of the IJA's 239th Infantry Regiment. KIYOSUMI MARU carries the 2nd Battalion (less 7th and 8th Companies), AIKOKU MARU carries HQ and the 1st Battalion and GOKOKU MARU carries the 3rd Battalion. Aircraft from carrier ZUIHO provide air cover.
E 18 February 1943:
The 2nd echelon arrives at Palau. Refuels and replenishes.
19 February 1943:
At 1300, AIKOKU, KIYOSUMI and GOKOKU MARUs depart Palau.
At 1440 (I) LtCdr (later Rear Admiral) Frank W. Fenno's's USS RUNNER (SS-275) sights the masts of freighters in Toagel Melungui Pass. At 1455 (I), Fenno fires his four stern torpedoes at destroyer SAMIDARE, but does not score a hit. At 1456 (I), Fenno fires one torpedo at a freighter. Immediately thereafter, a depth charge, dropped by an E13A1 "Jake" of the 902nd NAG based at Palau, explodes close to RUNNER. Fenno, nevertheless, fires two more torpedoes and claims a hit on the freighter, but it was not.
The single 250-kg dropped by the Jake knocks out both of RUNNER's periscopes, her sound gear and magnetic and gyro compasses. The damage forces Fenno to terminate the patrol and return to Pearl Harbor.
26 February 1943:
The 2nd echelon arrives at Wewak, New Guinea:.
31 March 1943:
Arrives at Takao.
2 April 1943:
Departs Takao.
5 April 1943:
Arrives at Kure. Captain-Retired (later Rear Admiral)
Mizusaki Shojiro (38)(former CO of SUZUYA) assumes command.
19 April 1943:
Departs Kure.
13 May 1943:
Returns to Kure.
24 May 1943:
Departs Kure.
25 May 1943:
Arrives at Sasebo.
27 May 1943:
Departs Sasebo.
E 16 June 1943:
Minelayer NUWAJIMA joins AIKOKU MARU at 26-55N, 134-52E.
E 18 June 1943:
Minelayer YURIJIMA joins the convoy at 30-50N, 133-00E.
19 June 1943:
Arrives at Saeki.
21 June 1943:
Arrives at Kure.
28 June 1943:
Departs Kure.
29 June 1943:
Arrives at Yokosuka.
6 July 1943:
Departs Kisarazu, carrying ground personnel and equipment of the 201st NAG. After departure, joins the escort carrier UNYO and other
vessels.
10 July 1943:
170 miles N of Truk. At about 2100, AIKOKU MARU is
attacked by LtCdr Phillip H. Ross' USS HALIBUT (SS-232). Ross fires six
torpedoes by periscope and claims three hits. AIKOKU MARU is actually hit
once and sustains moderate damage.
11 July 1943:
Arrives at Truk.
At 1845, USN codebreakers intercept and decrypt a message that reads: From CO AIKOKU MARU. Report of damage. Parts 1-4. Includes flooding of No. 6 hold, shaft alley, etc. Part 5. Casualties 21 men...."
July 1943:
Truk. Re-munitioned and provisioned by KEISHO MARU.
15 July 1943:
About 1500, AIKOKU MARU is attacked by LtCdr (later Rear Admiral) Lawrence R. Daspit's USS TINOSA (SS-283) at 10-27N, 150-50E. Daspit fires four Mark-14 steam torpedoes at her, but they all miss.
E 22 August 1943:
AIKOKU MARU departs Truk in a convoy also consisting of GOKOKU MARU escorted by destroyer USHIO, subchaser CH-28 and minesweeper W-33.
E 23 August 1943:
CH-28 is detached from the convoy and returns to Truk.
E 28 August 1943:
Auxiliary minesweepers TAKUNAN MARU No. 3 and TAKUNAN MARU No. 8 join the convoy at 27-50N, 136-00E
E 30 August 1943:
Auxiliary minesweepers AOI MARU and YACHIYO MARU join the convoy at 30-50N, 135-20E
E 31 August 1943:
Minesweeper W-33 joins the convoy at 32-12N, 133-55E.
1 September 1943:
Arrives at Sukumo and departs later that day with only USHIO as escort.
2 September 1943:
Arrives at Kure.
1 October 1943:
Rerated a special (misc) transport and assigned to the Kure Naval District. Departs Kure.
2 October 1943:
Arrives at Tama.
6 October 1943:
At the Mitsui Engineering & Shipbuilding Tamano
shipyard. Refit. Begins installation of additional armament.
20 October 1943:
Captain-Retired Nakamaruo Yoshizo (36) (former XO of
JINGEI) assumes command. Captain Mizusaki is reassigned to the Yokosuka Naval
district.
31 December 1943:
Completes installation of two 152-mm guns and four
twin Type 96 25mm (4x2) AA machine guns.
16 January 1944:
Departs Kure.
17 January 1944:
Arrives at Tokyo Bay.
21 January 1944:
Departs Tokyo Bay. Arrives at Yokosuka the same day.
Embarks personnel of the 66th Naval Guard Unit (629 men), 1200 mines, dynamite,
artillery shells, food and construction materials; all originally destined for
Brown Island .
24 January 1944:
Departs Yokosuka. Arrives at Tateyama that same day.
Spends the night to await the arrival of other vessels
25 January 1944:
Departs Tateyama for Truk in convoy with 11,
930-ton submarine depot ship YASUKUNI MARU and the ex-AMC AKAGI MARU escorted by
destroyers MICHISHIO and SHIRATSUYU and the minelayer NASAMI.[4]
31 January 1944: American Operation “Flintlock” - The Invasion of the
Marshall Islands:
Vice Admiral (later Admiral) Marc A. Mitscher’s Task Force
58 lands the 4th Marine Division and the Army's 7 th Infantry Division that
capture the Kwajalein, Roi-Namur and Majuro atolls.
300 miles NW of Truk. About 0200 that same day, LtCdr Robert E. Dornin's
USS TRIGGER (SS-237) attacks the convoy. Dornin fires three torpedoes by radar
at largest ship and Lt (later Captain) Edward L. Beach, the XO fires three other
torpedoes from the bridge at the nearest destroyer using the Target Bearing
Transmitter (TBT). The TBT's torpedoes run erractically and miss. The three fired by radar also miss the big ships, but one hit and sinks NASAMI.
Still on the surface, TRIGGER turns tail on a nearby destroyer and fires four stern torpedoes at her, but they all miss. Masked by her heavy diesel exhaust, TRIGGER hauls away on a reciprocal course to the destroyer. Unaware that her opponent is on the surface, the destroyer drops depth charges.
Dornin makes a high speed "end-around." At about 0500, he fires five torpedoes in surface radar attack on the largest ship. YASUKUNI MARU is hit by of the two torpedoes and sinks about 30 minutes later at 9-15N, 147-13E.
There are 43 survivors. AIKOKU MARU escapes undamaged.
1 February 1944:
Arrives at Truk.
February 1944:
Departs Truk for Brown Island, Eniwetok, Marshalls with
troop reinforcements, but is forced to abort due to American aircraft activity in support of Operation Flintlock.
16 February 1944:
Arrives at Truk lagoon late in the day. All of the Combined Fleet's capital ships based at Truk have departed in anticipation of an American air raid. AIKOKU MARU begins loading ammunition almost immediately so as to be able to depart for Rabaul as soon as possible. 629 Navy soldiers of the 68th Naval Guard Force heading for Brown Island are aboard.
17-18 February 1944: American Operation
"Hailstone" - The Attack on Truk:
Vice Admiral (later Admiral) Marc
A. Mitscher’s Task Force 58's five fleet carriers and four light carriers, supported by six battleships, ten cruisers and 28 destroyers, launch air attacks on airfields, shore installations and ships in the lagoon. Mitscher launches 30 strikes of at least 150 aircraft each. Beginning at dawn, the strikes are launched about every hour for two days.
Fourth Fleet anchorage, E side of Dublon Island. At dawn, on the first day of the raids, planes from INTREPID (CV-11) attack AIKOKU MARU. The first bomb hits the officers’ wardroom galley and starts a fire that spreads quickly. She takes three more hits by bombs. During the next attack, at about 0830, a Mark 13 aerial torpedo hits her No. 1 hold and sets off ordnance that shears off the entire fore ship. AIKOKU MARU sinks in two minutes at 07-22N, 151-56E along with the attacking Grumman Avenger, most of the ships' crew including Captain Nakamaruo and 945 sailors, passengers and men of the First Brigade.
Captain Nakamaruo is promoted Rear Admiral, posthumously.
30 March 1944:
Removed from the Navy List.
July 1980:
The remains of about 400 men KIA aboard AIKOKU MARU are recovered by the Japanese, cremated in Shinto rites and the ashes returned to Japan.
Authors’ Notes:
[1] On 20 July 1942, GENOTA is commissioned in the IJN as oiler "OSE".
[2] This story was given first hand to Peter Cundall by the HAURAKI's 3rd Engineer. HAURAKI is sent back to Japan, renamed HOKI MARU and enters IJN service as a transport serving in the South Seas. HOKI MARU is sunk in February
1944 by American torpedo bombers at Truk, only a mile from AIKOKU MARU.
[3] Dutch and Japanese accounts of the battle are generally consistent, but the British account does not match either. Uncertainty also exists as to which ship scored the fatal hit on HOKOKU MARU. Japanese sources credit ONDINA. In Singapore Naval circles, there were strong rumours that HOKOKU MARU was accidentally sunk by a hit from AIKOKU MARU, but this is questionable since at that time AIKOKU MARU was still a few miles away.
[3] Another rumor suggested the ONDINA lured HOKOKU MARU near, indicating they were going to surrender. Just when the CO of HOKOKU MARU ordered a turn to read the name of the tanker from her stern, ONDINA manned her stern gun and fired a single shell from a point-blank range that detonated HOKOKU MARU's starboard torpedo tube.
[4] YASUKUNI MARU had just completed conversion for duty as the flagship of Vice Admiral Takagi Takeo's Sixth Fleet (Submarines) and was enroute to Truk to replace light cruiser KATORI due to be reassigned to the General Escort Command.
Photo credit goes to Gilbert Casse of France.
Special thanks for assistance in developing this TROM go to Mssrs. Peter
Cundall of Australia, Jean-Francois Masson of Canada, Andrew Obluski of Poland and Jan Visser of the Netherlands. Thanks also go to John Whitman for info on decrypts.
Thanks also go to Toda Gengoro of Japan and to Peter Cundall for info in Rev 7
and the late John Witman for info on the 68th Naval Guard Force in Rev 9.
-Thanks also go to Erich Muethaler of Germany for assistance with Operation C (HEI-GO) and Fontessa-san of Japan for info in Rev 10.
- Bob Hackett and Sander Kingsepp.
Back to
Auxiliary Cruisers Page

